
About This File
Hi!
I share here an Excel tool I made that helps creating JoyToKey config files for different systems. With this tool, you can configure JoyToKey profiles for up to 12 systems and 6 pairs of physical controllers for each system. It semi-automates the process, preparing the text for the cfg files.
I have a cab with 2 Ultimarc U360s (each one as a joystick with 8 buttons), and I also have several retro usb controllers that I use with different emulated systems. This tool helped a lot in the tedious process of making the JoyToKey profiles for all the possible combinations of controllers - system.
I attach in this post the instructions (also copied below), an example file in pdf, the actual Excel file (zipped), and the JoyToKey profiles and RetroArch config files that I use in the example.
I hope you find it useful, please feel free to use it, improve or re-distribute it.
Regards,
ReTango
PS: the spreadsheet is initially protected so you can only enter data in the allowed cells, you can unprotect in the Review pane, it has no password.
Instructions
With this spreadsheet, you can configure JoyToKey profiles for up to 12 systems and 6 pairs of physical controllers.
Step 1: Configure Key bindings for each "System"
First you should configure each emulated system, you can configure up to 12 systems.
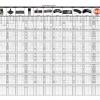
In the "Main" worksheet, between rows 1 and 27, you must complete 3 columns for each system.
On the light gray column, you must specify which "Emulated Buttons" the system uses, and name them. On the Player 1 and 2 columns, you must enter which "Key" binds to each Emulated Button for players 1 and 2 in the selected System.
E.g., for NES you need the Pad plus buttons "B", "A", "Select" and "Start". First enter the names of each "Emulated Button" on the light gray column (in this case, I chose "B", "A", "Select" and "Start"). Then enter which "Key" corresponds to each "Emulated Button" for each player in your designed emulator, for example in Retroarch in my case.
The "Keys" you enter should match one of the available standard Windows keys, which you can find in the "Key Codes" worksheet. If you enter a "Key" that is not found, the cell will turn red. Look into "Key Codes" for the names I chose for each key.
Step 2: Configure each "Physical Controller"
Next you should configure each "Physical Controller", up to 6, in the "Main" worksheet, between columns A and D, rows 28 to 100.
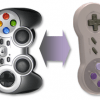
In my case I use Ultimarc's U360s with 8 buttons each for my arcade cabinet, Logitech F710, and some RetroLink imitation controllers and adapters.
For each controller, you should name each "Physical Button" in column C, and enter in column D which actual button number it is. You can configure up to 10 buttons for each controller (plus the Pad), numbers 1 to 10. (Sorry if you need more!)
To find out which number corresponds to each Physical Button, plug your controller, go to "Set up USB Game Controllers" in Windows, select the controller and go to "Properties". You should get to the window you see on the right. Then press each button and see which number lights up in this window.
Here you can also optionally chose a button for each physical controller that will always work as "Escape" (in all systems) when pressed for more than half a second. You enter the "Escape button" number to the right of the controller name, on column D. Leave it blank if you do not want to use this feature.
Each physical controller will use 2 Joystick tabs in JoyToKey, always the same number in all the system. In order for this to work, you should map each Physical controller to a Joystick Number in JoyToKey. With your joystick/s plugged, in JoyToKey got to "Settings", "Configure Joysticks", "2.Advanced Setting for each device". Then select your plugged joystick in "Please select a device", and "Specify a preferred number when this device is connected". Now JoyToKey will always assign the selected Joystick number when this device is selected. (This is stored in the JoyToKey.ini file)
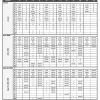
Step 3: Map each "Physical button" to each "Emulated Button"
You then need to map each "Physical Button" of each "Physical Controller", to the different "Emulated Buttons" in each system. (the direction Pads are always mapped to the same keys)
This is done between columns E and AN, rows 28 to 100. For each "System"-"Physical Controller" pair, you need to complete only the light gray column: enter the name of the "Emulated Button" that is assigned to each "Physical Button". The Keys the correspond to that Emulated Button are completed automatically.
Step 4: Create the .cfg files.
When you are finished mapping, you have to create the JoyToKey .cfg file for each system. This is a semi-automatic method.
With RocketLauncherUI, create an empty JoyToKey Profile for each system (or emulator), and locate the file .cfg it creates. Then go the "JoyToKey cfg" spreadsheet, enter the system number (1-12) in cell C1, select column A (go to cell A1, and press Ctrl+Shift+↓), and copy paste into your .cfg file.
Alternatively, you can print the "JoyToKey Maps" spreadsheet, and enter profiles manually.
Notes.
Works with JoyToKey v 5.7.
Spreadsheets are protected for your convenience. If you want to Unprotect them, just go to the Review Pane in Excel and press "Unprotect Sheet". There is no password.
What's New in Version 1.0
Released
- v 1.0
Recommended Comments
There are no comments to display.