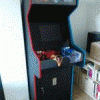
mono Posted November 29, 2013 Posted November 29, 2013 Hello everybody, today I decided to create my 1st post in the Hyperspin forums. The last year, I spend reading a lot here, getting a lot of valuable info and ideas. When my company gave away only HW for free, it did not take me long to decide what I will be doing with it. I started building a cab! This is what I want to present today. What I got is a Lenovo T61 (today equipped with a 120GB SSD, 500GB HDD, 4GB RAM and a Core2Duo) turing out to be capable handling all my desired emulators. In the beginning, I thought I could get it set up without spending too much money (haha, guessed wrong), so I disassembled an old ps2 keyboard and rewired the matrix to get an interface for the buttons Then I got a few buttons, created a dummy control panel and set up my 1st prototype Man, I was happy seeing pacman again - so happy that I did only playing for several day before I started thinking about creating the cab When I started the design phase of the cab, a few things were clear: I should be a 2-player cab with 7 buttons plus flipper buttons on the side (I loved pinball fantasies on my old amiga 500) plus the usual start, exit etc buttons. Also I wanted to used an old 17" crt monitor I still had in the basement (it still works) and I wanted to have a control panel with is "inside" the side panels. I personally did not like the designs where the cp is broader than the cab itself. I started doing some drawings on paper and pc but when i wanted to create a 3D model using cad software, it turned out to be too complicated. So this is what I came up with a cardboard cab I liked the overall dimensions, cut a little here and there, glued a little here and there and finally had my cab prototype. Afterwards it was re-drawn on the pc in order to have exact measurements. Next step was to buy the wooden panels (This is the point when the "not too much money"-approach failed) - I decided for 18mm (~3/4") multipley birch wood. Next step was, of course, transferring the measurements and cutting the wood. During this time, I found a tutorial on cab making which I did not really follow, but there was one thing I did follow. After every step, it said "open a bottle of beer and appreciate your work" - what I did Starting cutting the control panel, I decided to cover it with plexi to protect the artwork - if you never bended plexi before, this can be a pretty tough task to do - I needed 4 sheets before it worked out as I wanted After a lot of priming, painting, painting again and again and again (I do hate enamel varnish now) and finally applying a clear coat - The great day came - the first assembly Some artwork needed to be done now - lighted marquee and control panel I had printed in a local copy shop and a lot of wires had to be soldered. As my keyboard had turned out not being able to do simultanious keypresses, I decided to switch to an iPac instead. Also I had to wait for delivery of the T-Molds from USA (They are nearly impossible to get in Germany). I Used taht time to apply a coat of black to the back of the plexi bezel - which turned out to look just great. After fitting everything together, I was able to convince my wife that it looks good enough for the living room (original plan was to put it in the basement), so I diassembled it again, carried it upstairs, assembled everything and turned it on - WOW a cab is one of the greatest toys for an adult man Of course it runs Hyperspin The design itself is pretty custom - I like the Fire&Ice theme as it reminds me of the 90s - and I did not want to theme the cab for some specific game as it should play everything desired. I hope you like it and I hope this post will encourage more people tobuild a cab - You will spend way too much money - You will spend even more time - You might not see your wife too often as you will be in the workshop/basement all night - Your wife might start hating you for doing so - You will swallow a lot of sawdust - You will breathe a lot of color vapors - You will be frustrated realizing that you measured wrong and need to start over - SW/emulator setup will not be as easy as their manuals pretend but, AT THE END, it is absolutely WORTH IT Here are some specs Lenovo T61 Notebook Core2Duo 2GHz 4GB RAM 120GB SSD 500GB HDD Docking station power-button wired to arcade button 2.1 Active Speaker System USB-activated multi-socket plug (powering on everything whn notebook turns on) 17" CRT Monitor Keyboard & Mouse - hidden in an "invisible" drawer Buttons & Joysticks 1x iPac2 controller 2x Sanwa JLF-TP-8YT 23x ILSA Pushbutton SL 1x Coin Door 0.50€ T-Molding red and blue 18mm birch multiplex Lots of paint clear plexi (cp and marquee) smoked plexi (bezel) lots of wires Windows 7 64bit 2 user setup (1x arcade, 1x service) boot/logon logo replaced auto-login for arcade user Hyperspin shelled for arcade user cursor etc removed for arcade user Systems emulated MAME Daphne Nintendo Entertainment System Super Nintendo Entertainment System Nintendo 64 Nintendo Game Boy Nintendo Game Boy Color Nintendo Game Boy Advance Sega Master System Sega Genesis Sega Dreamcast Sega Game Gear Sony PlayStation Commodore Amiga Future Pinball ScummVM
stephenfalken Posted November 29, 2013 Posted November 29, 2013 Love it!! Well done! Sent from my Galaxy S4 using Tapatalk 2

Recommended Posts
Archived
This topic is now archived and is closed to further replies.