Imagamejunky Posted February 20, 2015 Author Posted February 20, 2015 Thank you ashurax and austin585 The Gamejunky Cab: http://www.hyperspin-fe.com/topic/7191-project-gamejunky-cab/ My new youtube channel: https://www.youtube.com/channel/UC85zq3VgibnPTOkielbyRegInstagram: https://instagram.com/imagamejunky/
Imagamejunky Posted February 21, 2015 Author Posted February 21, 2015 Progress made this week. Shaped and drilled holes in lexan cp overlay. Framed structure for and installed keyboard drawer (with red paint for test color). Added upper monitor mount and bracing. Glued a few more panels. Junky The Gamejunky Cab: http://www.hyperspin-fe.com/topic/7191-project-gamejunky-cab/ My new youtube channel: https://www.youtube.com/channel/UC85zq3VgibnPTOkielbyRegInstagram: https://instagram.com/imagamejunky/
Imagamejunky Posted February 27, 2015 Author Posted February 27, 2015 Hi guys. I'm happy to say it's been a productive week so far. I built and installed the front cabinet doors and speaker mounts, cut the holes for the subwoofer, exterior usb ports for aimtraks, and main electrical connections. I had to change the upper cabinet body because I didn't like the position of the marquee screen mount. Now it looks better . Here's a pic of the last test fitting before starting primer today. Hell yes! The Gamejunky Cab: http://www.hyperspin-fe.com/topic/7191-project-gamejunky-cab/ My new youtube channel: https://www.youtube.com/channel/UC85zq3VgibnPTOkielbyRegInstagram: https://instagram.com/imagamejunky/
Imagamejunky Posted February 27, 2015 Author Posted February 27, 2015 Primer pics I'm stoked Junky The Gamejunky Cab: http://www.hyperspin-fe.com/topic/7191-project-gamejunky-cab/ My new youtube channel: https://www.youtube.com/channel/UC85zq3VgibnPTOkielbyRegInstagram: https://instagram.com/imagamejunky/
THK Posted February 27, 2015 Posted February 27, 2015 [ATTACH=CONFIG]51239[/ATTACH] Almost looks like it's gonna be in the bathroom, with the porcelain look ..........................back with a vengeance........................
hitchhikingflatlander Posted March 7, 2015 Posted March 7, 2015 Thats one bad mamba jamba! Hope I have the space for something like that someday. Not to long ago I say one of the huge House of Dead cabinets on craigslist and got to thinking what a cool conversion that would be, didn't have the $900 they were asking. Look forward to seeing the progress!
Imagamejunky Posted March 12, 2015 Author Posted March 12, 2015 I haven't been posting pics because I've been BUSY building. So now I will show you my progress. Here's my acrylic overlay for the main screen. I decided to use cabinet magnets to mount it and black spray paint (for plastics) to paint the inside "bezel". Here's how I did it. With the acrylic in place in front of the tv I used blue painter's tape on the front side to mask out where I wanted the edge of the black bezel to be. Then I took the acrylic off of the cabinet, removed the hardware for the magnets, and used green frog tape on the back side of the acrylic. This way I was able to place the edge of the frog tape to the exact line of the blue tape on the front side. I carefully used a sharp exacto knife and a metal straight edge to cut the 90 degree corners. I drug my fingernail along the edge of the frog tape to make sure it had a nice attachment to the acrylic. Then I painted. It took a lot more paint to cover up than I had expected. I used a flashlight from underneath to look for any areas that light would bleed through. Here's a tip I read on the forums that really helped... remove the frog tape early, while the paint is still wet. That way the paint has less time to seep under the tape. I'm really happy with how this turned out. It looks fantastic in my opinion The Gamejunky Cab: http://www.hyperspin-fe.com/topic/7191-project-gamejunky-cab/ My new youtube channel: https://www.youtube.com/channel/UC85zq3VgibnPTOkielbyRegInstagram: https://instagram.com/imagamejunky/
Imagamejunky Posted March 12, 2015 Author Posted March 12, 2015 Here is the upper acrylic overlay. I did this one the same exact way. I used drill bits from tap plastics that are designed to drill though acrylic. In this upper one I had to drill multiple large holes for the speakers The Gamejunky Cab: http://www.hyperspin-fe.com/topic/7191-project-gamejunky-cab/ My new youtube channel: https://www.youtube.com/channel/UC85zq3VgibnPTOkielbyRegInstagram: https://instagram.com/imagamejunky/
Imagamejunky Posted March 13, 2015 Author Posted March 13, 2015 This is a pic with both acrylics in place Junky The Gamejunky Cab: http://www.hyperspin-fe.com/topic/7191-project-gamejunky-cab/ My new youtube channel: https://www.youtube.com/channel/UC85zq3VgibnPTOkielbyRegInstagram: https://instagram.com/imagamejunky/
Imagamejunky Posted March 13, 2015 Author Posted March 13, 2015 I purchased the 10" diamond plate from Tread-Ware. They will custom cut the length for you but you will need to drill your own holes. The Gamejunky Cab: http://www.hyperspin-fe.com/topic/7191-project-gamejunky-cab/ My new youtube channel: https://www.youtube.com/channel/UC85zq3VgibnPTOkielbyRegInstagram: https://instagram.com/imagamejunky/
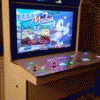
Imagamejunky Posted March 13, 2015 Author Posted March 13, 2015 Ladies and gentlemen! Let me introduce.... The Gamejunky Cab! Here's everything in place including the chrome T-molding and the control panel. I am SUPER happy with the look. Junky The Gamejunky Cab: http://www.hyperspin-fe.com/topic/7191-project-gamejunky-cab/ My new youtube channel: https://www.youtube.com/channel/UC85zq3VgibnPTOkielbyRegInstagram: https://instagram.com/imagamejunky/
Imagamejunky Posted March 13, 2015 Author Posted March 13, 2015 Here's some pics of the Gamejunky Cab running. You can see the upper dynamic marquee via HyperMarquee and EDS. I'm seriously F-ing stoked Junky The Gamejunky Cab: http://www.hyperspin-fe.com/topic/7191-project-gamejunky-cab/ My new youtube channel: https://www.youtube.com/channel/UC85zq3VgibnPTOkielbyRegInstagram: https://instagram.com/imagamejunky/
Imagamejunky Posted March 13, 2015 Author Posted March 13, 2015 Control Panel pics The Gamejunky Cab: http://www.hyperspin-fe.com/topic/7191-project-gamejunky-cab/ My new youtube channel: https://www.youtube.com/channel/UC85zq3VgibnPTOkielbyRegInstagram: https://instagram.com/imagamejunky/
Imagamejunky Posted March 13, 2015 Author Posted March 13, 2015 Holy wiring batman! That took me MANY hours. I included 2 pictures of these connectors I found on amazon. http://www.amazon.com/gp/product/B00CQK77GC/ref=oh_aui_detailpage_o07_s00?ie=UTF8&psc=1 I purchased RGB Leds from GGG that come with no terminations on the ends of the wire. I needed to find a way to connect them to the ipac. These connectors are a little thicker than I would prefer, but they definitely worked. The connectors that Andy at Ultimarc provides with his buttons must be thinner. The one on the UTrak trackball is thinner. It fits better on the board. The Gamejunky Cab: http://www.hyperspin-fe.com/topic/7191-project-gamejunky-cab/ My new youtube channel: https://www.youtube.com/channel/UC85zq3VgibnPTOkielbyRegInstagram: https://instagram.com/imagamejunky/
HazzardActual Posted March 13, 2015 Posted March 13, 2015 damn dude, that shit is HUGE, i love it. good call on the magnets for the glass. thats one of those things thats such a simple idea but so cool. get some video of that thing man!
Imagamejunky Posted March 13, 2015 Author Posted March 13, 2015 Thanks Hitchhikingflatlander and HazzardActual! I appreciate it The Gamejunky Cab: http://www.hyperspin-fe.com/topic/7191-project-gamejunky-cab/ My new youtube channel: https://www.youtube.com/channel/UC85zq3VgibnPTOkielbyRegInstagram: https://instagram.com/imagamejunky/
Imagamejunky Posted March 13, 2015 Author Posted March 13, 2015 I added 2 videos to post #2 in this thread Junky The Gamejunky Cab: http://www.hyperspin-fe.com/topic/7191-project-gamejunky-cab/ My new youtube channel: https://www.youtube.com/channel/UC85zq3VgibnPTOkielbyRegInstagram: https://instagram.com/imagamejunky/
Dubbloseven Posted March 13, 2015 Posted March 13, 2015 That's a beautiful work of art Imagamejunky. absolutely love it !!! congrats and have fun !!! My YouTube Channel https://www.youtube.com/channel/UCx0yXVItMU6uz4z5hUavGgA
Imagamejunky Posted March 13, 2015 Author Posted March 13, 2015 EDIT- PLEASE READ POST 53 IN THIS THREAD Now onto my problems. Hopefully I can help someone out too.. 1- Trying to get the Aimtrak guns to work correctly is a total pain in the ass. I have wasted HOURS and HOURS with these stupid guns. I follow instructions on different websites, follow video tutorials, etc etc. NOTHING WORKS. So frustrating. One thing that did help me is finding the program JoyID. http://theairtacticalassaultgroup.com/forum/showthread.php?t=13009 This great little program helps you by stopping stupid ass windows from reassigning your usb devices with new ID numbers. Try it out if you are having problems with your joystick ID's. 2- The ipac ultimate i/o from ultimarc doesn't have the ability (yet) to have an individual id assigned to it. What this means is that you can't use LedBlinky to program/communicate with more than one board. I didn't know this and I built my entire control panel and wired eveything perfectly to 2 ipac ultimates. I had to take one of the ipacs out and re-wire many switches and led's. What a flipping nightmare! For the time being I have some led's connected together and I have some buttons connected to joystick inputs on the board. This will work temporarily for me until Andy releases a new version of firmware that will allow an id assignment on the ipac ultimate. Like I said hopefully this helps someone. Do any of you have 2 aimtraks successfully working? If so, will you please help me out? I want 2 guns to work CORRECTLY with mame, sega m2, nestopia, and of course pc games like hotd 3. Based on a video tutorial I installed and used the "lightgun troubleshooter". This program is like a virus on my pc now. It doesn't work for me and I can't uninstall it. Any advice would be appreciated. Junky The Gamejunky Cab: http://www.hyperspin-fe.com/topic/7191-project-gamejunky-cab/ My new youtube channel: https://www.youtube.com/channel/UC85zq3VgibnPTOkielbyRegInstagram: https://instagram.com/imagamejunky/
Imagamejunky Posted March 13, 2015 Author Posted March 13, 2015 That's a beautiful work of art Imagamejunky. absolutely love it !!! congrats and have fun !!! Thank you very much man The Gamejunky Cab: http://www.hyperspin-fe.com/topic/7191-project-gamejunky-cab/ My new youtube channel: https://www.youtube.com/channel/UC85zq3VgibnPTOkielbyRegInstagram: https://instagram.com/imagamejunky/
HazzardActual Posted March 13, 2015 Posted March 13, 2015 Do any of you have 2 aimtraks successfully working? If so, will you please help me out? I want 2 guns to work CORRECTLY with mame, sega m2, nestopia, and of course pc games like hotd 3. Based on a video tutorial I installed and used the "lightgun troubleshooter". This program is like a virus on my pc now. It doesn't work for me and I can't uninstall it. Any advice would be appreciated. Junky Aimtraks are filthy, filthy whores. Had i known that using wii motes was better in the first place i would have never spent the money. the only person i know that has 2 working is Connorsdad. and I think even his are still screwy. I gave up on having 2 on my cab. 1 works well with nestopia and m2. in mame it "works" but if you so much as drag the gun cursor off screen an inch it fucks the whole calibration. nothing i ever did fixed that. Wiimotes with touchmote is the better option
Imagamejunky Posted March 13, 2015 Author Posted March 13, 2015 Aimtraks are filthy, filthy whores. Had i known that using wii motes was better in the first place i would have never spent the money. the only person i know that has 2 working is Connorsdad. and I think even his are still screwy. I gave up on having 2 on my cab. 1 works well with nestopia and m2. in mame it "works" but if you so much as drag the gun cursor off screen an inch it fucks the whole calibration. nothing i ever did fixed that. Wiimotes with touchmote is the better option Ahhhh! That is NOT what I want to hear. But thanks for the input man. Damnit The Gamejunky Cab: http://www.hyperspin-fe.com/topic/7191-project-gamejunky-cab/ My new youtube channel: https://www.youtube.com/channel/UC85zq3VgibnPTOkielbyRegInstagram: https://instagram.com/imagamejunky/
HazzardActual Posted March 13, 2015 Posted March 13, 2015 sorry dude. All we can do now is warn future buyers. say... you would happen to be in the market for a custom aimtrak gun with a protective cord shielding would you?
Imagamejunky Posted March 13, 2015 Author Posted March 13, 2015 No, but thanks. I do want side mount holsters though. The Gamejunky Cab: http://www.hyperspin-fe.com/topic/7191-project-gamejunky-cab/ My new youtube channel: https://www.youtube.com/channel/UC85zq3VgibnPTOkielbyRegInstagram: https://instagram.com/imagamejunky/
HazzardActual Posted March 13, 2015 Posted March 13, 2015 I went to the container store and found a small pencil/pen holder that was wire frame. I just dremmel'd the bottom off. works great

Recommended Posts
Archived
This topic is now archived and is closed to further replies.