ghutch92
-
Posts
923 -
Joined
-
Last visited
-
Days Won
1
Content Type
Forums
Events
Downloads
Store
Everything posted by ghutch92
-
Step 16.)
-
I see a user error, not a program error. You can't just go around changing file extensions to ahk and expect it to work. Nowhere in the instructions did I tell you to change your ini file's extension to ahk. If you want to write an ahk file read the autohotkey documentation.
-
error screenshot or error never happened.
-
screenshot? I have no issues running from a separate drive using the version found in my first post. I feel like it's something on your end.
-
I think you'll need to start with explorer.exe to have DT and xpadder and joysticks working correctly. Also the shutdown hotkey makes no sense to me, would it not be better to set it up so that when you exit your frontend your computer shuts down, instead of mapping a hotkey to do it? Did you know xpadder has media key options that allow you turn the volume up or down using your joystick? Added new version that can hide the mouse and taskbar, get it in the first post. I find this useful for programs that put the taskbar back into focus like xpadder. Uses the same methods as HyperLaunch to accomplish this. User Beware: I know of no easy way to get the cursor back and taskbar back, so leave this disabled unless you're feeling adventurous or wanting to shell windows and you need explorer.exe to start.
-
@bb_neo, I fixed the bug you found, thanks for reporting it. @gigapig, some windows don't like to be minimized so when they are forced to minimize they leave those boxes. Use the Window Spy utility that comes with the autohotkey or autoit downloads to get the class name. Just append the class name of that window to the list in the ini of the window class names not to minimize.
-
I don't mind at all if you add stuff from my guides to the wiki. I won't edit the wiki until the issue of needing to log in to only read the articles is fixed.
-
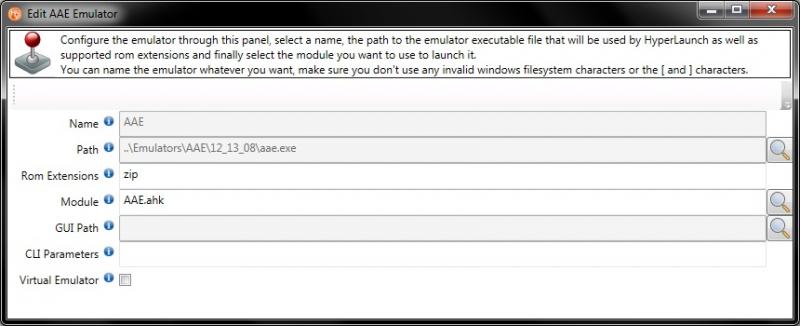
Systems: AAE Status: Inactive? (2008) Basic Setup 1.) Download the AAE alpha Binary and Update #2 from here. 2.) Create a new folder in your emulators folder called AAE. 3.) Create an emulator version folder inside that folder. The latest version at the time of this tutorial is 12_13_08 4.) Extract or install the contents of the AAE alpha binary download to the new folder you creates in step 3. C:\HyperSpin\Emulators\1964\12_13_08\aae.exe 5.) Extract or Install the contents of update #2 to the same folder as you did the alpha binary download. Overwrite everything. 6.) Open the aae.ini in notepad. This file is in the same folder as aae.exe. Now remove the # in front of mame_rom_path and set the path to your MAME roms or your AAE roms if you separated them (Example: mame_rom_path = C:\HyperSpin\Games\AAE). 7.) Open HyperLaunchHQ, Highlight Global in the systems panel and then click on the big tab emulators. Find AAE in this list and double click on it. Now set your path to aae.exe and fill in the rest of the settings 8.) Now highlight AAE in the system panel. Click on the big tab Emulators and then add the path to your AAE roms to the rom paths field. You can do this by clicking on the smaller green plus button to the right of the rom paths field. 9.) Now set AAE as your default emulator by clicking on the magnifying glass to the right of the default emulator field and selecting AAE [Global] in the popup window. 10.) Don't forget that you can edit module settings by highlighting the AAE module in the modules tab and clicking the edit global module settings button. Advanced Setup FAQ

-
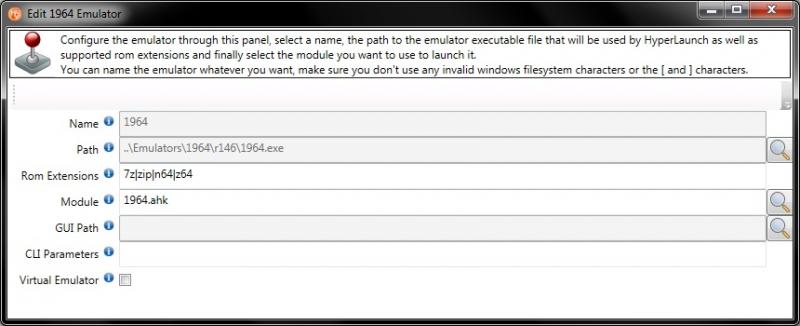
Systems: Nintendo 64 Status: last update 2012 Basic Setup 1.) Download both r106 and r146 here. 2.) Create a new folder in your emulators folder called 1964. 3.) Create an emulator version folder inside that folder. The latest version at the time of this tutorial is r146 4.) Extract or install the contents of r106 to the new folder you created above. Your path to 1964.exe should now be C:\HyperSpin\Emulators\1964\r146\1964.exe 5.) Extract or Install the contents of r146 to the same folder as you did r106. Overwrite everything. This installation method is because the r146 install is missing some files that r106 has. 6.) Now double click on the 1964.exe. You should receive a popup asking where your roms are. Point them to your rom folder. If you've followed this guide they will be in C:\HyperSpin\Games\Nintendo 64 7.) Open HyperLaunchHQ, Highlight Global in the systems panel and then click on the big tab emulators. Find 1964 in this list and double click on it. Now set your path and fill in the rest of the settings 8.) Now highlight Nintendo 64 in the system panel. Click on the big tab Emulators and then add the path to your Nintendo 64 roms to the rom paths field. You can do this by clicking on the smaller green plus button to the right of the rom paths field. 9.) Now set 1964 as your default emulator by clicking on the magnifying glass to the right of the default emulator field and selecting 1964 [Global] in the popup window. 10.) Don't forget that you can edit module settings by highlighting the module in the modules tab and clicking the edit global module settings button. Advanced Setup FAQ
-
I would love to make tutorials for the wiki but I find it frustrating because you need to be logged in to view the pages. Also the log in does not work for me when trying to log in from multiple computers. It's fine if I only use a single computer. It should be setup like a normal wiki where you can read it if you are not logged in, but to edit it you need to log in.
-
***Reserved
-
Making and Submitting Themes or Artwork *Guides coming soon
-
Faq *Guides coming soon
-
1.) Register as a user. Although I think you have to do this anyway to download HyperSpin 2.) Have fun with the HyperSpin community and be respectful. Asking questions. HyperNoobie Guide *Pictures Included* 1.) Use the forum search first. Look for a thread related to your topic. 2.) If you found a thread related to your topic read the thread. 3.) If that thread did not answer your question please check the most recent post date in that thread, if it's older than let's say 6 months, start a new thread on the topic. If it's newer than six months reply to the thread using the reply button at the bottom right of the post. 4.) Starting a new thead, first make sure you've already googled your problem and searched the forums here before starting a new thread. 5.) Choose the correct forum section for your topic. (Example: put HyperLaunch questions in the HyperLaunch forum section.) 6.) Make a descriptive title that accurately reflects the topic of your new thread. Follow The Forum Rules Private Messaging Private messaging is just that, it's private. Please do not post problems with another user in public use private messaging to help you and the other user save face. Do not spam someone endlessly with private messages. Treat it like an email system. You can send someone a private message by either clicking on their user name or adding their user name to the recipients field when typing the message. How to save Sent PM's Click on the Settings link near your username in the top right hand corner of this page. In the left hand pane you should see a section called My Settings and in that category click on General Settings. Here you will find the setting "Save a copy of sent messages in my Sent Items folder by default" under Sent Private Messages.
- 270 replies
-
- 1
-

-
- guide
- hyperlaunch
- (and 3 more)
-
**Reserved
- 270 replies
-
- 1
-

-
- guide
- hyperlaunch
- (and 3 more)
-
HyperLaunch FAQ How do I get my joystick to work with HyperSpin? How do I get the HyperSpin Profile working? 1.) Get xpadder $10 2.) Put xpadder in a Utilities folder in your HyperSpin folder (C:\HyperSpin\Utilities\xpadder\xpadder.exe) 3.) Open xpadder, create a controller file left hand corner of xpadder 4.) Create a profile for that controller (right hand corner) with the mappings needed to navigate hyperspin. 5.) Name the newly created hyperspin profile p1. Copy your file named p1 and create three more copies named p2, p3, and p4. 6.) Place these profiles in the folder directory as directed by here 7.) Open up HLHQ highlight the global system click on General Settings tab then click on the smaller 3rd party tab. Find Xpadder path setting and make sure it points to your xpadder.exe 8.) Make sure you also the setting Keymapper Front End Profile Name set to HyperSpin 9.) Make sure you have setting Keymapper Front End Profile set to xpadder 10.) Now click on the big tab Settings and then click on the smaller tab main settings. Set keymapper Enabled to true. (Do not disable keymapper per system) 11.) Set keymapper to be xpadder. Alright almost there, just a few more steps, 12.) Someone already wrote a startup script for you to take care of xpadder loading so we will use that. Get it here. Carefully read the first post about the settings Keymapper= and Keymapper_Enabled= also be sure to read the last sentence of the post and the sentence above "how to make it work." This is most of getting the keymapper to work, I may have missed a few small details along the way, but you're smart and you will be able to figure out the details I may have forgot.
-
**Reserved
-
Emulators will not be mentioned because they are already covered in another post. Programs found to be useful in all HyperSpin setups. HyperSpin -- no explanation needed HyperHQ -- gui for managing settings for the HyperSpin front end. HyperLaunch -- very essential to HyperSpin, it runs all your emulators, handles loading your roms, and other stuff during gameplay. HyperLaunch HQ -- gui for managing settings for HyperLaunch. (makes changing settings very easy compared to manual method) HyperSync (platinum members only) -- artwork downloader. Updates HyperSpin with available wheel artwork, themes, jump letters, box art, media container art, and preview videos (emumovies subscribers only). Saves months of time in making HyperSpin look nice. Very little user setup needed. Git + Tortoise Git -- used in downloading and updating (getting bug fixes) for hyperlaunch. more explanation HyperTools: List Filter -- useful for editing what game is in HyperSpin. It has a cell style view of many filtering options for your games. There are alternatives, but this is my favorite one. HyperTools: List Splitter -- useful for generating genre xmls to use for HyperSpin's genre feature. Programs found to be extremely useful/borderline necessary. utorrent -- no explanation because you should know why Daemon Tools Lite -- useful for loading cd images for cd based emulators/games, supported by HyperLaunch. 7zip -- useful for archived (zipped) roms. Helps improve storage space on larger roms. Integrated with HyperLaunch. Useful outside of HyperSpin. xpadder ($10.00 USD) -- useful for remapping joystick/gamepad controls to keys. Required if you want to use joysticks for HyperSpin menu controls or HyperLaunch menu controls. joytokey ($7.00 USD) -- cheaper alternative to xpadder. The user interface is "harder to learn" than xpadder. Less advanced features, less community support. FileZilla -- useful for accessing/dowloading/uploading ftps like the HyperSpin ftp (gold/platinum members only) or Emumovies ftp (emumovies subscribers only). programs found to be useful Altova XMLSpy (not free) -- useful in making, editing, and validating any xml, including isd files and HyperSpin xmls. The tree grid view is why this one comes recommended over others. HyperSpin Startup Script -- useful for starting keymappers, minimizing windows, and starting/closing other programs when HyperSpin starts Authotkey -- useful scripting language for Windows. Good support on these forums. Good documentation. HyperLaunch is written in AutoHotKey. HyperTools: List Merger -- does what it says. Easily merge HyperSpin xmls with this utility. Teamviewer -- most popular screen sharing utility on forums. Forum users like using this to help others setting up HyperSpin. Good for setting up/managing your Internet connected HyperSpin Setup from the office or8ital's HyperSpin Helper - 2nd or 3rd display image viewer -- useful for turning that 2nd screen and/or 3rd screen into a marquee/instruction/image viewer. Seems easy to use. Only useful if you have another display screen. (requires HyperLaunch) LEDBlinky -- useful for managing led lights on your arcade cabinet. Most people use it to light the control buttons in different colors based on the game displayed/played File/Rom Renaming and Management utilities It is easier to rename your roms to match the official HyperList names than to rename all the associated artwork and files for that game. These tools help you with this. HyperTools: Rom Renamer -- uses crc matching and some fuzzy matching to help rename your roms. Easy to use. Disc image renaming is good but does have some issues. Bulk Rename Here -- Generic file renamer. Useful for renaming lots of files at once. Looks advanced and extremely powerful. no crc or fuzzy matching. HyperSync (not this HyperSync) -- older utility that I used to manually rename my roms before HyperTools. Simple interface. Displays xml list next to list of files. clrmamepro -- rom management and manipulation utility. For Advanced Users. likes using dat files. RomCenter -- rom management and manipulation utility. For Intermediate/Advanced Users. (I think it's easier to use than clrmamepro.) Programs found to be useful for artwork and themes. HyperTheme -- useful for developing themes and editing theme settings. Able to preview a theme. Adobe Creative Suite -- useful for editing and creating artwork and themes. Gimp -- free alternative to photoshop, useful for editing images. Does not do fancy custom theme effects like Adobe Creative Suite. Disclaimers I will be adding links for all these programs, when I get some time. If I missed your favorite utility and you want to add it to this list. Private message (PM) me with a link to the utility, give a short description and explain why you found it useful.
- 270 replies
-
- 3
-
-

-
- guide
- hyperlaunch
- (and 3 more)
-
I will try to keep this guide up to date with the latest versions of HyperSpin and RocketLauncher. Also I'm adverse to making videos, because I don't want to make a new video every time something is updated, I find it easier just to edit a pic and text guide then recording a new video and editing links. All guides will assume you know how to navigate files and folders in windows. Translations Español - Admoroux This is for a new install. I'm assuming you know your way around folders and files in windows To download HyperSpin first you need to get the necessary support files from version 1.3.3 http://www.hyperspin-fe.com/files/file/5599-hyperspin-133-full-install/ and then overwrite with the contents from the beta http://www.hyperspin-fe.com/files/file/7500-hyperspin-14/ I'm gonna use the C drive in the examples. Any drive letter is ok Now extract the contents of the download to a HyperSpin folder on the root of your drive. Example: C:\HyperSpin The path to your HyperSpin.exe should now be C:\HyperSpin\HyperSpin.exe Now you need to get RocketLauncher which is a fork of HyperLaunch, but with more active development. Download it here. http://www.rlauncher.com/forum/downloads.php?do=file&id=1. The archive (zip) password is www.rlauncher.com Extract Rocketlauncher into a RocketLauncher folder on the root of your drive (C:\RocketLauncher) and make sure the path to RocketLauncher.exe is C:\RocketLauncher\RocketLauncher.exe and NOT C:\RocketLauncher\RocketLauncher\RocketLauncher.exe Get back in your HyperSpin folder. This time we are gonna do some manual ini editing . Open your Settings folder in your HyperSpin folder C:\HyperSpin\Settings. Find the file named Settings.ini, open it in notepad. You should see at the top a line that reads [Main]. Right up under the [Main] line add Hyperlaunch_Path= C:\RocketLauncher\RocketLauncher.exe Open your RocketLauncher folder (C:\RocketLauncher), now look for the RocketLauncherUI folder open it and then open RocketLauncherUI.exe. If you are having trouble opening RocketLauncherUI and you get some message about failing to initialize, you will need to download Microsoft .NET Framework 4.0 to get RocketLauncherUI to work. You will be greeted with a prompt asking you to update. Choose yes. Choose 'Latest' in the dropdown. Click on Check Updates at the bottom of the window. Wait for it to finish and then click Apply Updates. Close the update window. You can update in the future using the update button in the RocketLauncherUI tab (the update button looks like a globe with arrows.) You're thinking wow, so many settings this is too complicated. Well that's your fault for wanting lots of customization . RocketLauncherUI will probably restart wait for RocketLauncherUI to restart and then close RocketLauncherUI. Open your RocketLauncher folder (C:\RocketLauncher), now look for the Settings folder, open it and then rename Global Emulators (example).ini to Global Emulators.ini (Make sure you can see the extension: Known Extensions Are Set to Show) If there is already a file called Global Emulators.ini replace it with the example one. Open your RocketLauncher folder (C:\RocketLauncher), now look for the RocketLauncherUI folder open it and then open RocketLauncherUI.exe Look for the big tab on the right with the RocketLauncherUI image and click on it. Now look for a smaller tab called "Frontends" beneath the row of big tabs and click on it Click the green + under the small tabs and add a new frontend (here you can add different frontends like gamex or kodi). In the popup window titled Add Frontend: for the first blank, set the name to HyperSpin for the second blank, Click the Magnifying glass to the right and locate your HyperSpin.exe application. (C:\HyperSpin\Hyperspin.exe which should look like ..\..\HyperSpin.exe if you are following the guide) for the RocketLauncherUI plugin, choose Hyperspin in the dropdown box. for the RocketLauncher plugin, choose Hyperspin in the dropdown box. click on the button that looks like a blue floppy disk to save, if the button is not available just click the red x button to close and save the window. Highlight the HyperSpin frontend item in the list you just added and: click on the button that looks like a folder with a thumbtack (bulletin board pin) to set HyperSpin as your default frontend. (default frontend means RocketLauncherUI will always start up with this frontend) click on the button that looks like a robot terminator red eye to set HyperSpin as the active frontend. (active frontend means the frontend that you are currently working on in RocketLauncherUI) Look in the left near the top of the RocketLauncherUI main window for the words "Select a System" under it you should see a button that looks like two green arrows making a circle. Click on the circular green arrows button to refresh the systems list to match the active frontend. You can now close RocketLauncherUI or leave it open (you will need to open it later in this guide). Now to make full use of RocketLauncher we want to download the media pack. http://www.rlauncher.com/forum/downloads.php?do=file&id=2 Extract the contents of the media pack into your RocketLauncher folder (C:\RocketLauncher). Congrats you have now installed HyperSpin + RocketLauncher! You think you're done don't you, but you're wrong. There is still more to go. Gasp. We don't have any emulators yet. Ok then let's try to set one up, how about we do the most popular one. MAME Download the binary unless you plan on compiling your own version. (there are some benefits to compiling, hiscores and nonag being the most popular) Now let's create a new folder on your root drive called Emulators. C:\Emulators -this is not required but it is recommended Now inside this folder create a new folder named after the emulator called MAME. C:\Emulators\MAME Now inside your emulator folder install MAME. So the path to your mame.exe or mame64.exe should be C:\Emulators\MAME\mame.exe Congrats you have installed an emulator. Now to get it working with RocketLauncher and ultimately HyperSpin. Open your RocketLauncher folder (C:\RocketLauncher), now look for the RocketLauncherUI folder open it and then open RocketLauncherUI.exe On the left hand side in RocketLauncherUI you will see a list of all our systems and at the top is a system called Global (not actually a system in HyperSpin). Changing settings in Global affects all of your settings in every system. Consider this the default settings. Ok now highlight the Global System and click on the big tab Emulators. If you installed correctly (didn't skip steps like step 9) you will be greeted with a long list of emulator names. Scroll down this list until you find MAME. Double click on it. A new window will appear. Fill in the path value by clicking on the magnifying glass to the right of the path entry and find your MAME emulator. Close this window if the values for module and rom extensions are already filled. Now highlight the MAME system in the systems list. and click on the big tab Emulators. Add the path to your MAME roms in the rom paths field by clicking on the green plus button. For most mame installations it's in the same folder as mame.exe in a folder called roms. C:\Emulators\MAME\roms For other systems, I personally put roms in a folder separate from hyperspin and the emulator folder, something like C:\Games\systemName\gameName.extension ROMS are not included with MAME or HyperSpin or RocketLauncher. Do not ask for roms on this forum, it will get you banned. Google is your friend for this. Now back in RocketLauncherUI choose your default emulator by clicking on the Magnifying glass. Choose MAME [global] from the list that appears. Congrats! you have now setup MAME within RocketLauncher. Now to setup MAME for use with HyperSpin. First get the latest MAME xml from HyperList http://hyperlist.hyperspin-fe.com/ Drop the xml you downloaded into C:\HyperSpin\Databases\MAME\ and rename it to MAME.xml. If it asks you to overwrite, choose yes. XML management can be a pain and so can renaming all those roms that you legally copied from your personal collection of actual games that you legally acquired through legal purchases. For emulators other than MAME or MESS you will need to make sure that the file names for your roms match the names for the games found in your xml. For the best hyperspin xml management and renaming applications use Don's HyperSpin Tools or check out the beta version of HyperTools.zip (thanks, emb). I think that's it for a basic installation. It will be hard and time consuming to get artwork and videos until you subscribe to emumovies and receive platinum status here by donating. Oh wait I almost forgot, whenever any one says edit your module settings they usually mean open RocketLauncherUI click on your system, click on the big modules tab, highlight the module you are using, and then click on the Edit Global Settings button. A little bit more info can be found here & here. If you liked this guide and want to say thank you, hit the like button at the bottom of this post. Hyperspin and RocketLauncher Compatibility Fix.zip
- 270 replies
-
- 143
-
-
-
-
- guide
- hyperlaunch
- (and 3 more)
-
File Name: HyperSpin Startup Script 1.08 File Submitter: ghutch92 File Submitted: 08 May 2015 File Category: Add-Ons Credits: ghutch92 http://www.hyperspin-fe.com/topic/9028-hyperspin-startup-script/ - support topic in forums Ok, this is not amazing but it is useful for you joystick/gamepad users and multi-taskers. This script is written in autohotkey and borrows some code from RocketLauncher. This startup utility allows you to start and close an unlimited amount of processes and programs when hyperspin starts and closes. It allows you to use your gamepad/joystick in the hyperspin program without paying for 3rd party software. It can minimize your background windows when you start hyperspin and restore them in the opposite order when you close hyperspin. It has a volume bar that moves in from the bottom of the screen that allows you to control the volume in hyperspin using hyperspin keyboard controls or joystick controls. It has a quicklaunch bar that moves in from the left side of the screen from which you can launch commonly used programs that are used in setting up hyperspin or your gaming session and even restart hyperspin (examples: hyperhq, RocketLauncherUI, don's hypertools, an internet browser, fraps, etc) To use it Open HyperHQ, Go to Main Settings -> Startup\Exit -> and set the .exe file as your startup program. How to make it work: Run it once, a new file should appear in the folder it is in. It's name will be the same name as this program and will have the extension "ini" Open the ini file. You should see some of the settings described below. [Required] HyperSpin_Folder_Path REQUIRED! is the path to the folder containing hyperspin.exe (Default is .\ which would be the same folder as the startup script. ..\ means one folder up. ..\..\ would mean two folders up). Absolute paths are still accepted. Primary_Color_RRGGBB is the background color of the menus given in a hex rrggbb format. Examples and a color picker can be found here. Secondary_Color_RRGGBB is the background color of the menus given in a hex rrggbb format. Examples and a color picker can be found here. [Controls] Joysticks_Enabled can be true or false. Set this to true to use a joystick or gamepad with hyperspin. May work for controllers other than the 360 controller. Joystick_Delay is the number of milliseconds to wait before repeating for only the hyperspin startup menus Joystick_Deadzone is a number between 0 and 49 representing the size of the axis deadzone for every axis. 0 is the most sensitive. 49 is the least sensitive. Joysticks_MaxNumberOfJoysticks is a number between 1 and 16 that represents how many joysticks you want to use at the same time (using same control layout) to control hyperspin Joystick_Up, Joystick_Down, Joystick_SkipUp, Joystick_SkipDown, Joystick_SkipUpNumber, Joystick_SkipDownNumber, Joystick_HyperSpin, Joystick_Genre, Joystick_Favorites, Joystick_Start and Joystick_Exit do the same thing as their HyperSpin keyboard counterparts. Joystick_Roulette, Joystick_Volume, Joystick_Volume_Close, Joystick_QuickLaunch and Joystick_QuickLaunch_Close joystick controls for roulette, volume bar and quicklaunch bar. Joystick_Info, Joystick_Info_Close, Joystick_Filters and Joystick_Filters_Close are not yet implemented, need to be able to receive Event Dispatcher info, com xml code are needed to get these controls to work. Joystick control options in the settings are separated by a vertical bar delimiter | . The joystick control options available are as follows for axis: JoyX-, JoyX+, JoyY-, JoyY+, JoyZ-, JoyZ+, JoyR-, JoyR+, JoyU-, JoyU+, JoyV- and JoyV+ for dpad/hat switch: JoyPOVN, JoyPOVE, JoyPOVS and JoyPOVW for buttons: Joy1, Joy2, Joy3, Joy4, Joy5, Joy6, Joy7, Joy8, Joy9, Joy10, Joy11, Joy12, Joy13, Joy14, Joy15, Joy16, Joy17, Joy18, Joy19, Joy20, Joy21, Joy22, Joy23, Joy24, Joy25, Joy26, Joy27, Joy28, Joy29, Joy30, Joy31 and Joy32 [startup] Minimize_Background_Windows_Enabled can be true or false. Set this to true to minimize windows when this script starts. Window_Classes_To_Not_Minimize is a comma delimited list of window classes that will not be minimized. To get the window class you can use this tool AU3 Window Spy.zip. [Exit] Restore_Windows_On_Exit can be true or false, if true it will restore all windows minimized by the script, if false the windows will stay minimized when hyperspin exits [startup] & [Exit] Process_Name_To_Close_1 is the name of the process you wish to close. To add more processes to close, just change the 1 to a 2 for the second process, the 2 to a 3 for a third process, etc. Example: Process_Name_To_Close_1=notepad.exeProcess_Name_To_Close_2=hyperlaunch.exe Program_To_Run_Target_1 is a document, URL, executable file (.exe, .com, .bat, etc.), shortcut (.lnk), or system verb to launch. If Target is a local file and no path was specified with it, The script's directory will be searched first. If no matching file is found there, the system will search for and launch the file if it is integrated ("known"), e.g. by being contained in one of the PATH folders. To pass parameters, add them immediately after the program or document name. If a parameter contains spaces, it is safest to enclose it in double quotes (even though it may work without them in some cases). Paths relative to the startup script are allowed. Program_To_Run_Working_Dir_1 is the working directory for the launched item. Do not enclose the name in double quotes even if it contains spaces. If omitted, the script's own working directory will be used. Relative Paths are not allowed. Program_To_Run_MaxMinHide_1 is if omitted, Target will be launched normally. Alternatively, it can contain one or more of these words: Max :launch maximized Min :launch minimized Hide : launch hidden (cannot be used in combination with either of the above) Note: Some applications (e.g. Calc.exe) do not obey the requested startup state and thus Max/Min/Hide will have no effect. To add more programs to open, just change the 1 to a 2 for the second program, the 2 to a 3 for a third program, etc. Example: Program_To_Run_Target_1=C:\Utilities\Xpadder\xpadder.exe "C:\HyperLaunch\Profiles\xpadder\HyperSpin\p1.xpadderprofile" /MProgram_To_Run_Working_Dir_1=Program_To_Run_MaxMinHide_1=Program_To_Run_Target_2=HyperSearch.exeProgram_To_Run_Working_Dir_2=C:\HyperSpin\HyperSearchProgram_To_Run_MaxMinHide_2=Program_To_Run_Target_3=explorer.exeProgram_To_Run_Working_Dir_3=Program_To_Run_MaxMinHide_3= [Roulette] Roulette_Key is the compatible autohotkey key name for the key or two key combo used to trigger the roulette event. Modifier Symbols are accepted. There is already built in support for the roulette function for joysticks. Roulette_Min_MilliSeconds is the minimum amount of milliseconds to spin the HyperSpin menu wheel Roulette_Min_MilliSeconds is the maximum amount of milliseconds to spin the HyperSpin menu wheel [Volume_Menu] Volume_Menu_Key is the compatible autohotkey key name for the key or two key combo used to open/close the volume bar. Modifier Symbols are accepted. There is already built in support for the volume menu for joysticks. Volume_Bar_Offset_From_Bottom is the distance in pixels from the bottom of the screen to the bottom of the volume bar. For reference the windows 7 taskbar is typically 40 pixels. [QuickLaunch] QuickLaunch_Key is the compatible autohotkey key name for the key or two key combo used to open/close the quicklaunch menu. Modifier Symbols are accepted. There is already built in support for the quicklaunch menu for joysticks. QuickLaunch_Enabled can be true or false. Set to false to disable the use of the quicklaunch menu, useful to disable if you don't want to ruin the arcade experience, useful to enable to help troubleshoot and make changes to your setup, amongst other things. QuickLaunch_Left_Offset is the distance in pixels from the left of the screen to the left edge of the logos QuickLaunch_Top_Offset is the distance in pixels from the top of the screen to the top edge of the first selectable logo QuickLaunch_Bottom_Offset is the distance in pixels from the bottom of the screen to the bottom edge of the last selectable logo Item_1_Path is a document file, executable file (.exe, .com, .bat, etc.), or shortcut file (.lnk), to launch. If Target is a local file and no path was specified with it, The script's directory will be searched first. If no matching file is found there, it will not be added to the menu as an option. Paths relative to the startup script are allowed. Item_1_Parameters is the parameters to pass to the application. If a parameter contains spaces, it is safest to enclose it in double quotes (even though it may work without them in some cases). Item_1_LogoPath is a path to an image file to be used as the logo for the application in the quicklaunch menu. If this value does not exist or is empty, this script will attempt to extract and use the application's icon. Item_1_Ignore_Process_Close can be true or false. does not reactivate hyperspin or the quicklaunch menu when the application specified is closed. Useful for for applications that use a launcher. To add more items to the quicklaunch menu, just change the 1 to a 2 for the second item, the 2 to a 3 for a third item, etc. Example: Item_1_Path=C:\HyperSpin\HyperSpin.exeItem_1_Parameters=Item_1_LogoPath=Item_1_Ignore_Process_Close=falseItem_2_Path=C:\HyperSpin\HyperHQ.exeItem_2_Parameters=Item_2_LogoPath=Item_2_Ignore_Process_Close=falseItem_3_Path=C:\HyperSpin\HyperSync Cloud\HyperSync Cloud.exeItem_3_Parameters=-trueItem_3_LogoPath=Item_3_Ignore_Process_Close=falseItem_4_Path=C:\HyperLaunch\HyperLaunchHQ\HyperLaunchHQ.exeItem_4_Parameters=Item_4_LogoPath=C:\HyperLaunch\HyperLaunch Icons\hlhqicon256x256.pngItem_4_Ignore_Process_Close=falseItem_5_Path=C:\HyperSpin\HyperTools\Filter HyperList.exeItem_5_Parameters=Item_5_LogoPath=Item_5_Ignore_Process_Close=falseItem_6_Path=C:\HyperSpin\HyperTools\Rename ROMs.exeItem_6_Parameters=Item_6_LogoPath=Item_6_Ignore_Process_Close=falseItem_7_Path=C:\HyperSpin\HyperTools\Split HyperList.exeItem_7_Parameters=Item_7_LogoPath=Item_7_Ignore_Process_Close=falseItem_8_Path=C:\HyperSpin\HyperTools\Create New HyperList.exeItem_8_Parameters=Item_8_LogoPath=Item_8_Ignore_Process_Close=falseItem_9_Path=C:\HyperSpin\HyperTools\Merge HyperLists.exeItem_9_Parameters=Item_9_LogoPath=Item_9_Ignore_Process_Close=false If you want the source ahk code for the latest version just pm me for it. I will fix bugs, but I am not taking feature requests nor helping others set it up. Click here to download this file HS Startup.zip HyperSpin Startup Script.zip Joystick Detection.ahk Link to the downloads section
-
Is there a preferred emulator for the Sony Playstation?