I found this app online and works great for hyperlaunch aka rocket launch media. It works
great for stuff like manuals etc that have to be in their own "folder" and you cant just have the file names in the root. For instance instance in the manual folder of hyperlaunch say
you have 100 manuals. First you'll want to use fatmatch to match up the names of the manuals to your games. Once they have all been renamed properly and you have unzipped this, just
right click your mouse and select "files 2 folder", once clicked the document will create its own folder and place the document in there. If you chose to do all of your media, hold down ctrl or use shift to select them all and click "files 2 folders" by right clicking. This time you'll get a different option in the pop up. To get a folder for each file individually use the second option named move each file to indivudal subfolders based on their names. This makes managing hyperlaunch media a breeze with creating folders for your content
hyperspin forum: http://www.iconarchi...-by-harwen.html
Click here to download this file
Tempest - tempest (AAE)-Unknown
Video Snap available from EmuMovies
Tempest - tempest (MAME)-Unknown
Video Snap available from EmuMovies
This allow us to map the Xbox 360 controller guide button - which isn't normally mapable - to any keyboard key you'd like. Supports four controllers each being mapped to the same or different keys. This could be good for Pause aka HyperPause
http://www.hyperspin-fe.com/topic/1395-mapping-the-x360-guide-button-executable-source-code/page-1
it's a great useful little app to Batch Zip/7z files
Features
•Adds Batch-Processing to 7zip
•Multiple Compression Methods available
•7zip and Zip Support
•Perfect for Rom-Collections
•Shutdown after completion
•Now with DLLs
Put dll and executable into the 7zip directory (where the 7z.exe is)
Files can be added by drag and drop
For easier debug a command.txt will be created with the command which gets send to the CMD
Notes from Creator
Quote
My first try of a GUI with wxWidgets.
Now 7zip can do "each file to a seperate archive" from Winrar.
Sends commands to the CMD to process through the list, though maybe Admin rights are required.
Maybe a Linux-Version later...
Original Site
http://sourceforge.n...cts/sevenzipbc/
License
Public Domain
Basically, all you need is to launch mcheat.exe (it will be mimimaized in tray), than launch any of supported emulators than use Ctrl+E to show menu, arrows to navigate, "END" button to activate/deactivate cheats and enter submenus, backspace to return from submenu or close main menu.
You have to have .net framework 4 installed. And if you plan to use it on 64x OS with 32 bits emulators (most of them are 32 bits), you need to launch "Register SlimDX.bat" before using the app.
If you want to use gamepad to load/save quickstates and change slots, right click on tray icon and choose "Configure joystic". The savestate controls for supported emulators are already predefined.
Installation: firstly need .net framework 4.0. If it is not - crash at startup. Second, if you use 32-bit emulators on 64-bit system, you must run the "Register SlimDX.bat" from the program folder. If you do not, the program kreshnetsya and carry with them the emulator. This operation is a one-off! Inside the file is nothing special, just check SlimDx.dll in GAG, can be found in noutpede.
Usage: run mCheat.exe. The program runs in the system tray. Start the emulator and load the game. To call / retraction of the cheats menu, the default Ctrl + E. Menu Navigation - Arrow. Activate / deactivate the cheat - button "end". Back from the sub-menu - Backspace.
The program supports 16 systems:
• NES (Nintendo NES / Dandy)
• SNES (Super Nintendo)
• GB (Nintendo Gameboy)
• GBC (Nintendo Gameboy Color)
• GBA (Nintendo Gameboy Advance)
• GG (Sega GameGear)
• SMS (Sega Master System)
• SMD (Sega MegaDrive, aka Sega Genesis)
• SCD (Sega CD, the support is there, but since this program in the course of the first to use the cheats for this system, and the Internet to cheat her to do, then there are cheats in the database only for two toys that are quickly able to find - Popful Mail and Bram Stokers Dracula)
• 32X (Sega 32x)
• SAT (Sega Saturn)
• PSX (Sony PlayStation)
• PS2 (Sony PlayStation 2)
• N64 (Nintendo 64)
• NGC (Nintendo GameCube)
• 3DO (Panasonic 3DO. Same crap that with segoy CD. On the Internet there is no cheating. Sam promptly inserted 10 pieces, there is no longer)
There is a built-in database editor cheat (right mouse button on the tray icon -> Database Manager -> tab Global).
In the settings you can configure the control joystick are four buttons to control seyvsteytami emulator - download, save, and switch to the next / previous slot.
Now the bad news: the program works only with certain versions of emulators. Here is the list:
• FCEUX 2.1.6-interim svn2503 (NES)
• FCEUX 2.2.2 (NES) (download)
• Fusion 3.64 (GG, SMS, SMD, SCD, 32X) (download)
• Snes9x 1.5.3 testbuild_20110910 (SNES) (download)
• Snes9x x64 1.5.3 testbuild_20110910 (SNES) (download)
• VisualBoyAdvance-M 1.8.0 svn1022 (GB, GBC, GBA) (download)
• project64 17.0.50b23 (N64)
• project64 2.1.0.1 (N64)
• R100 1964 (N64) (download)
• 1964 R140 (N64) (download)
• 1.7.0 ePSXe (PSX) (download)
• pcsxr r789713 (PSX)
• Dolphin x64 3.0 r714 (download)
• dolphin x64 3.5
• MAMEPlus x64 0.147u3 (GG) (download)
• MAMEPlus-0.152-r5100-cave-sh3-nonag-x64 (GG)
• PCSX2 r5444 (PS2) (download)
• SSF 012 Beta R3 (SAT) (download)
• 4DO 1.3.2.3 (3DO) (download)
The program includes "Emulator Config Wizard", with the help of it, if you can connect confuse any emulator. However, this feature is still in the alpha stage and can kreshnutsya.
The program comes with source code is written in vb.net (.net 4.0) and compiled in MSVS 2010. It will be useful mazahistov trying to implement in BASIC such things as access to and modification of functions in the wrong processes (hooks), the use of API DirectX, global hotkeys, use sql server ce base without having to turn the final product in the installer, work with a joystick, a quick search in the memory pattern using unmanaged code, and the like, not specific to the BASIC things.
Ever had a TON of pics that are jpegs and you asked yourself if only there was a way to make all these png files so hyperspin would read them? Look no further with this batch process. Just select the directory of your media. Select from bmp, emf, exif,gif,jpeg, png, tiff,wmf files to convert to or from those same format. Happy picture conversions!
Stick these in the Resource>backgrounds folder and watch your bordered wheels get created with ease
What CLRMame does is to check all of the individual rom files against a data file to make sure that they have the right information in them when you update mame
Tutorial also found here http://mame.3feetund...ck-start-guide/
Start CLRMAMEPRO
Read the welcome message dialog, then click "OK"
Click "Create..."
Click "..." next to filename and find your mame exe
Type a description like "MAME0138"
Click "Create Profile"
Click "OK"
select the new profile that you created
click "Load / Update"
Click "OK" and wait a while
Click "OK to All" or "Yes to All" on any window that pops up
Now you're at the main window
Click "Settings"
Click "Add" to add a ROM path
Browse to your MAME roms folder and click "OK"
It should now look like this with your ROM path
In the drop-down, pick "Sample-Paths"
Click "Add" to add a Sample path
Browse to your MAME samples folder and click "OK"
It should now look like this with your sample path
Click the X in the corner to close this window
Now you're at the main window again
Click "Scanner"
Click "New Scan" to scan your current MAME roms
If you get a popup about an empty samples folder, just click ok
Here's the statistics window
Click "OK" to close this window when you're done looking at it
Here's the results window, with one of the incomplete sets opened up so we can see what files are missing
Click the "+" button under "Fix", then click "New Scan" again
If you get popups, click "Yes To All"
Here's the statistics window after we fixed some problems
Click "OK" to close this window when you're done looking at it
To rebuild your rom set when adding new files, use the rebuilder from the main window
Select the source of the new files that you want to rebuild into your current set
Click "Rebuild"
This is useful when you have a set for an old version of MAME that you want to rebuild for a newer version of MAME
Here's the statistics screen from the rebuilding process
Armed with the knowledge above, you should be able to rebuild and scan/fix your MAME set.
Got a game that is just looking funky? This app allows you to automatically change the resolution for a game and it creates a shortcut. In theory you could for whatever reason have 3 shortcuts to the same game or more and each short cut has a different resolution. This was helpful for a game that refused to run at X resolution initially and a shortcut was made to start it in X resolution. Once the game closes, your computer returns to the original resolution
A collection of tools to enable CUE file renaming in order to match up with HyperSpin XML's
What's New in Version 1.05 (See full changelog)
•Fixed bug djvj discovered
•1.04
•Added support for GDI images
•1.03
•Proper handling of Named Pairings in CUE files (ccd/img/sub, ...)
•1.02
•Allow manual selection of MIA asset file in CUE
•1.01
•Bug Fixes & Code Refactor
•1.00 Original Release
Fotosizer is a free batch photo/image resizer tool. It lets you resize hundreds of photos in a matter of minutes in a quick and easy way.
This program was perfect for me when I was wanting to customize special C artwork. Most of you kill that option but I got genre icons, made them real small to fit in the top right corner of the screen, its like sick. I shrunk the genre art by using the option "custom size" in the app here.
Simply makes a txt file of all the missing roms that you don't have that your xml includes
A one click utility to change the windows shell to any application or front end and completely hide the windows environment.
Use at your own risk, if you have problems post on the forum, but make sure you understand what you are doing here.
What's New in Version 0.8 (See full changelog)
•13th November 2012 - Version 0.8
•◾A step forward with Windows 7. This version hides the Welcome.. and Shutting Down text
The article below was taken from the MAMEworld forums, in case it ever becomes lost.
In addition to the guide below I have developed a small application that automates all the process called InstantSheller. It allows you to one click shell GameEx or any other front end. It does “everything” in the guide below automatically. Its for Windows XP Service pack 2 and above, Vista and Windows 7 although for full functionality XP is required. It also requires the .net framework 2 service pack 1 or above. It now also features a one click ‘Undo’.
Use at your own risk, if you have problems post on the forum, but make sure you understand what you are doing here.
How to completely hide windows, and SHELL directly into a Front-End
Okay, I finally succeeded in hiding windows completely this morning. I’ll give you a quick heads-up!
The first thing that you need to do is get a CmdLine MAME up and running with a good FrontEnd. I use The Dragon King by Howard Castro (mainly coz’ it looks feckin’ awsome and it’s easy to skin! Also, it supports automated shutdown of Windows, YOU REALLY WANT THIS TO HIDE WINDOWS COMPLETELY!)
http://www.oscarcontrols.com/lazarus/
I run this setup under WinXP Pro, simply because the USB support is second to none, you’ll find out what I mean if you stick an I-pac into it! NOTE: this quick guide assumes you are using XP Pro, if not I don’t really know how accurate it will be!
Right, now you’ve got your actual emulator up and running, lets hide that OS!
***PLEASE NOTE*** THE FOLLOWING GUIDE COULD REALLY MESS UP YOUR SYSTEM! MAKE SURE THAT ALL OF YOUR ROMS AND ANYTHING ELSE THAT YOU WANNA’ KEEP HOLD OF IS SAFELY BACKED UP FIRST, I CAN’T BE HELD RESONSIBLE, SO DON’T COME CRYING TO ME!
Right, now that’s outta’ the way, on with the show!
Google for a cursor editing package (shareware will do, you’ll only be using it once!). Install and leave it for the time being. I used this one:
There’s two ways to get ride of that bootscreen. Use a package designed for it, or make your own.
1. The safest way is to get a program and screen from the net. If you’re not a fan of trial and serious error, this is the way to go, although if you create a custom skin for your FE, you may want them to match! Download BootSkin from Stardock:
http://www.stardock....ducts/bootskin/
And get a decent skin. Either google, or try this one:
After you install BootSkin, simply double click the downloaded skinfile and apply it. Simple!
2. The second method. Caution, SCREW THIS UP AND YOU MAY BE LOOKING AT A REFORMAT! REMEMBER TO BACK UP YOUR NTOSKRNL FIRST! Now download and install BootEditor. This will give you your custom boot screen. Be aware that you will certain runtime files for this! One of them that I can remember off the top of my head is CMDCTL32.OCX I think. Run the program in compatablily mode for Win2K and any errors will be reported on screen, then just google for the files you need.
http://www33.brinkst.../booteditor.zip
**UPDATE** I Just DL’d Ultimard I-Pac utility, and it seems like all the runtime files you need come with it! Just download and install! **Update**
http://www.andywarne...k/ipd_setup.zip
To create your bootscreen you will need a decent art package. Believe it or not I use Ulead PhotoImpact. Okay, it’s cheap, but it does for most of the basic stuff! The instructions included with BootEditor (you’ll find a readme in the extracted folder, FOR GOD’S SAKE, PRINT, READ, AND READ AGAIN! This can really screw your system up if you cock up!)
Once you’ve created an NTOSKRNL that you’re happy with (by the time you’ve got this far, you should know what I mean!), the only thing you have left to do is actually hide windows itself. Start by going into control panel\sounds and make sure that your default scheme is set to NOSOUND (silent). Open your cursor editor and create a cursor 1pixel in size, and in a dark colour (remember that you may need to be able too see it, a shade of gray will do). Export the cursor you’ve made with a name you can remeber, and place it in the \windows\cursors\ folder, we’ll be coming back to that later!
Now we’re going to disable the startup\shutdown screens.
Change from the default windows XP welcome screen to the older style by going to Control Panels>User Accounts>Change the way users logon or off. Deselect the “Use Welcome Screen” checkbox.
To get rid of the startup and shutdown messages, enter regedit (Start>Run>Type “regedit” without the quotes.). Using the tree on the left, browse through to the following entry:
HKEY_LOCAL_MACHINE >Software>Microsoft >Windows>CurrentVersion> Policies>System
If there’s a DisableStatusMessages dword there, change it to 1, otherwise add it (right click, add dword) and change it to 1.
Now you’ll have to change the background colour of the login screen. Even though you’ve disabled the login, the screen will still load up in blue as it laoding the personal settings. Again, this is a registry hack like before. Browse to the following entry:
HKEY_USERS>.DEFAULT>Control Panel>Colors>Background
The default value of this is an RGB value. For the sake of ease, if you change this to 0 0 0, you will get a black screen.
While you’re in regedit, here’s the final hack:
HKEY_CURRENT_USER \Software\Microsoft\Windows NT\CurrentVersion\Winlogon
Look for a string entry called ‘Shell’. If it is not there, create a string entry and name it ‘Shell’. Set the value of this entry to the name and location of your Front-end. For Dragon King, the shell entry may be “C:\MAME\The Dragon King.exe” or wherever your Frontends executable is located. To repair this if anything happs, bbot via safe mode, go into regedit, and change this value to “explorer.exe”. When you reboot, you will find that you enter windows, and not your frontend! Simple!
Right, now for the cursor! If this isn’t changed at the logon level, you’ll see the mouse cursor for around five seconds while windows loads your personal settings. This really spoils the effect! Download TweakUI:
http://www.systemsme...s/TweakUIXP.exe
NOTE: I got a newer version of this from MS and it was missing the option that I needed!
Once this is installed, go to Control Panel>Mouse>Pointers and change all of your cursors to the one that you created earlier. Save this scheme as “MAME Single Point Cursor Set” or something. Don’t apply this yet, it’ll make things bloody hard to do!
Right, the last thing to do is finish off making the cursor invisible. Go back to the cursor screen in control panel, load your scheme and hit apply. It’ll be hard to see your cursor, which is why I left this till last! Squint your way into your start menu and open TweakUI. Go to the LOGON option, and somewhere there is the option to copy your wall paper etc. across to the Logon Screen. Hit apply and you’re done!
Restart your machine, and you should no longer notice windows at all! The only thing that really gives it away is the status bar scrolling on the boot screen, but you can get rid of this using BootEditor, but I think it’s handy to have a guide as to whether or not the systems crashed! While you’re in the front end, if you need to revert back to windows, press CtrlAltDelete, enter the task manager (you will have you mouse back at this point, if you can see it, or simply use the keyboard), end your Frontends, click on New Task, and type in explorer.exe. Taa Daa! Windows! Simply navigate to control panel with your invisible cursor (once you hit the start
button things get easier!), and change your scheme back to the windows deault! Do your maintenance, and restart the machine. Back into your FE! Y ou like!?!
Well, that’s how I did it. I think that using TweakUI would be able to sort the screens out the same way as it did the mouse, but I haven’t tried it. If anybody has the time, creating something in VB to make this a ‘Tick The Box’ process should be quite easy I would have thought?
Whilst most of this was put into my own words,I can’t take credit for most of this guide, I found it whilst trying to do the same thing myself! The links were all active at the time of writing this. The original guide can be found here, as well as a full WIP report for a scratch-built cab. It’s indispensible! Check it out, sign the guestbook, and tell ‘im Ritchie sent ya!
http://www.upup.us/o..._09_01_old.html
If anyone has any corrections for this, PM me and I’ll edit the post, and give credit of course!
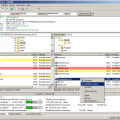
FileZilla Client is a fast and reliable cross-platform FTP, FTPS and SFTP client with lots of useful features and an intuitive graphical user interface. Website: filezilla-project.org
Features:•Easy to use
•Supports FTP, FTP over SSL/TLS (FTPS) and SSH File Transfer Protocol (SFTP)
•Cross-platform. Runs on Windows, Linux, *BSD, Mac OS X and more
•IPv6 support
•Available in many languages
•Supports resume and transfer of large files >4GB
•Tabbed user interface
•Powerful Site Manager and transfer queue
•Bookmarks
•Drag & drop support
•Configurable transfer speed limits
•Filename filters
•Directory comparison
•Network configuration wizard
•Remote file editing
•Keep-alive
•HTTP/1.1, SOCKS5 and FTP-Proxy support
•Logging to file
•Synchronized directory browsing
•Remote file search
Lunar Lander (Rev 2) (MAME)-80sgamer
Video Snap available from EmuMovies
Three Stooges In Brides Is Brides, The - 3stooges (MAME)-Unknown
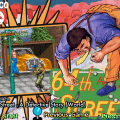
64th. Street - A Detective Story (World) - 64street (MAME)-Unknown
Video Snap available from EmuMovies