Leaderboard


Popular Content
Showing content with the highest reputation since 04/11/2015 in Posts
-
I will try to keep this guide up to date with the latest versions of HyperSpin and RocketLauncher. Also I'm adverse to making videos, because I don't want to make a new video every time something is updated, I find it easier just to edit a pic and text guide then recording a new video and editing links. All guides will assume you know how to navigate files and folders in windows. Translations Español - Admoroux This is for a new install. I'm assuming you know your way around folders and files in windows To download HyperSpin first you need to get the necessary support files from version 1.3.3 http://www.hyperspin-fe.com/files/file/5599-hyperspin-133-full-install/ and then overwrite with the contents from the beta http://www.hyperspin-fe.com/files/file/7500-hyperspin-14/ I'm gonna use the C drive in the examples. Any drive letter is ok Now extract the contents of the download to a HyperSpin folder on the root of your drive. Example: C:\HyperSpin The path to your HyperSpin.exe should now be C:\HyperSpin\HyperSpin.exe Now you need to get RocketLauncher which is a fork of HyperLaunch, but with more active development. Download it here. http://www.rlauncher.com/forum/downloads.php?do=file&id=1. The archive (zip) password is www.rlauncher.com Extract Rocketlauncher into a RocketLauncher folder on the root of your drive (C:\RocketLauncher) and make sure the path to RocketLauncher.exe is C:\RocketLauncher\RocketLauncher.exe and NOT C:\RocketLauncher\RocketLauncher\RocketLauncher.exe Get back in your HyperSpin folder. This time we are gonna do some manual ini editing . Open your Settings folder in your HyperSpin folder C:\HyperSpin\Settings. Find the file named Settings.ini, open it in notepad. You should see at the top a line that reads [Main]. Right up under the [Main] line add Hyperlaunch_Path= C:\RocketLauncher\RocketLauncher.exe Open your RocketLauncher folder (C:\RocketLauncher), now look for the RocketLauncherUI folder open it and then open RocketLauncherUI.exe. If you are having trouble opening RocketLauncherUI and you get some message about failing to initialize, you will need to download Microsoft .NET Framework 4.0 to get RocketLauncherUI to work. You will be greeted with a prompt asking you to update. Choose yes. Choose 'Latest' in the dropdown. Click on Check Updates at the bottom of the window. Wait for it to finish and then click Apply Updates. Close the update window. You can update in the future using the update button in the RocketLauncherUI tab (the update button looks like a globe with arrows.) You're thinking wow, so many settings this is too complicated. Well that's your fault for wanting lots of customization . RocketLauncherUI will probably restart wait for RocketLauncherUI to restart and then close RocketLauncherUI. Open your RocketLauncher folder (C:\RocketLauncher), now look for the Settings folder, open it and then rename Global Emulators (example).ini to Global Emulators.ini (Make sure you can see the extension: Known Extensions Are Set to Show) If there is already a file called Global Emulators.ini replace it with the example one. Open your RocketLauncher folder (C:\RocketLauncher), now look for the RocketLauncherUI folder open it and then open RocketLauncherUI.exe Look for the big tab on the right with the RocketLauncherUI image and click on it. Now look for a smaller tab called "Frontends" beneath the row of big tabs and click on it Click the green + under the small tabs and add a new frontend (here you can add different frontends like gamex or kodi). In the popup window titled Add Frontend: for the first blank, set the name to HyperSpin for the second blank, Click the Magnifying glass to the right and locate your HyperSpin.exe application. (C:\HyperSpin\Hyperspin.exe which should look like ..\..\HyperSpin.exe if you are following the guide) for the RocketLauncherUI plugin, choose Hyperspin in the dropdown box. for the RocketLauncher plugin, choose Hyperspin in the dropdown box. click on the button that looks like a blue floppy disk to save, if the button is not available just click the red x button to close and save the window. Highlight the HyperSpin frontend item in the list you just added and: click on the button that looks like a folder with a thumbtack (bulletin board pin) to set HyperSpin as your default frontend. (default frontend means RocketLauncherUI will always start up with this frontend) click on the button that looks like a robot terminator red eye to set HyperSpin as the active frontend. (active frontend means the frontend that you are currently working on in RocketLauncherUI) Look in the left near the top of the RocketLauncherUI main window for the words "Select a System" under it you should see a button that looks like two green arrows making a circle. Click on the circular green arrows button to refresh the systems list to match the active frontend. You can now close RocketLauncherUI or leave it open (you will need to open it later in this guide). Now to make full use of RocketLauncher we want to download the media pack. http://www.rlauncher.com/forum/downloads.php?do=file&id=2 Extract the contents of the media pack into your RocketLauncher folder (C:\RocketLauncher). Congrats you have now installed HyperSpin + RocketLauncher! You think you're done don't you, but you're wrong. There is still more to go. Gasp. We don't have any emulators yet. Ok then let's try to set one up, how about we do the most popular one. MAME Download the binary unless you plan on compiling your own version. (there are some benefits to compiling, hiscores and nonag being the most popular) Now let's create a new folder on your root drive called Emulators. C:\Emulators -this is not required but it is recommended Now inside this folder create a new folder named after the emulator called MAME. C:\Emulators\MAME Now inside your emulator folder install MAME. So the path to your mame.exe or mame64.exe should be C:\Emulators\MAME\mame.exe Congrats you have installed an emulator. Now to get it working with RocketLauncher and ultimately HyperSpin. Open your RocketLauncher folder (C:\RocketLauncher), now look for the RocketLauncherUI folder open it and then open RocketLauncherUI.exe On the left hand side in RocketLauncherUI you will see a list of all our systems and at the top is a system called Global (not actually a system in HyperSpin). Changing settings in Global affects all of your settings in every system. Consider this the default settings. Ok now highlight the Global System and click on the big tab Emulators. If you installed correctly (didn't skip steps like step 9) you will be greeted with a long list of emulator names. Scroll down this list until you find MAME. Double click on it. A new window will appear. Fill in the path value by clicking on the magnifying glass to the right of the path entry and find your MAME emulator. Close this window if the values for module and rom extensions are already filled. Now highlight the MAME system in the systems list. and click on the big tab Emulators. Add the path to your MAME roms in the rom paths field by clicking on the green plus button. For most mame installations it's in the same folder as mame.exe in a folder called roms. C:\Emulators\MAME\roms For other systems, I personally put roms in a folder separate from hyperspin and the emulator folder, something like C:\Games\systemName\gameName.extension ROMS are not included with MAME or HyperSpin or RocketLauncher. Do not ask for roms on this forum, it will get you banned. Google is your friend for this. Now back in RocketLauncherUI choose your default emulator by clicking on the Magnifying glass. Choose MAME [global] from the list that appears. Congrats! you have now setup MAME within RocketLauncher. Now to setup MAME for use with HyperSpin. First get the latest MAME xml from HyperList http://hyperlist.hyperspin-fe.com/ Drop the xml you downloaded into C:\HyperSpin\Databases\MAME\ and rename it to MAME.xml. If it asks you to overwrite, choose yes. XML management can be a pain and so can renaming all those roms that you legally copied from your personal collection of actual games that you legally acquired through legal purchases. For emulators other than MAME or MESS you will need to make sure that the file names for your roms match the names for the games found in your xml. For the best hyperspin xml management and renaming applications use Don's HyperSpin Tools or check out the beta version of HyperTools.zip (thanks, emb). I think that's it for a basic installation. It will be hard and time consuming to get artwork and videos until you subscribe to emumovies and receive platinum status here by donating. Oh wait I almost forgot, whenever any one says edit your module settings they usually mean open RocketLauncherUI click on your system, click on the big modules tab, highlight the module you are using, and then click on the Edit Global Settings button. A little bit more info can be found here & here. If you liked this guide and want to say thank you, hit the like button at the bottom of this post. Hyperspin and RocketLauncher Compatibility Fix.zip143 points
-
Hey everyone! First off, a huge thank you to everyone who reported bugs, shared comments, and threw in suggestions over the past week. I’m doing my best to keep up, but it’s clear we’ve got an amazing group of testers who are leaving no stone unturned. You all rock! So, it’s been a week—where’s the next beta?! Well, here’s the scoop: we went back to the drawing board on the cache system. Based on your feedback and the discussions here, we realized we needed something more robust and foolproof. The good news? The updated cache system is in internal testing right now. During the final round, we uncovered a few extra things that need fixing before it’s ready to roll out. While we expect a few hiccups here and there, our goal is to have fewer issues than the current build. That’s why we’re holding off until next week. Here’s what you can expect in the new beta: No more _cache folder—saving you time and disk space. No waiting for cache rebuilds in the wheel manager. Faster cache rebuilds—our early metrics show it’s taking about 2 seconds per system. Smaller, more efficient cache files with better performance. Full support for overrides in the cache. We’re aiming for a Friday release! I’ll be out of town for a work event (yes, I’d rather be here with you all, but bills don’t pay themselves). While I’m away, the team will be wrapping up some final bugs in both HQ and HyperSpin. Here’s a short list of what’s on their plate: Wheel images show instead of text where possible in the system view. Custom system support: bypass match-making and add whatever you want. Name your system during the setup wizard. Steam updates to support more media. Fixed the default themes download bug. Auto-login added for EmuMovies when you get logged out. Option to remove collections in the manager. HQ update dialog no longer gets blocked by downloads. Bugfix for the plugin system to improve HyperSpin updates. Bezel project patch applied for smoother functionality. And let’s not forget our incredible content creators—they’ve been absolutely crushing it. If you haven’t already, check out @RetroHumanoid's latest themes—they’re amazing! And a massive shoutout to @baddeolvfor his work on the default HyperSpin set. He’s been tirelessly covering almost every core system we support, and the results speak for themselves. Plus, we’ve got a few new artists jumping in and experimenting with the updated toolset. The feedback and the flood of stunning new themes are a joy to see! After the next release, we’re diving into updates for the theme builder, focusing on bug fixes and workflow enhancements to make it even smoother. Future releases of the theme builder will introduce support for shaders, groups, and so much more. I can’t wait to get started! As always, thanks for all your support, feedback, and enthusiasm—it’s what keeps us going. Can’t wait to see what’s next! Stay awesome, -fr0stbyt3
 23 points
 -
Hey yall! Welcome to our new Hyperspin! For anyone who used/uses Launchbox,I am sure you might have heard of the theme I created back in 2018 called Unified Refried. It is currently the 2nd highest downloaded theme for LB,only sitting under City Hunter 2,which was released over a full year before it,at a time where custom themes were not rampant. Refried covers over 220+ systems,each with HQ artwork,creating a unified and colorful look across all platforms,while also looking professional. Despite how long this is going to take me (and it will) I have decided to bring that theme over to Hyperspin! I will gradually be adding more and more to it in HyperTheme during this beta period,and hope that users will download,and enjoy using it in their setups. Any and all constructive criticism,or suggestions is always welcome. Hyperspin Refried Main Menu Theme - Hyperspin Refried Game Theme -
17 points
-
First off, a huge thank you to everyone who’s been testing, reporting bugs, and sharing feedback. Your input has been invaluable, and I really appreciate the patience as we work through everything. I know we didn’t have a launch last week, and I wanted to address that. Some core systems—especially the cache system and UI updates—needed more work before they were ready. Rather than pushing out something unfinished, we took the extra time to make sure things were in a better state before releasing. It’s still a beta, so expect some rough edges, but we feel this build is in a much better place than it would have been last week. Over the past two weeks, we’ve overhauled the UI in all settings pages, made system setup smoother, optimized downloads, and added MUGEN support. You can now add multiple systems at once, pick multiple folders when selecting game directories, and we’ve made major improvements to cache handling, controller support, and error logging. Here’s what’s new: HyperHQ RetroArch Core Selector – No more manual typing! Select the core from a dropdown, and we’ll handle the command. For customization, click Advanced. System Setup Improvements – Automatically creates all override folders when adding new systems. New System Support – Added support for systems without a complete game list. Media Sounds Bug Fixed – Prevented duplicate downloads. Download Improvements EmuMovies video downloads are now optimized. Fixed issue where new downloads were not set as active. ROM Management Fix – Deleted games will no longer reappear. New Refresh Option – Added the ability to refresh overrides. MUGEN Support Added – Clear your system cache in the cache menu for the best experience. Updated System Add Component – Now supports adding multiple systems at the same time. Updated LED Blinky Support. Fixed Launching Error Logs. Multiple Folder Selection – Now possible when selecting game folders. Cache & Log System Improvements Updated Cache Service – Dozens of tweaks to fix corruption and errors. Updated Log System – More logs added for cache tracking. Updated UI for Cache Page – Improved settings menu for better navigation. UI Updates Updated UI for All Settings Pages – Improved design, layout, and usability across all settings menus. Updated UI for Intro & Outro Videos – Enhanced layout and functionality. Updated Plugin Page UI – Improved design and usability. HyperSpin Controller Fixes – Resolved issues where the main menu wasn’t responding to controllers. HyperTheme ThemeBuilder Fix – Fixed a double-select error. Profile Management Fix – Resolved errors when deleting a client. Collection Theme Errors Fixed – Various improvements for a smoother experience. In the Works: Revamped Controller Support One of the biggest things we’re working on right now is revamped controller support with direct HID input control. The goal is to eliminate the remaining controller issues and provide a more seamless, native experience. This is still in development, but early testing looks promising. More details soon! Thanks again for all your support, testing, and feedback. I know waiting an extra week for this one wasn’t ideal, but we wanted to make sure things were in a better place before pushing it out. As always, let me know if you run into anything, and we’ll keep making it better. Happy gaming!
15 points
-
Hello everyone! We’ve been hard at work through May bringing a slew of updates and improvements to ThemeBuilder, HyperSpin, and HQ. Below is a complete roundup of what’s new, improved, and fixed this month. 2025-05-23 19-10-20.mp4 New Features Flipbook Effect – A brand new way to animate your themes with classic flipbook-style visuals. Ripple SFX – Ripple effect is now live with adjustable settings. New Special Effects – Now available in ThemeBuilder: Circle Reveal Left Reveal Right Reveal Top Reveal Bottom Reveal (center out) Swipe Rays Stripe Forum Auto-Posting (Coming Soon) – Publishing on HT will soon automatically post your theme to the forums with a direct link. Sharing made simple! User Profile UI Overhaul – Cleaned up and modernized user profiles. Log Out Button is Back – Back by popular demand! Improved Caching Logic – Moving between themes is now significantly faster. Fixes MAME Themes Fix – You’ll need to edit the metadata, reselect the game name, and re-save & publish for fixes to take effect. Fixed Stroke Loss on Video Reload Fixed Errors in Older Themes Fixed Preview Pixelation When Adding SFX Fixed Theme Asset Duplication Fixed Long Load Times on Large Themes Fixed Project Load Errors for Many Older Themes Fixed Theme Delete Bug – Deleting a theme now correctly targets the selected project. Improved Logging – Better server-side logging helps us squash bugs faster. Improvements Delete Animation Moved – It now appears at the bottom of all effects for better UX. Ripple SFX Fully Live – After a preview period, it's now fully integrated. HyperSpin v2.0.41 – Now supports all the latest ThemeBuilder features and special effects. HQ Now Supports MAME 0.277 Thank you to @yaron and his team for some brilliant suggestions and to the community for your continued support and feedback. Let us know what you think of the new features and stay tuned – more great things are on the way! Don’t forget to edit, re-save, and re-publish your MAME themes to apply the latest fixes! @rondar and @Roadrunner have been busy too! Aliens_Extermination.mp4 RoadBlasters_Arcade (1).mp4 Blazing_Angels.mp4 Radikal_Bikers (1).mp4 bandicam_2025-05-12_13-14-20-407.mp4 bandicam_2025-05-23_15-49-44-529.mp414 points
-
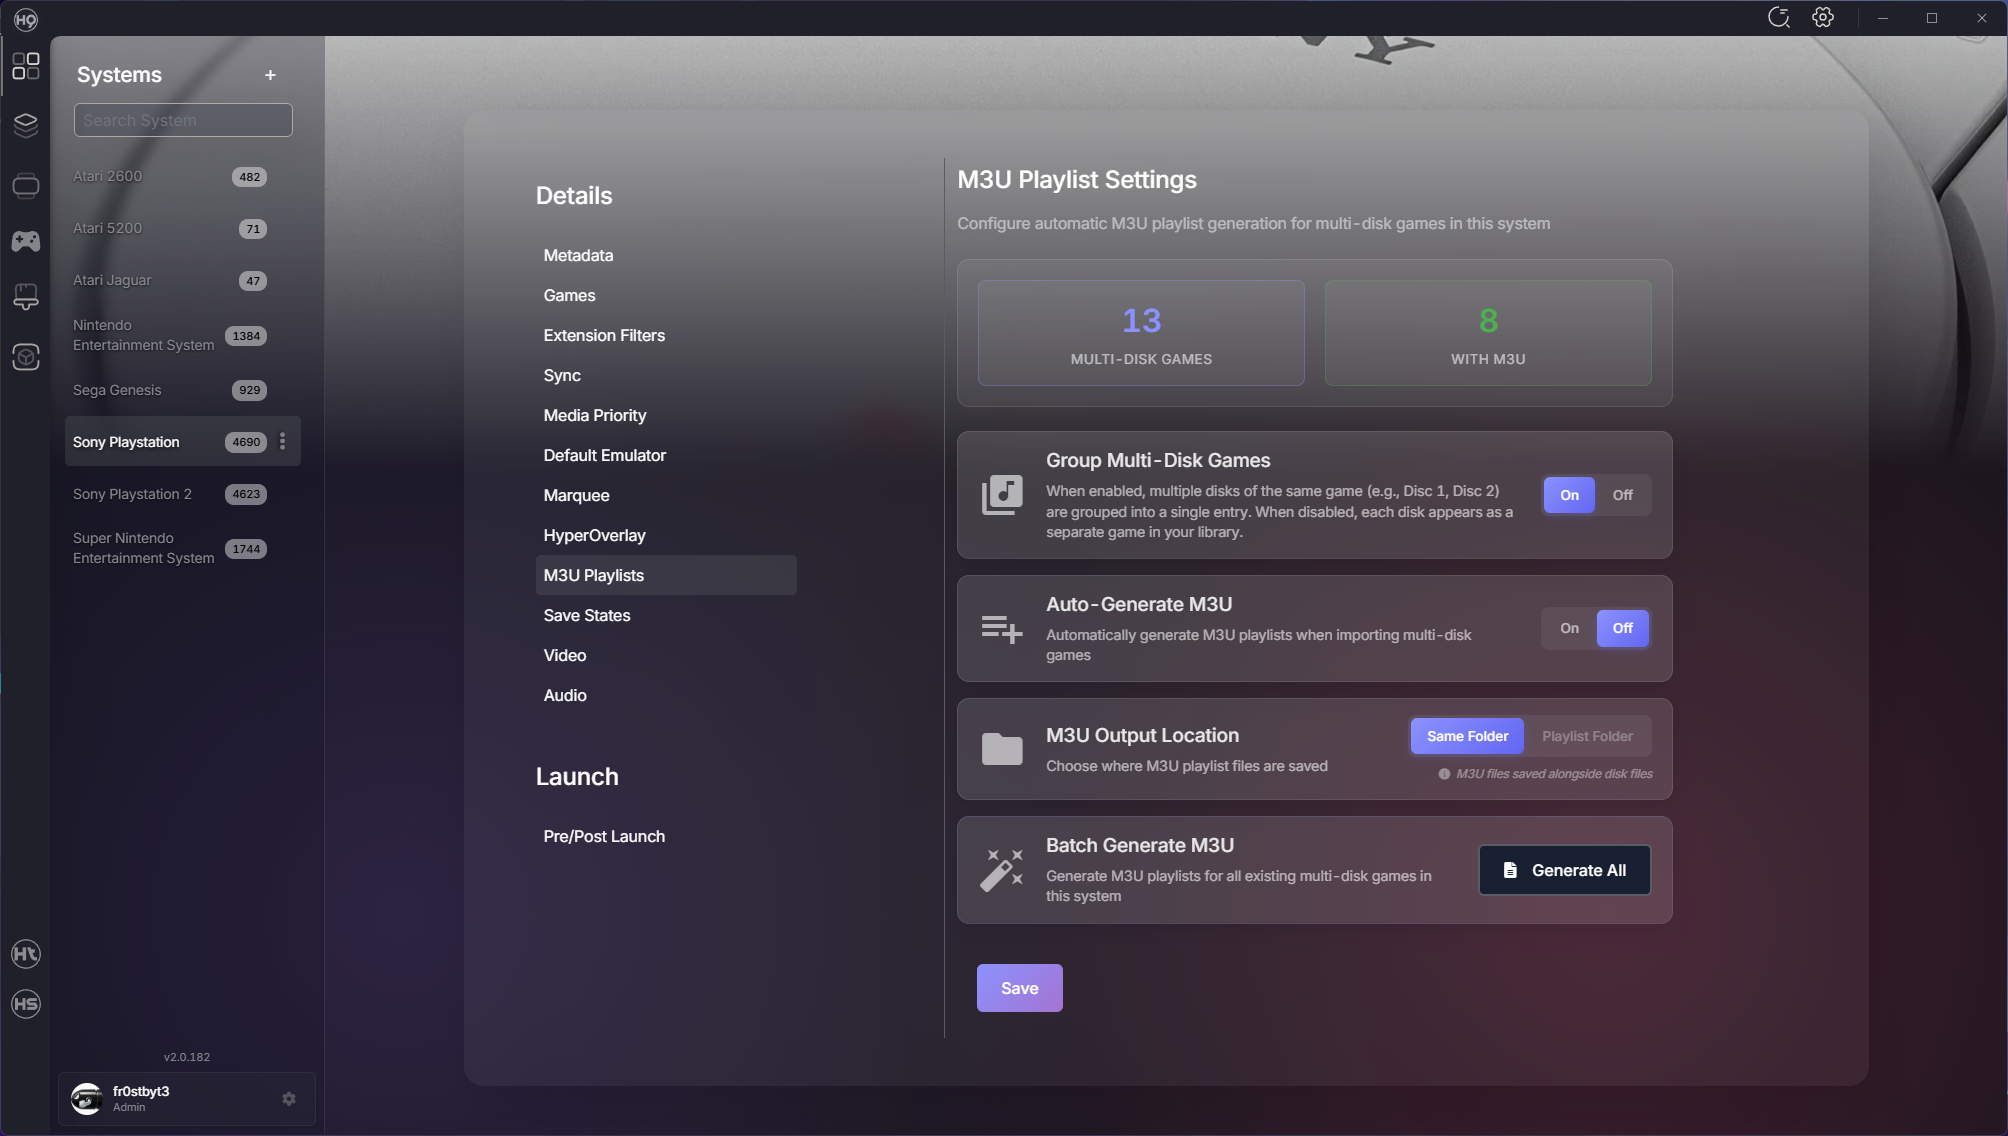
Hey everyone! We've been heads-down shipping improvements across the entire HyperSpin ecosystem over the past few weeks. This update spans 20 days with over 260 commits and 50+ merged PRs bringing major new features, performance enhancements, and quality-of-life improvements. Whether you're managing a massive collection or just getting started, there's something here for you. Let's dive in! Media Audit Screen Managing media for hundreds of systems just got easier. The new Media Audit Screen gives you complete visibility into what you have and what's missing. Features: Visual comparison of available vs. missing media Drag-and-drop upload for bulk media additions Real-time status tracking across all media types Organized by system for easy management No more guessing which games are missing artwork — it's all right there. System Import Overhaul We completely redesigned how you import systems with a queue-based approach that's faster and more reliable. Improvements: Progress tracking shows exactly what's happening Re-import skipped systems without starting over Automatic BIOS detection in emulator directories Better error handling and recovery The import flow now handles edge cases gracefully and keeps you informed every step of the way. Multi-Disk Game Support Games spanning multiple discs (like PS1 RPGs) now have first-class support with automatic playlist generation and management. New Capabilities: Automatic playlist creation for multi-disc games Multi-disk grouping settings Automatic ROM extraction before launch Switch between discs seamlessly without manual playlist editing Better Game Metadata HyperSpin can now pull game metadata from additional sources, giving you more complete and accurate game information. What This Means: Fuzzy search finds the right game even with typos Automatic metadata sync from trusted sources "Search For Match" added to game context menus Your game library stays up-to-date with accurate metadata from the community Performance Enhancements We've made significant improvements to how HyperSpin handles rendering and background operations. What's Faster: Sidebar system list loads instantly Boxart rendering redesigned with smart lazy loading Smooth scrolling even with thousands of games Background operations optimized to not block the UI Reduced memory usage for long-running sessions Everything feels snappier, especially when working with large collections. HyperTheme Updates ThemeBuilder continues to evolve with better tooling and compatibility. What's New: Improved layer management (no more accidental reordering) Drag-and-drop enhancements for easier theme building Better positioning controls Theme Player: Fixed layer management for complex themes Smoother hover animations Background system integration for system themes Fixes & Stability ROM counts now update reactively and stay synced across the UI RetroArch auto-setup registers platforms and downloads cores reliably BIOS detection improved MAME wizard no longer gets stuck at 10% Game artwork updates immediately after downloads Theme downloads reconnect properly if the connection drops Fuzzy search for system names handles typos Improved emulator availability checks Thank You A huge thank you to everyone who's been testing, reporting bugs, and sharing feedback. Your input has been invaluable in making these releases better. We've got more great things in the pipeline. Keep the feedback coming! — fr0stbyt3 & The HyperSpin Team
13 points
-
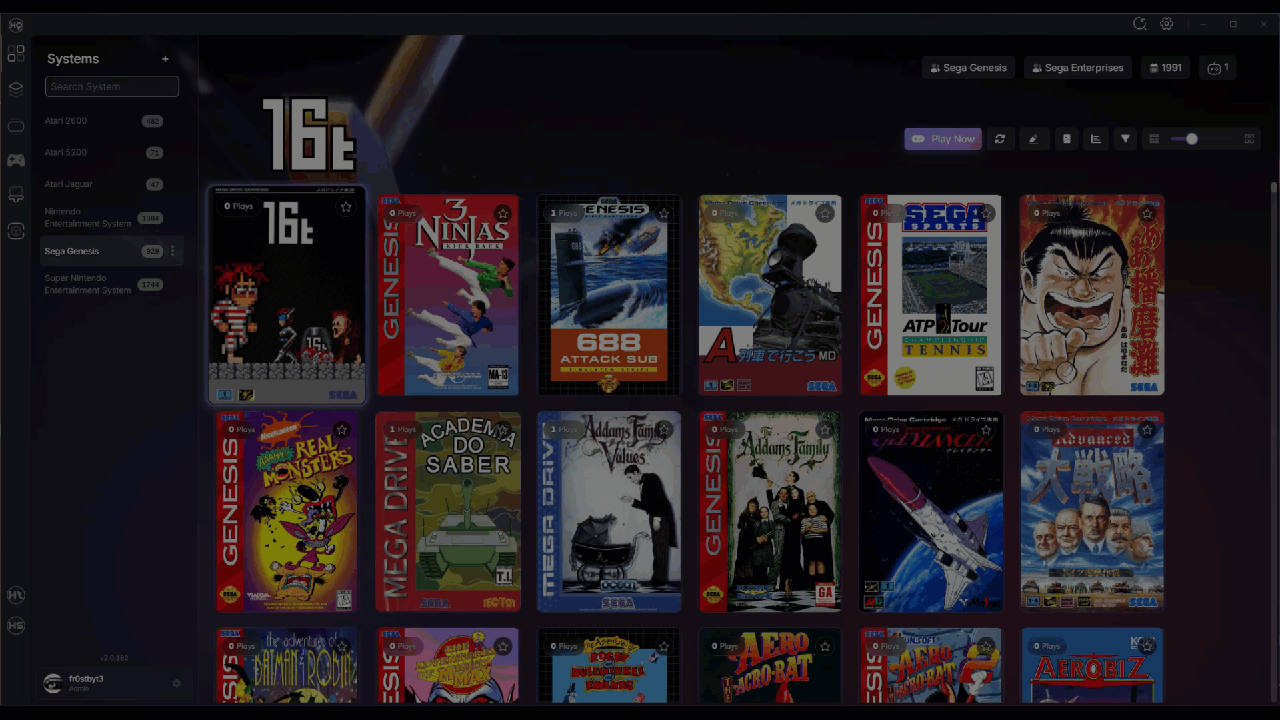
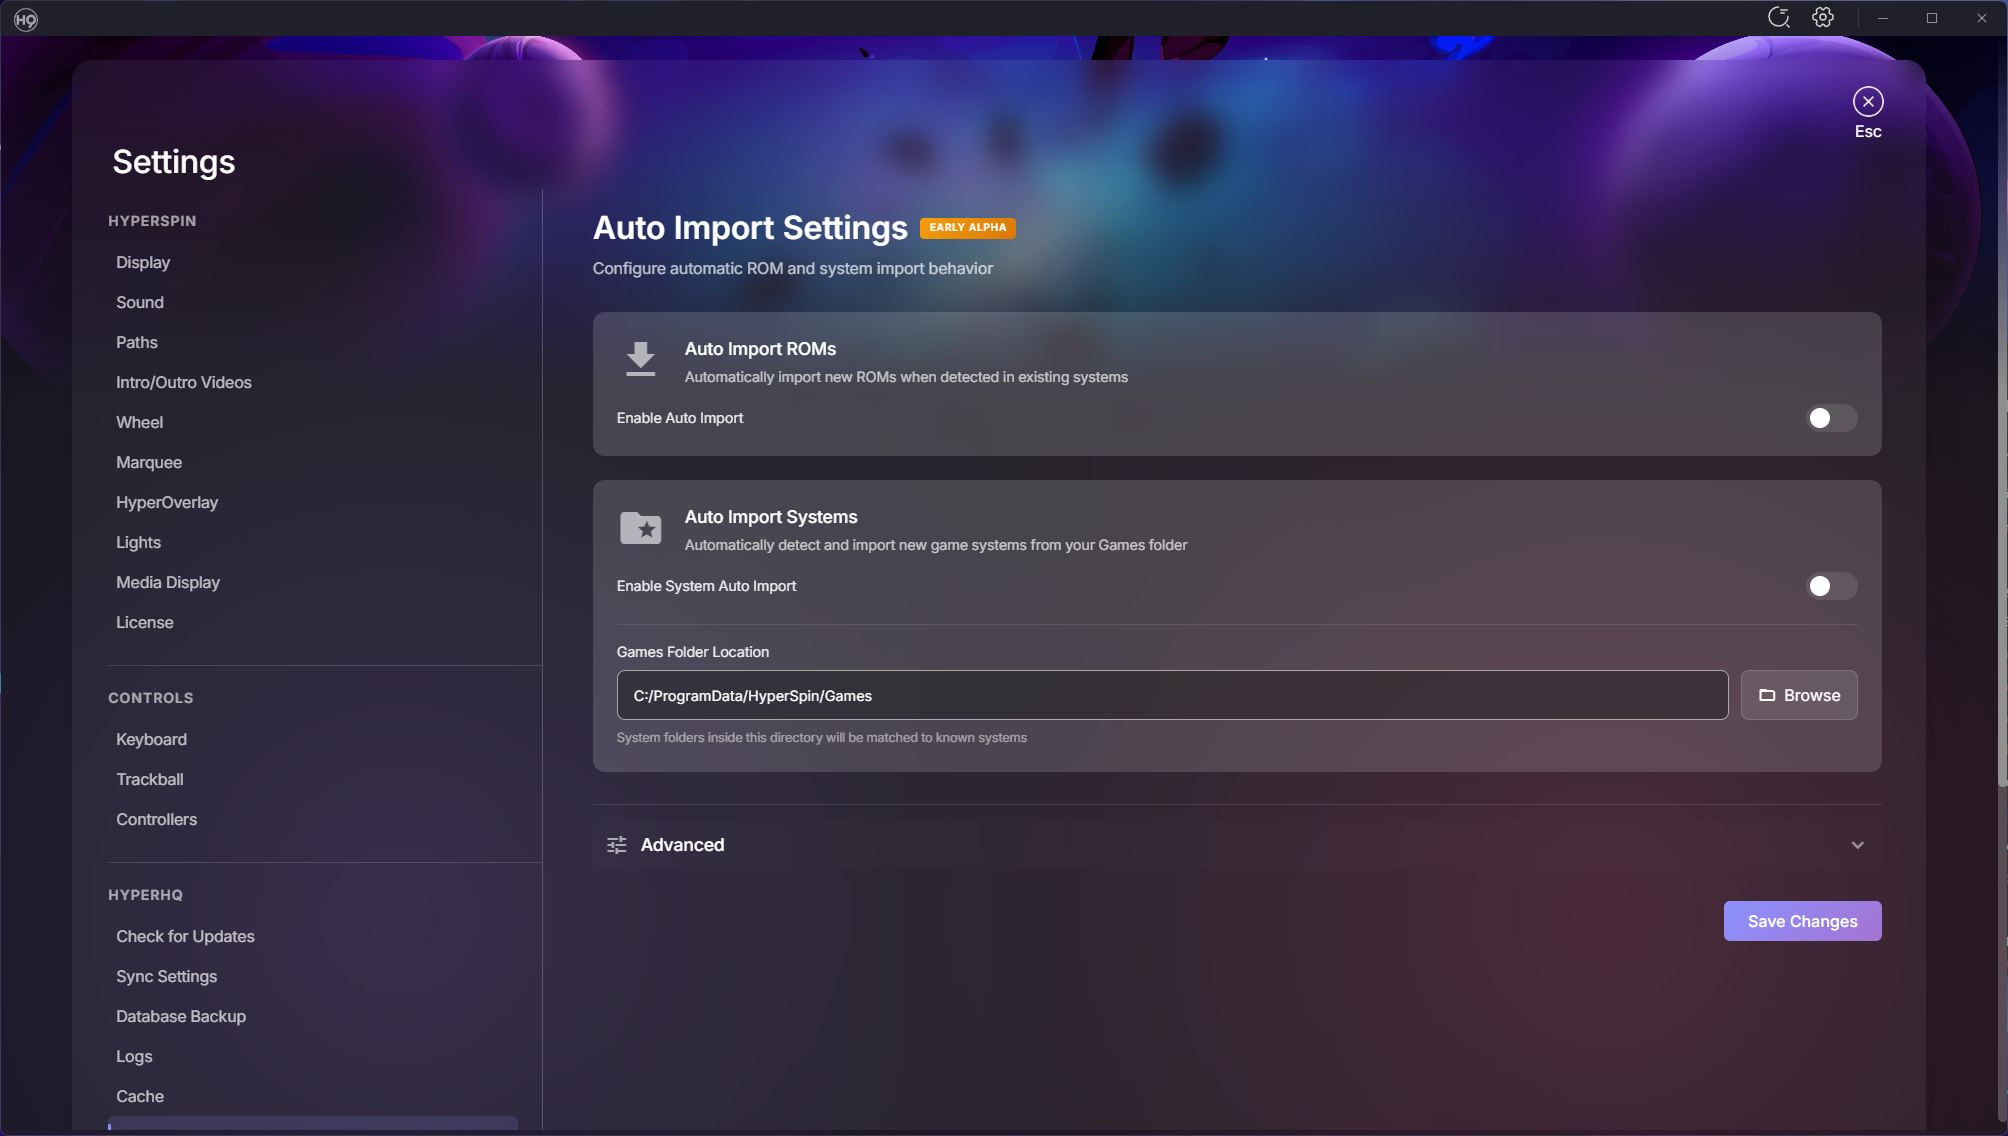
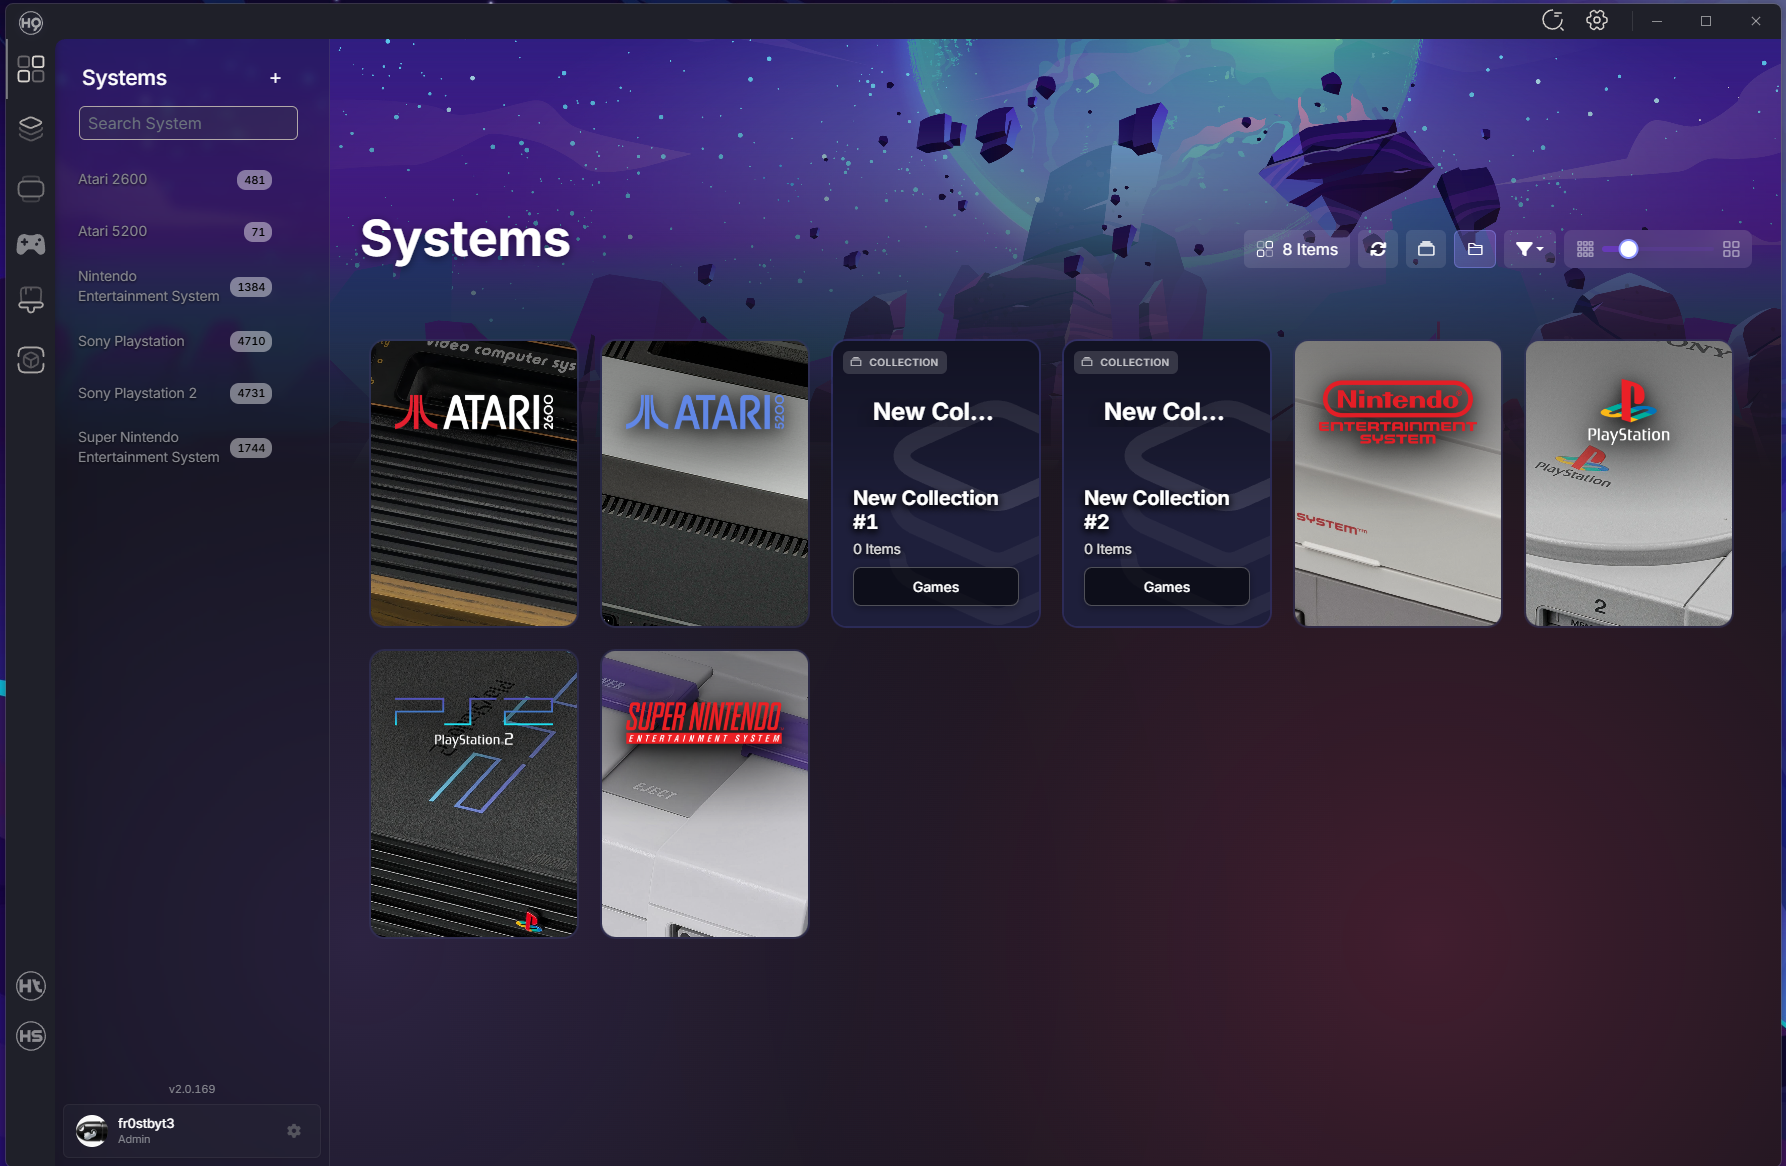
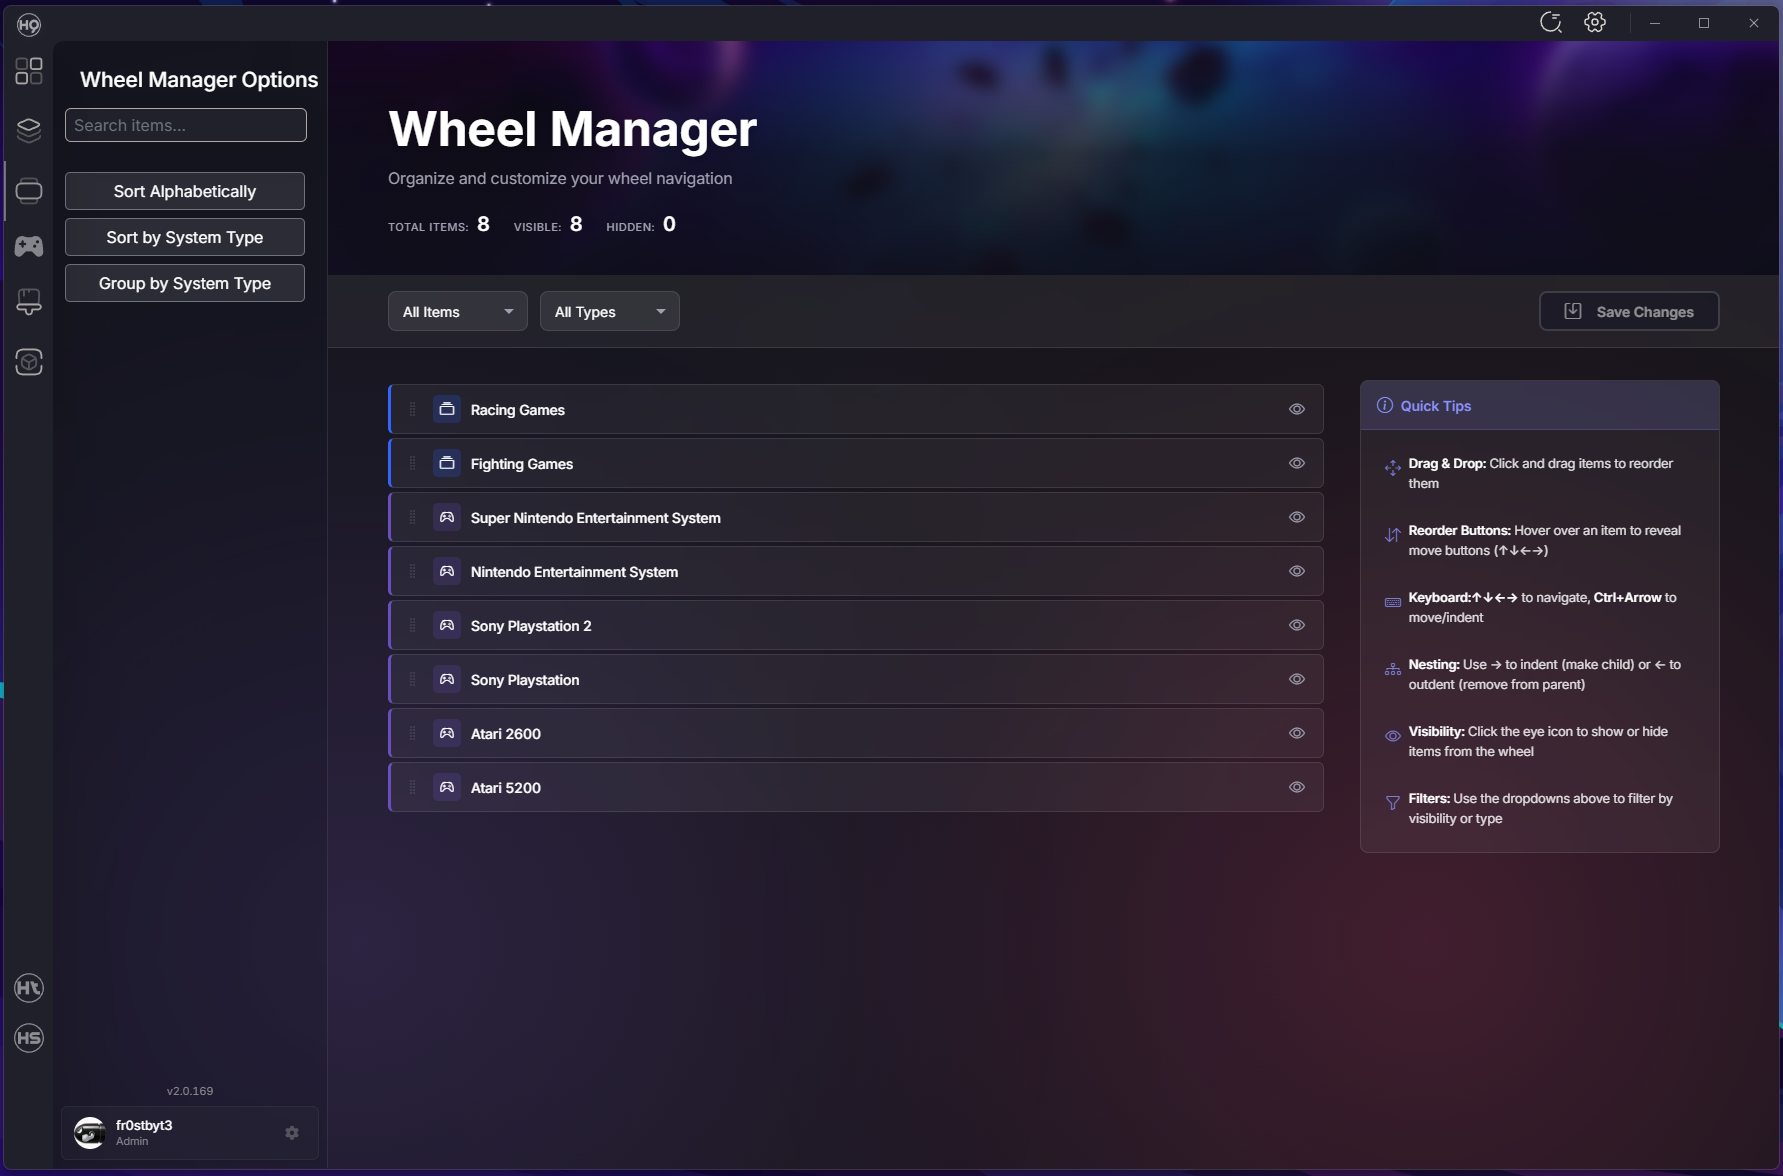
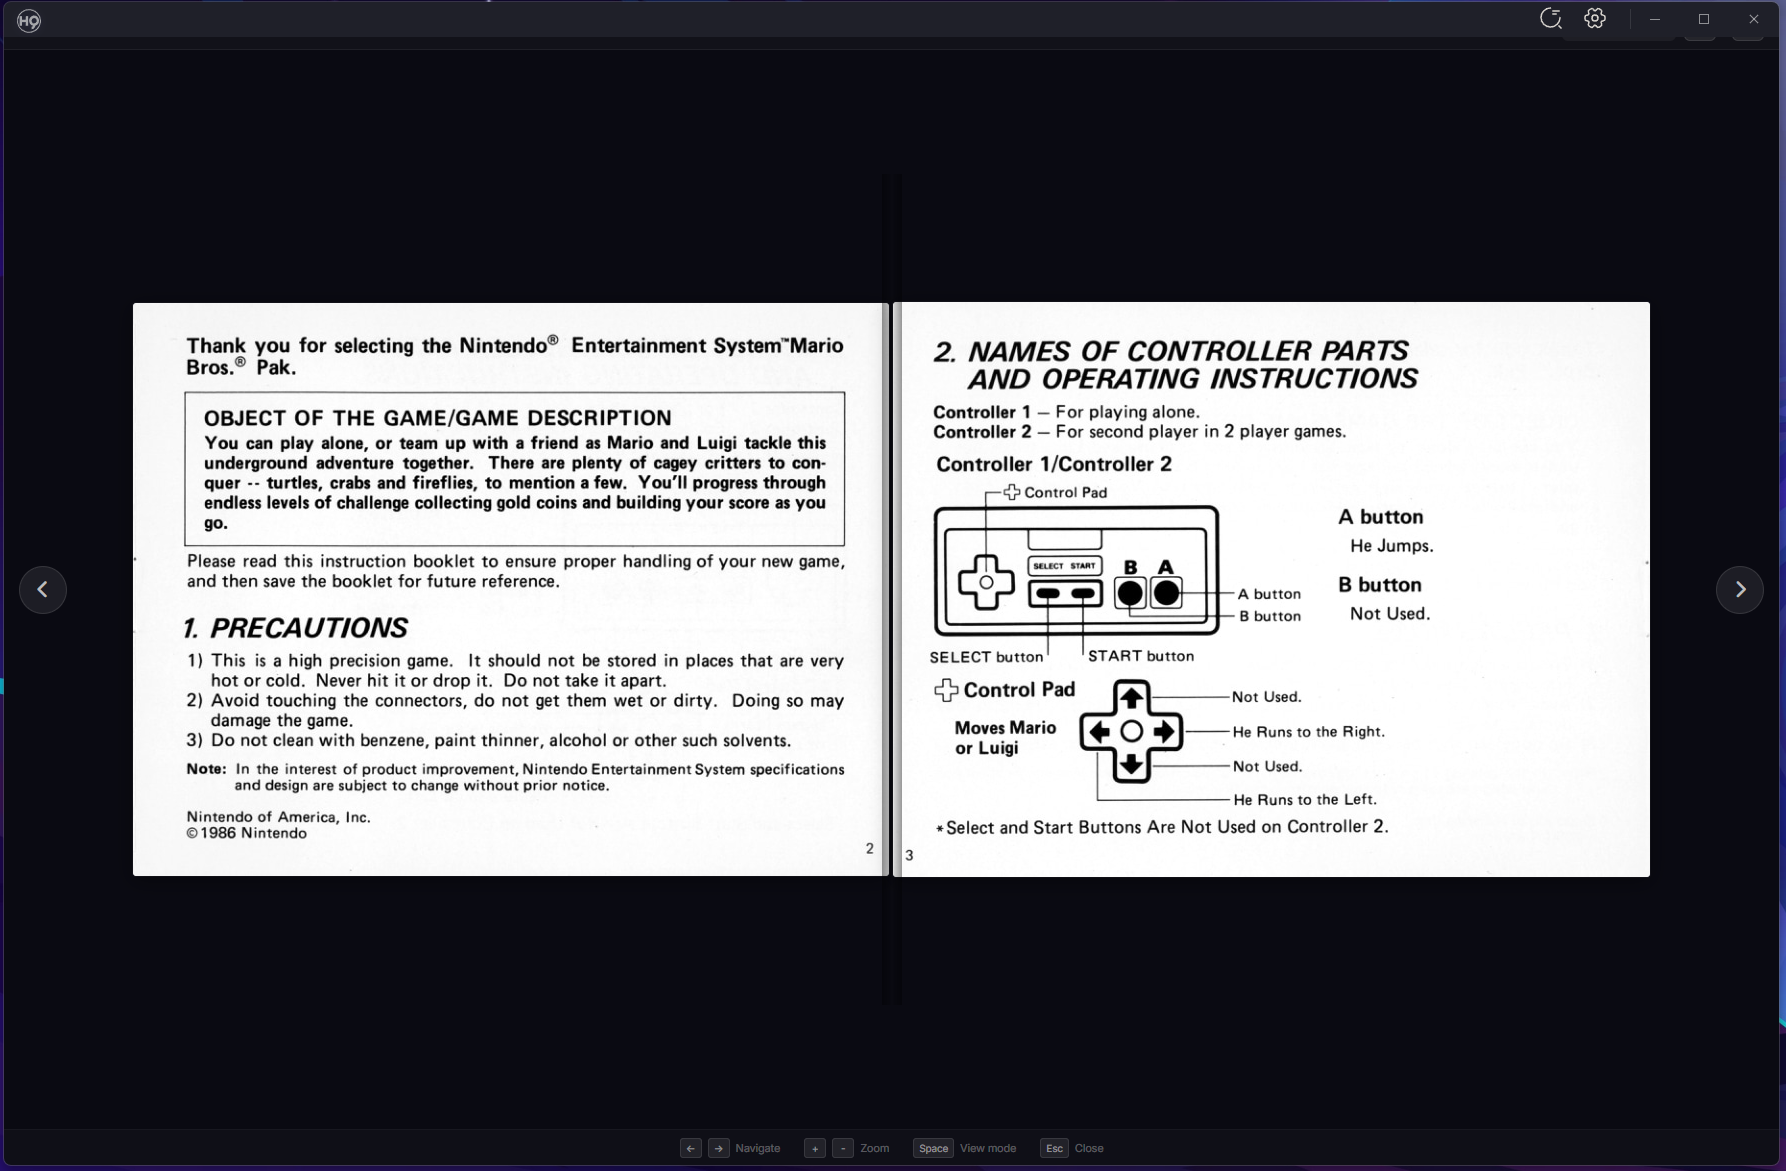
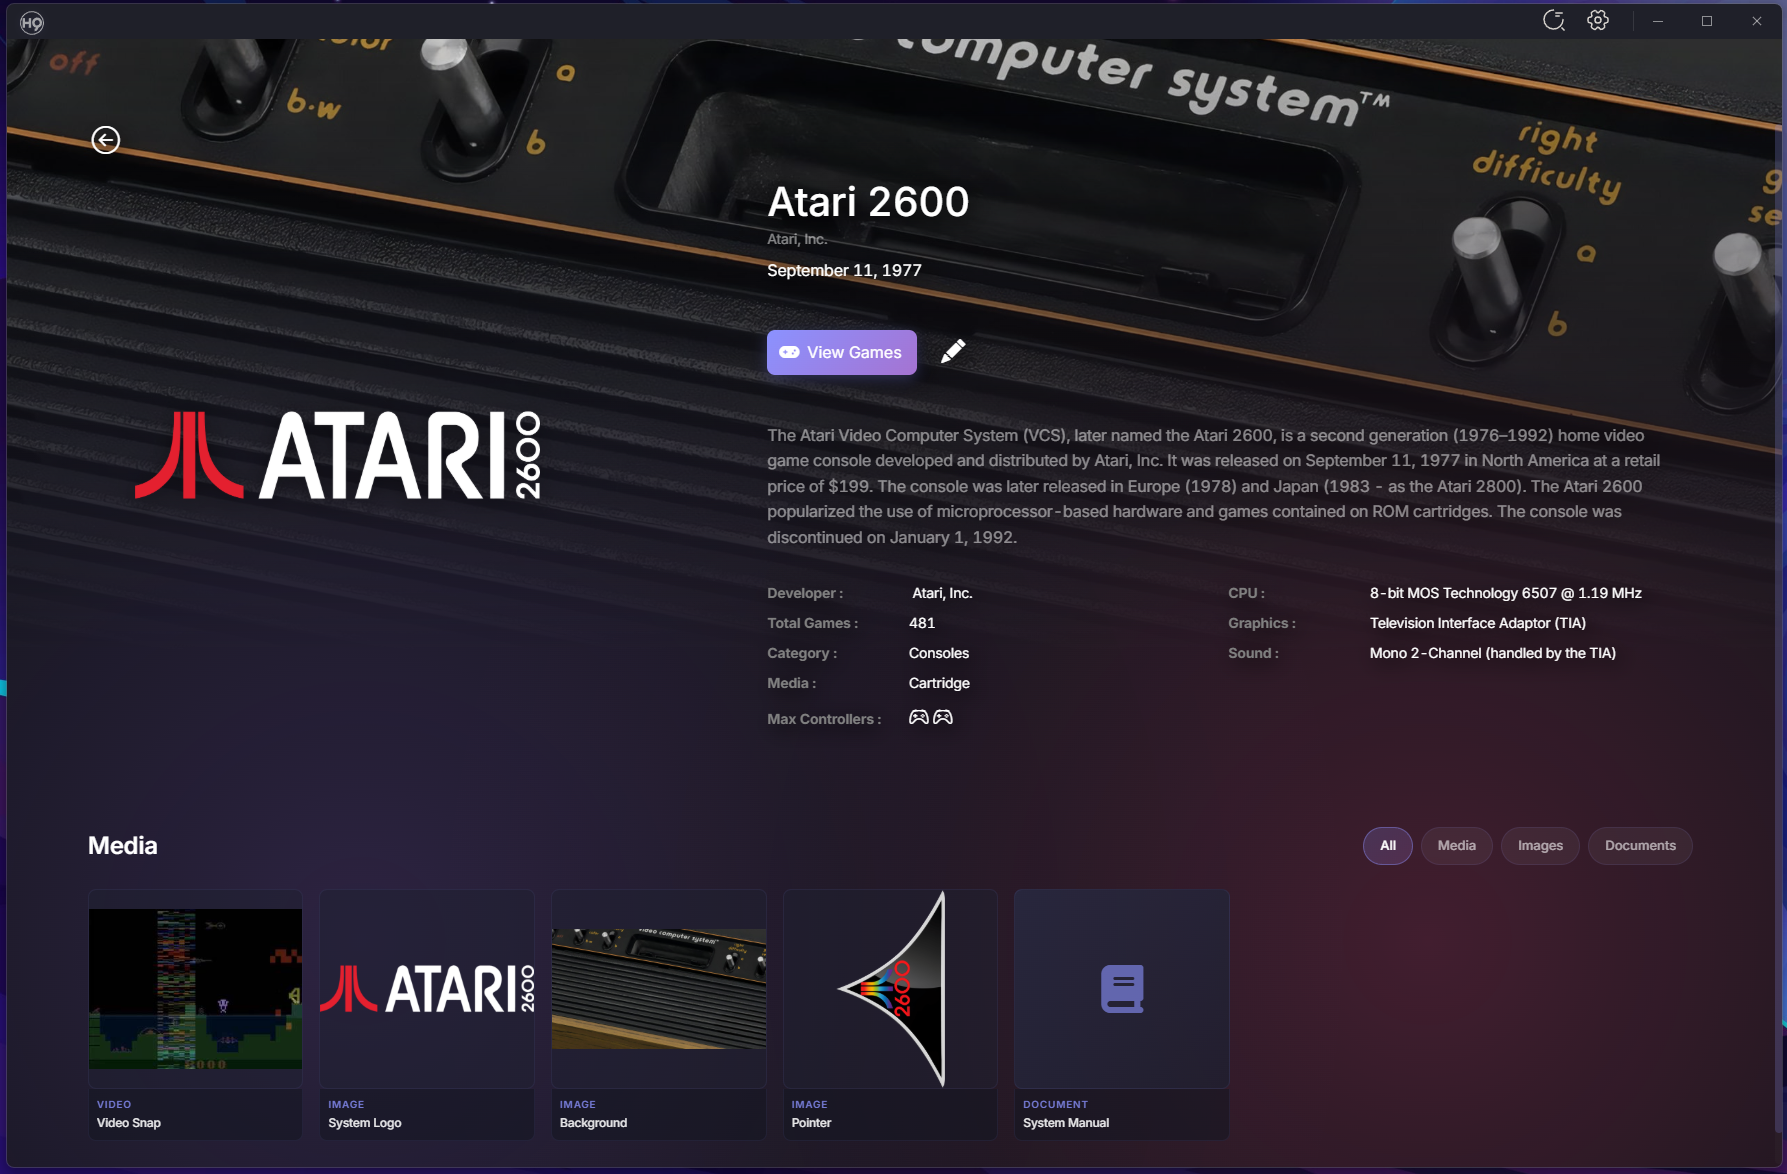
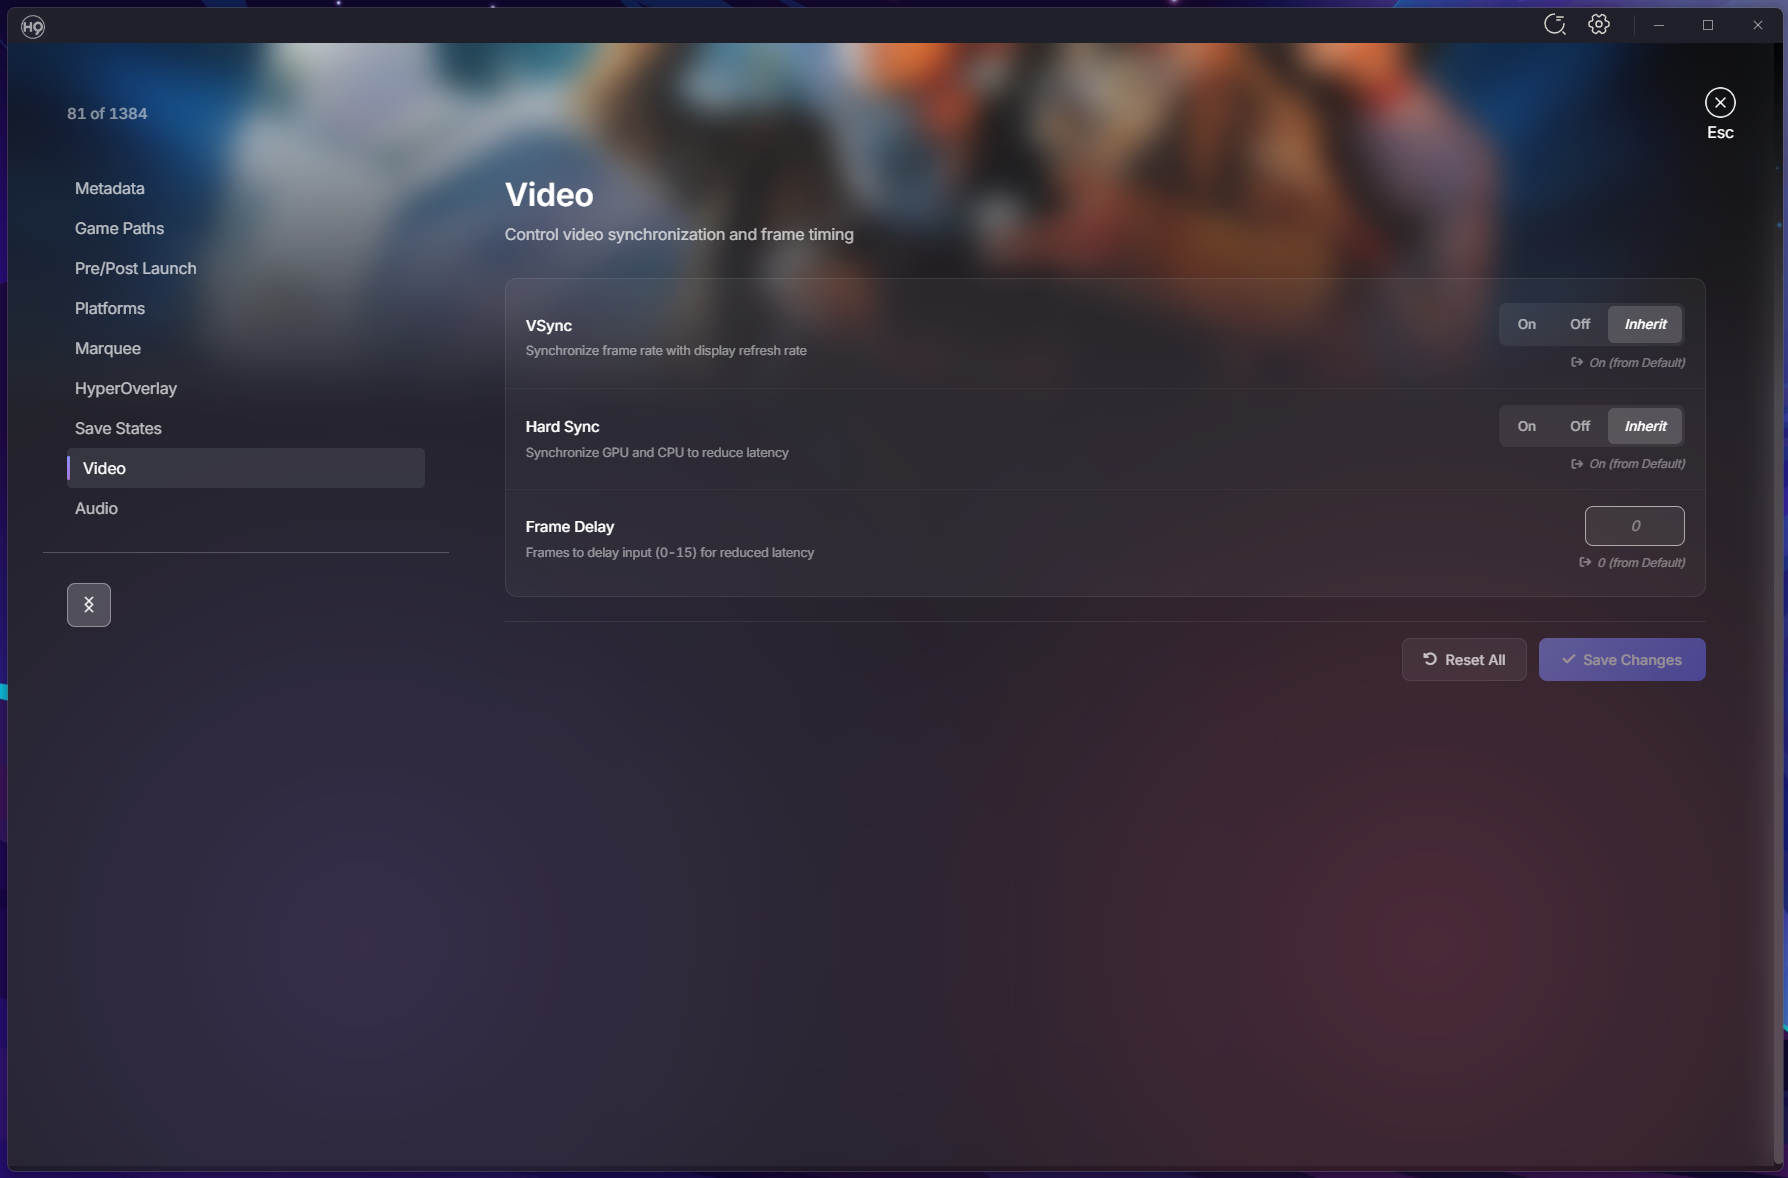
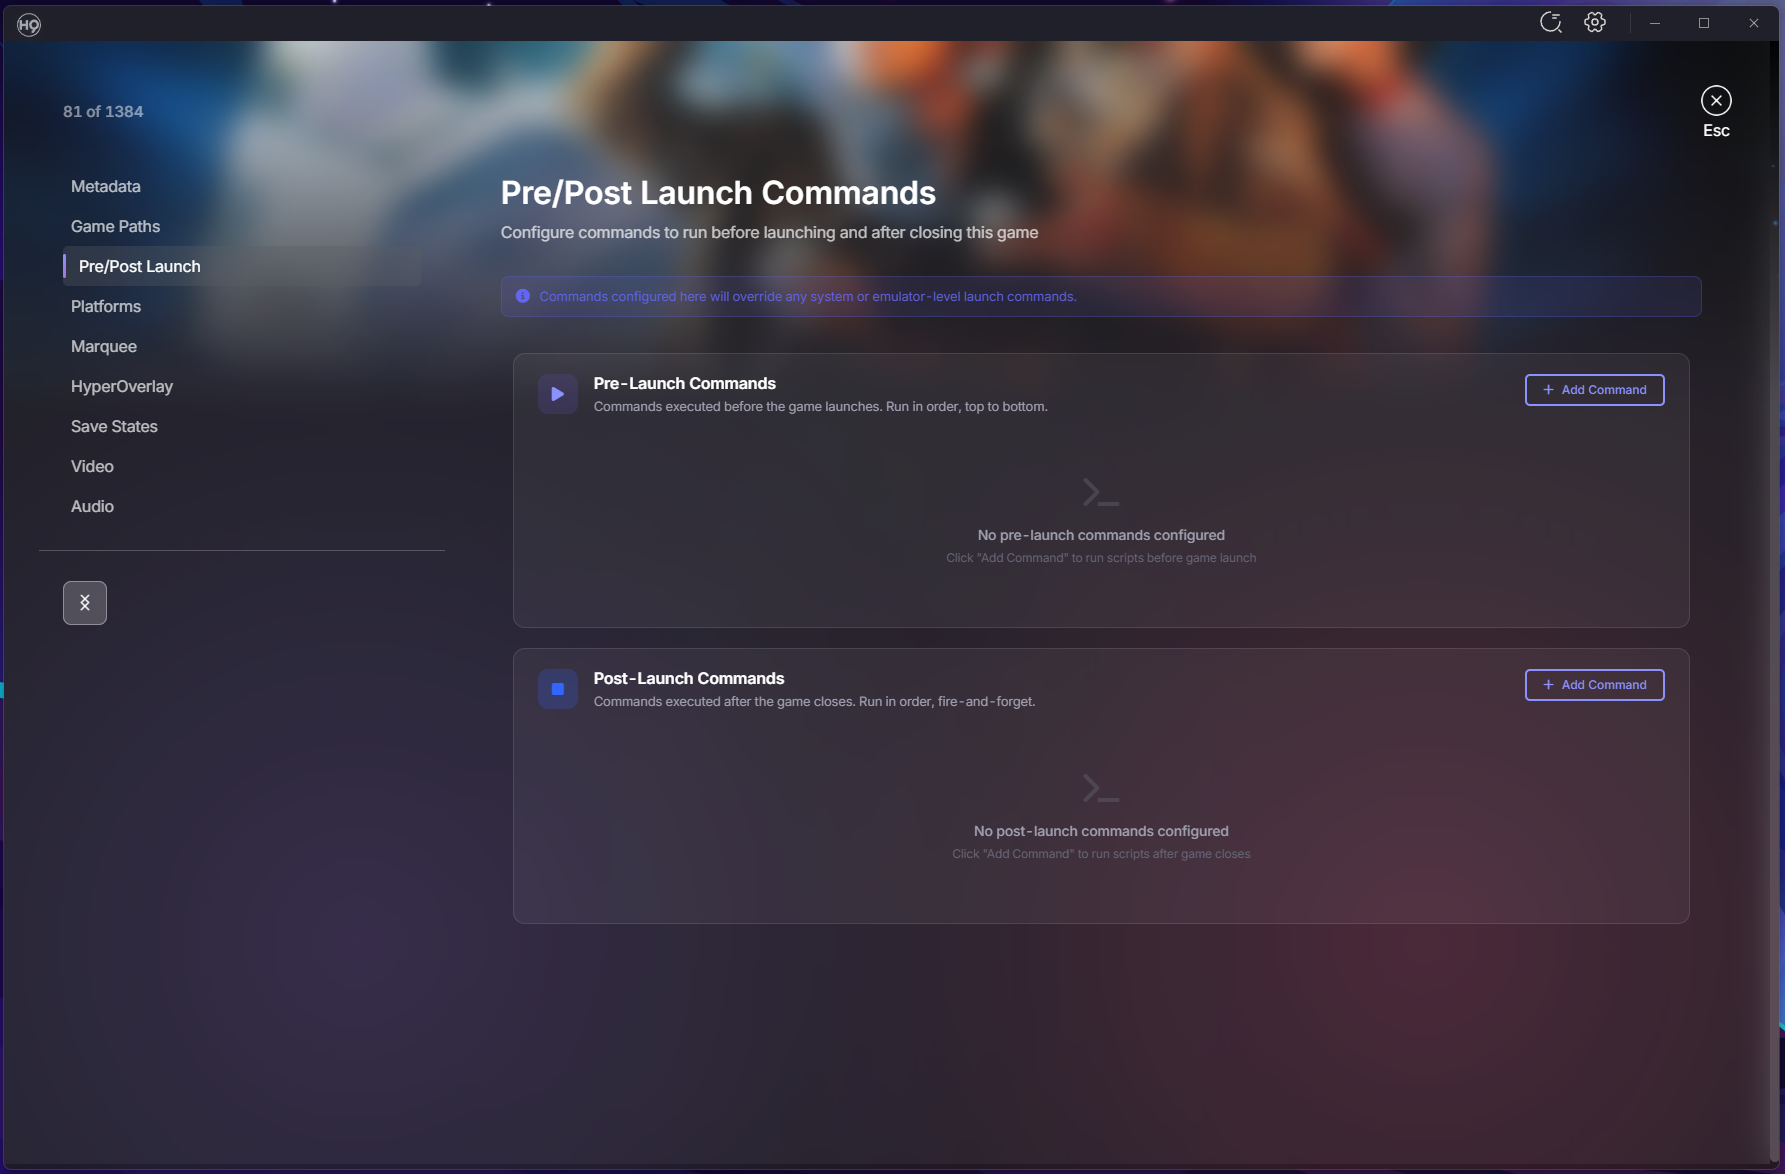
Hey everyone! It’s been a busy stretch since our last update, and we’ve got a lot to share! This release cycle spans over 30 beta builds with hundreds of commits bringing major new features, quality-of-life improvements, and plenty of bug fixes. Whether you’re setting up a new cabinet or managing a massive collection, there’s something here for you. Let’s dive in! Emulator Settings — Per-Game Customization You can now customize emulator settings at the emulator, system, or game level with full inheritance. Override video and audio settings for specific games without touching your global config. Supported Emulators RetroArch: Video settings (VSync, Frame Delay) and Audio settings (Volume, Latency) MAME, PCSX2, Dolphin, PPSSPP, DuckStation: Emulator-specific settings Xenia, RPCS3, Cemu, Xemu, Redream: Additional emulator support How It Works Game settings override system settings, system overrides emulator, emulator overrides defaults Dynamic Video/Audio menu items appear based on emulator capabilities Config files generated on launch — your original emulator configs stay untouched Save State Management A completely new way to manage and launch from your save states. Save State Browser: View all save states grouped by core and ROM in system settings Thumbnail Previews: See what you saved with thumbnail support for RetroArch Quick Launch: Play button dropdown lets you resume from any save slot Delete Management: Clean up old save states you no longer need Emulator Support: RetroArch, PCSX2, Dolphin, PPSSPP, DuckStation, and MAME Pre-Launch & Post-Launch Commands Run custom commands before or after launching games — perfect for scripts, controller profiles, lighting setups, or anything else your setup needs. Three-Level Configuration: Set commands at emulator, system, or game level Drag & Drop Ordering: Reorder commands with visual feedback Rich Variable Support: %system.name%, %system.path%, %rom.folder%, %rom.fileExtension%, %emulator.name% Unsaved Changes Warning: Never lose your work when navigating away Play Time Tracking Know how much you’ve played each game. Total Play Time: Tracked per game (e.g., "2h 30m") Last Played: See when you last played and how many times Crash Recovery: Sessions persist even if HyperHQ closes unexpectedly System Media Details Page A dedicated page for browsing all your system media in one place. Gallery View: Filter tabs for All, Media, Images, Documents, Themes Interactive Preview: Click any artwork or video to preview it instantly Built-in PDF Viewer: Read system manuals with zoom and page navigation Floating Audio Player: Listen to system music while browsing EXIF Metadata: View Title, Keywords, Credit, and Notes in the lightbox CBZ Manual Viewer A beautiful new way to read your game manuals in CBZ format. 3D Page Flip: Animated page turns with smooth transitions Two-Page Spread: Toggle between single page and spread view Zoom Controls: Keyboard shortcuts (+/- and Ctrl+wheel) Keyboard Navigation: Arrow keys, space, and escape Accessibility: Respects reduced motion preferences ROM Path Migration Moving your ROM folders? HyperHQ can update your database automatically. Automatic Detection: When you change a system’s ROM path, HyperHQ offers to scan for matches Batch Updates: All matching ROM paths updated in your database Multi-Disk Support: Handles multi-disk ROMs correctly Progress Display: Real-time feedback during migration Wheel Manager Improvements Complete overhaul of the wheel management experience. Keyboard Navigation: Arrow keys flow through the entire tree seamlessly Reordering Controls: On-screen buttons and Ctrl+Arrow shortcuts Sort by System Type: Organize systems by category then alphabetically Group by System Type: Create collections for each category automatically Smooth Animations: Visible slide effects when moving items Collections in Systems Grid Your collections can now appear right alongside your systems. Toggle Button: Show/hide collections in the systems grid Mixed View: Collections and systems sorted alphabetically together Visual Distinction: COLLECTION badge with item count on hover Keyboard Navigation: Arrow keys work across combined list Group Systems by Type Organize your systems list by category. Category Groups: Arcade, Consoles, Computers, Handhelds, and more Category Headers: Show system count for each group Persistent Setting: Your preference saves between sessions Auto-Import Systems HyperHQ can automatically detect and import system folders from your Games directory. Startup Scan: Detects unimported system folders when HyperHQ launches Live Monitoring: Watches for new folders added while running Smart Matching: Case-insensitive matching to our system database Skip List: Mark folders to always ignore Media Downloads: Uses your existing preferences for imported systems Note: This feature is currently in early alpha — we’d love your feedback! EmuMovies Media Defaults Set your preferred media types once and use them everywhere. Wizard Step: Choose default video quality and media types during setup Automatic Application: Preferences apply when adding new systems Easy Management: Update defaults anytime in EmuMovies Settings Skip Option: "Skip for now" during setup if you don’t have an account Boxart Priority Choose your preferred artwork style. Style Selection: Set which box art displays first — 2D, 3D, or 2.5D Per-System Override: Configure globally or per-system Smart Fallback: Automatically shows next available style if preferred is missing Media Filter Find games based on available media. Dropdown Filter: Show only games with specific media types Find Missing Media: Great for identifying games missing artwork or videos Descriptive Tooltip: Shows which filters are currently active Unified Platforms Tab Streamlined emulator configuration. Merged Tabs: Launch Command and Platforms combined into one view Variable Reference: Shows available variables (%ROM%, %ROMNAME%, etc.) Smart UI: RetroArch core selector only appears when RetroArch is selected Wii U Support Better support for Wii U games and Cemu emulator. Loadiine Folder Scanning: Automatically detects Wii U folder structures meta.xml Parsing: Extracts title, publisher, and region automatically DLC/Update Exclusion: Automatically skips DLC and update folders BIOS Management Updates Building on the automatic BIOS detection from v2.0.135, we’ve expanded coverage to more setup scenarios. Standalone Emulator Addition: BIOS step now appears when adding emulators directly from Platforms Skip Option: Emulators with optional BIOS let you configure later Cemu Integration: Dedicated setup flow for Wii U emulation Additional Improvements Setup & Configuration DOS Support: DOSBox games launch with game folder as working directory Steam Custom Systems: Create systems that pull metadata from Steam using App IDs Window State Memory: HyperHQ remembers your window size and position Media & Display Video Quality Selection: Game detail page shows best quality based on your preferences Game-Level Marquee Override: Complete Global → System → Game inheritance Faster Thumbnail Generation: Process up to 64 videos simultaneously Reorganized Media Categories: All, Media, Images, Documents, Themes User Experience App Tour System: Interactive walkthrough for new users System Card Actions: Quick access Games/Details buttons on hover Smarter Auto-Login: Retries saved credentials before prompting Media Processing Indicator: See when downloads are being prepared Improved Uninstaller: Clear options for removing data during uninstall Bug Fixes & Stability Fixed: Bezel Project downloads not working for fresh RetroArch installations Fixed: RetroArch reinstalling on every app restart Fixed: Disc-based games (CUE/BIN) selecting wrong file to launch Fixed: Steam games not launching (steam:// protocol) Fixed: Plugin list showing duplicate server and local entries Fixed: EXE file plugins start/stop behavior Fixed: Media sync for manually matched games Fixed: EmuMovies upgrade prompt for supporting members Fixed: MAME plugin reinstall and system creation issues Fixed: Games closing immediately after launch Fixed: System images not loading for MAME and other systems Fixed: Collections not showing games from uninstalled systems Fixed: External marquee not connecting on startup HyperTheme Animation Assistant HyperTheme now includes a chat assistant to help you build animations faster. Instead of clicking through menus, just describe what you want in plain language. Natural Language: "Add a fade in to layer 1", "Make the logo spin", "Set the delay to 2 seconds" Context Aware: The assistant understands your layers and animations by name or number Quick Access: Press Ctrl+/ or click the chat button to open the panel Workflow Focused: Designed to speed up adding and tweaking animations, not generating images 2026-01-20 11-53-30.mp4 Ecosystem Updates HyperSpin 2.0.66-2.0.68 New Theme Player: All changes from HyperTheme’s editor rolled in System Pointers: Now show when entering systems Dynamic Wheel Pointer Scaling: Pointers scale with wheel items Performance Optimizations: Smoother animations and reduced memory usage HyperMarquee 1.0.7 Improved Display Handling: Better scaling and transitions Reliability: Videos and fallback images display more consistently HyperTheme 1.11.0 Theme Player Enhancements: Better animation accuracy and reliability Scale Animation Fixes: X and Y axes now work correctly Hover Animation Improvements: Speed and easing fixes Your Feedback Matters We’d love to hear your thoughts: How are the new emulator settings working for you? Is the save state management helpful for your workflow? What do you think of the CBZ viewer and media details page? Any issues you’re encountering? What would you like to see in future releases? Thank you for being part of the HyperSpin community. Every bug report, feature suggestion, and word of encouragement helps make HyperHQ better. Stay awesome, -fr0stbyt3
13 points
-
You might've noticed today that things are starting to find their way from Upload Here into their proper places. That's because I've started picking away at it. At the rate I'm going, it should be more or less complete in about a month or two. I also plan on reviewing every subsection for misplaced items, and I'll be putting those where they belong as well. Please be patient, as I'm doing this a bit each weekday as I have free time. It's a process. We're getting there!13 points
-
Hello Everyone, Welcome to HyperSpin 2.0. We know that everyone is excited about the future of HyperSpin and excited to get going. The team is excited for everyone to finally see the work that has really been going on behind the scenes. Please keep in mind that everything you see is still very early beta release. Features are not final and may change at any time. Stay tuned... This is just getting started! First!12 points
-
Thanks for the vote of confidence! I can't wait for y'all to see what the (near) future holds!12 points
-
I've uploaded these to the tutorial section and archived them in my off-topic thread but now that they're fully blessed I'll be posting updates in this thread as the project unfolds. In response to demand from the community, Sub-Zero and I are working hard to bring you a polished guide to HyperSpin setup and customization. These first few episodes might not have much to offer most of you folks already on the forums but we'll be taking an overall logical approach to the series. The next few episodes will be focused on helping newcomers with actually getting properly setup to run the different types of basic core systems (ie. rom-based console, disc-based console, rom/chd based arcade, Daphne Laser Disc arcade, and PC) through HyperSpin problem free. After that we'll be diving into all of the minutia of HS tweaks/customization from the ground up. Feel free to make requests. There are a lot of topics that need covering. While we'll try our best to think of them all it certainly doesn't hurt to have feedback from the community. Part 1: Welcome to HyperSpin Part 2: How to Install HyperSpin and RocketLauncher ---Introduction/Explanations--- 0:11 Introduction 0:22 Software Requirements ---HyperSpin Installation--- 0:33 Drive Preparation 1:10 Downloading HyperSpin and Antivirus Considerations 1:40 Adding Exclusions to Your Antivirus softwar 2:01 HyperSpin Extraction and Cleanup ---RocketLauncher Installation--- 2:28 Rocketlauncher Registration 2:40 RocketLauncher Download and Pathing Considerations 2:56 Extracting the Encrypted Download 3:00 Directory Structure 3:09 Installing the RocketLauncher Base Media Pack 3:13 Where to Extract the RocketLauncher Base Media Pack 3:28 Adding Emulators by Renaming "Global Emulators (Example).ini" ---Initial HyperSpin and RocketLauncher Configuration--- 3:44 Adding RocketLauncher's Path to HyperSpins Settings 4:06 Enabling RocketLauncher for Game Launching in HyperHQ 4:30 How to Update RocketLauncher 4:53 Adding HyperSpin's Path to RocketLauncherUI 5:03 Setting HyperSpin as Your Default and Active FrontEnd 5:53 Adding Your Temporary Extraction Folder ---House Keeping and Preparation for Future Videos--- 6:28 Adding Important Shortcuts to Your Taskbar 6:47 Conclusion 7:15 End-Card and Links Part 3: How to Choose an Emulator and Add It to RocketLauncher ---Introduction/Explanations--- 0:08 Introduction ---Choosing an Emulator--- 0:38 How to Determine a System's Officially Supported Emulators 1:09 Introduction to NonMAME 1:41 The Importance of Personal Research via Google or Forums 2:00 How to use NonMAME to Help Choose an Emulator 2:20 NonMAME's Summary of Current Emulation Status 2:28 A Very Brief Description of RetroArch 2:39 Standalone Emulators vs RetroArch Cores 2:49 See Description Regarding Emulator Partisanship ---Adding an Emulator to RocketLauncher--- 3:00 Where to Install Your Emulators 3:25 Nomenclature for Specific Emulator Folders 3:35 Running and Exploring Your Emulator 3:50 Troubleshooting with Compatibility Options 4:06 Setting the Emulator Path in RocketLauncher 4:52 Selecting the Default Emulator for a System ---The Modules Tab--- 5:06 A Brief Introduction to the Modules Tab 5:13 How to View Module Information 5:34 Where to Go for Module Support 5:38 The Importance of Reading Module Notes 5:56 A Brief Caution Regarding Editing Modules 6:12 A Brief Introduction to Module Folder Contents 6:22 Emulator Settings in RocketLauncherUI 6:40 How to Verify Settings and Launch the Emulator EXE in RL 6:47 Conclusion 6:52 End-Card and Links Part 4: HyperSpin System Databases and How to Update Them ---Introduction/Explanations--- 0:06 Introduction ---Introduction to HyperSpin System Databases--- 0:35 System Database Games List in RocketLauncherUI ---Installation and Setup of Editor Software--- 0:55 Notepad++ Installation 1:09 How to Set Your Default Editor in RocketLauncherUI 1:47 Set Editor as Default Program for Opening XML Files ---Introduction to HyperSpin System Databases--- 1:25 HyperSpin Database Folder Structure 2:01 Introduction to HyperSpin System Database Structure 2:28 Brief Introduction to How System Databases are Created 2:56 What to Do if You Find a Database Error 3:02 Introduction to What Games Are Included in a Database ---How to Update Your System Database--- 3:31 Introduction to HyperList 3:56 Downloading the Most Recent Database 4:06 The Importance of Keeping the Official System Name 4:15 Conclusion 4:34 Endcard/Links Part 5: Add, Audit, and Run Games Through HyperSpin ---Introduction/Explanations--- 0:06 Introduction ---Rom Placement--- 0:40 Creating Rom Folder(s) 0:54 Creating System Specific Rom Folders 1:06 Evaluating Compatible Rom Formats ---RocketLauncher Rom Setup--- 01:14 Configuring Rom Paths ---Rom Audit--- 1:41 How to Audit Your Roms 1:49 Why We Need to Rename Roms 2:03 The Importance of Creating a Rom Backup 2:12 Downloading Audit Software - Don's HyperSpin Tools 2:46 Using Don's HyperSpin Tools' Rom Renamer 3:00 CRC Explanation 3:48 Renaming Roms and Filling the Gaps 4:10 Explanation of Audit Results ---Running Games--- 4:32 How to Test Games in RocketLauncherUI 4:44 Basic Troubleshooting Steps 4:55 7z Considerations and a Caution Regarding Save Files 5:22 Running Games in HyperSpin ---Rom Compression--- 5:36 The Value of Compressing Roms 6:03 Conclusion/Endcard/Links Part 6: Setting up MAME for HyperSpin ---Introduction/Explanations--- 0:10 Introduction ---MAME Installation--- 0:24 MAME Developer Website - What is MAME? 0:45 Downloading/Extracting the Latest Version ---MAME Customization--- 1:01 Eliminating Nag Screens with NONAG Compiled EXE 1:35 Configuring MAME 2:09 Hiscore Support ---MAME Roms--- 2:18 Understanding MAME Roms, CHDs, and Split/Merged Sets ---MAME Database XMLs--- 3:45 HyperList vs Custom User XMLs 4:26 Brief Introduction to Genre XMLs ---Conclusion--- 4:36 Closing Remarks 5:03 End Card Part 7: Adding, Arranging, and Removing Systems ---Introduction/Explanations--- 0:24 Introduction ---Adding Systems--- 0:48 Adding with RocketLauncherUI's Wizard 3:27 Overview of Created Folders/Files ---Arranging Systems--- 3:12 How to Rearrange Your Main Menu ---Removing Systems--- 3:40 Removing System From Main Menu vs Full Deletion ---Conclusion--- 4:01Closing Remarks 4:32 End Card Part 8: Commodore Amiga Setup ---Required Links--- WinUAE: http://www.winuae.net/download/ WinUAE Loader: http://headsoft.com.au/index.php?category=winuaeloader WHDLoad: http://whdload.de/ Amiga Forever: https://www.amigaforever.com/plus/ Guide to Adding Commodore Amiga to RocketLauncherUI: https://www.youtube.com/watch?v=feoQ68vE-z0 ---Introduction/Explanations--- 0:24 Introduction ---Installing WinUAE--- 0:40 Downloading WinUAE 1:05 Creating the Required Folder Structure ---Installing WHDLoad--- 1:18 Transferring WHD from a Temporary WinUAE Loader Download 1:36 Transferring the Required WHDLoad Files into WinUAE 1:49 Updating WHDLoad to Latest Release ---Installing the Amiga Operating System--- 2:25 Introduction to Amiga Forever 3:04 Downloading Amiga Forever 3:17 Installing Amiga Forever 3:41 The Importance of Running Amiga Forever After Installation 3:59 Transferring the Required OS Files to WinUAE 4:47 Uninstalling Amiga Forever ---Configuring WinUAE--- 5:00 Setting Path Options and Verifying OS Roms 5:31 Sound Config 5:57 Game Ports Config 6:21 Filters Config and Maintaining the Correct Aspect Ratio 6:41 Saving the Configuration for RocketLauncher ---Important RocketLauncher Settings--- 7:26 Adding Commodore Amiga to RocketLauncher's System List (see https://www.youtube.com/watch?v=feoQ68vE-z0) 7:42 Placing your Roms 7:51 Defining WinUAE's Path 8:14 Adjusting Module Settings for Correct Aspect Ratio ---Conclusion--- 8:31 Closing Remarks 8:58 End Card Part 9: HyperSpin Basic Settings Introduction ---Introduction/Explanations--- 0:24 Introduction ---Installing WinUAE--- 0:40 Downloading WinUAE 1:05 Creating the Required Folder Structure ---HyperHQ--- 0:33 Where to Find HyperHQ 0:49 General Settings 1:25 Screen Settings 2:30 Optimizer Settings 3:12 Attract Settings 3:40 Startup/Exit Settings ---Conclusion--- 4:18 Closing Remarks 4:43 End Card Part 10 - Customizing Your HyperSpin Intro and Other Core Frontend Aesthetics ---Introduction/Explanations--- 0:24 Introduction ---Intro Customization--- 0:35 General Information 0:51 Where to Find New Intros 1:00 Importance of Aspect Ratio 1:14 How to Change the Intro Video ---Customizing Frontend UI Artwork--- 1:40 General Information 2:00 How to Change the "No Video" Video 2:07 HyperSpin Transition Tips 2:31 How to Change the "Exit" and "Favorites" Screens 3:02 How to Change or Disable Wheel Sounds ---Conclusion--- 3:46 Closing Remarks and End Card12 points
-
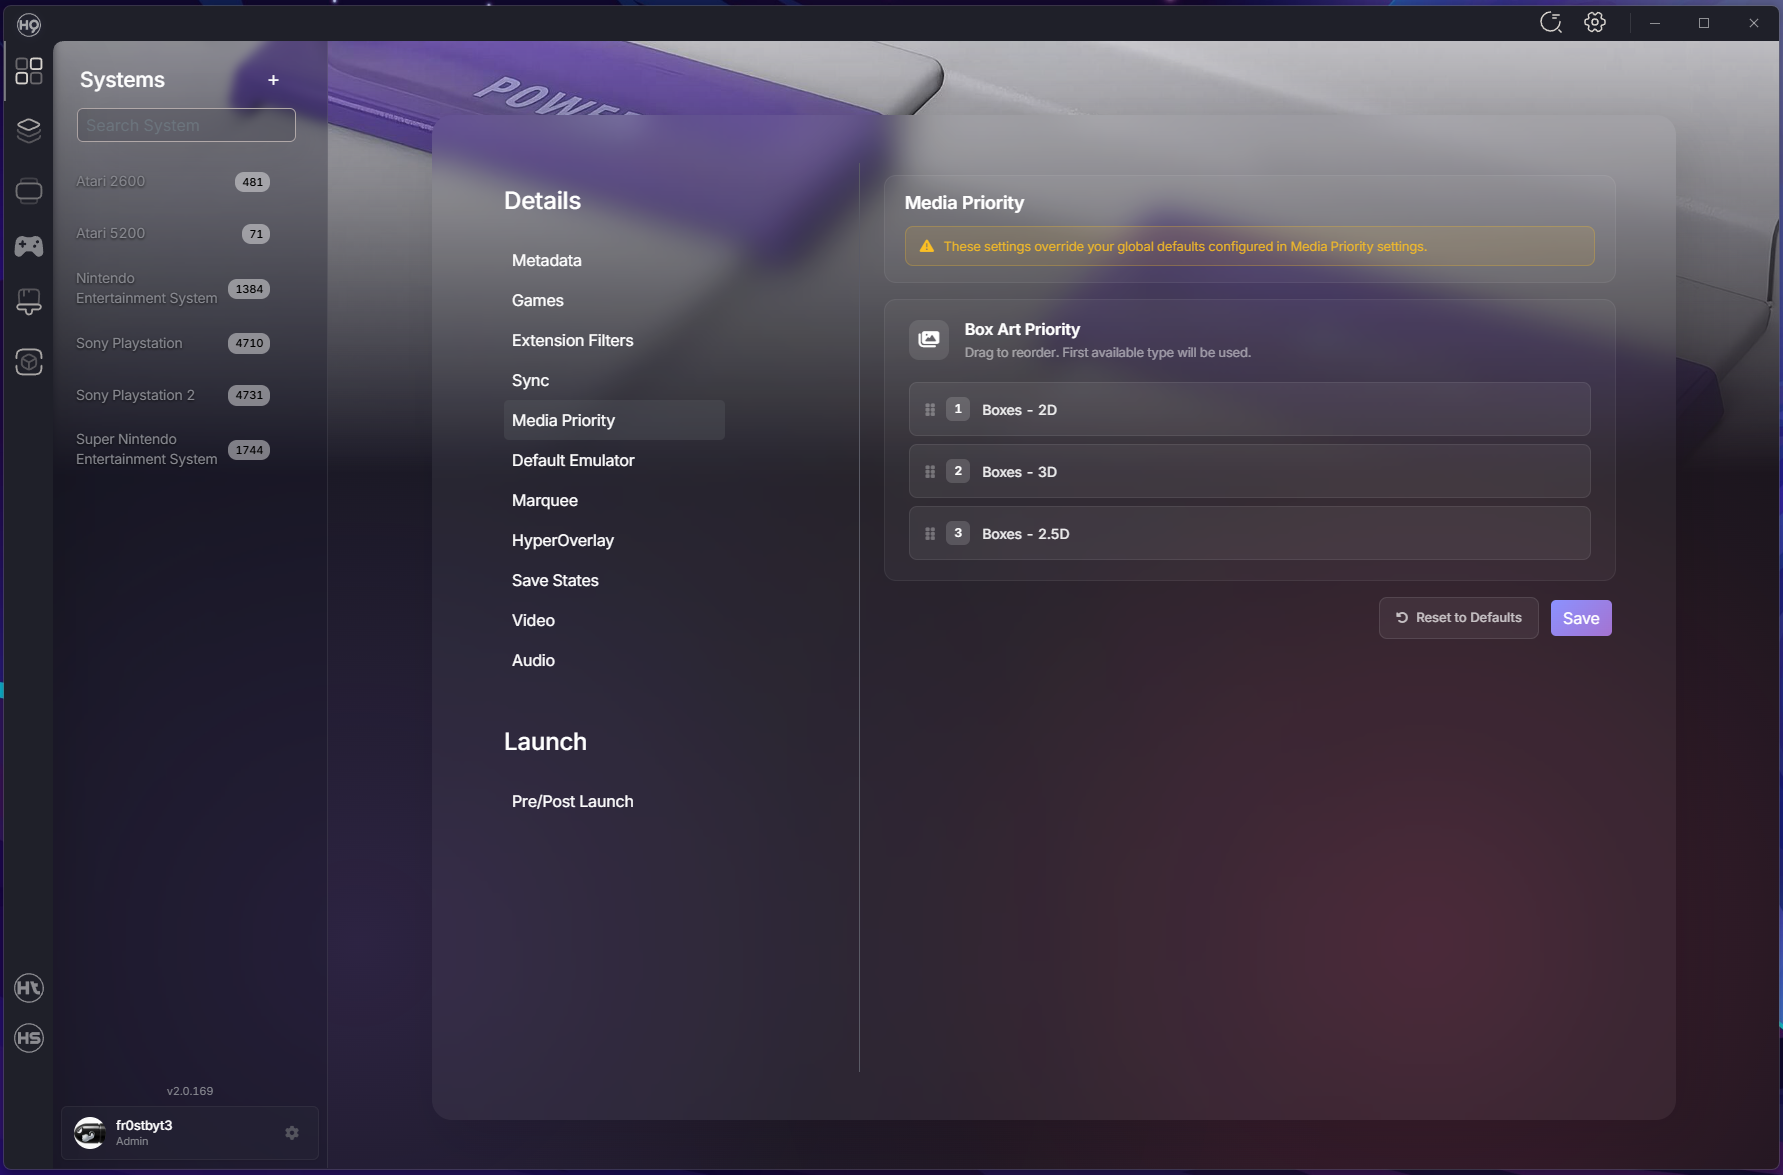
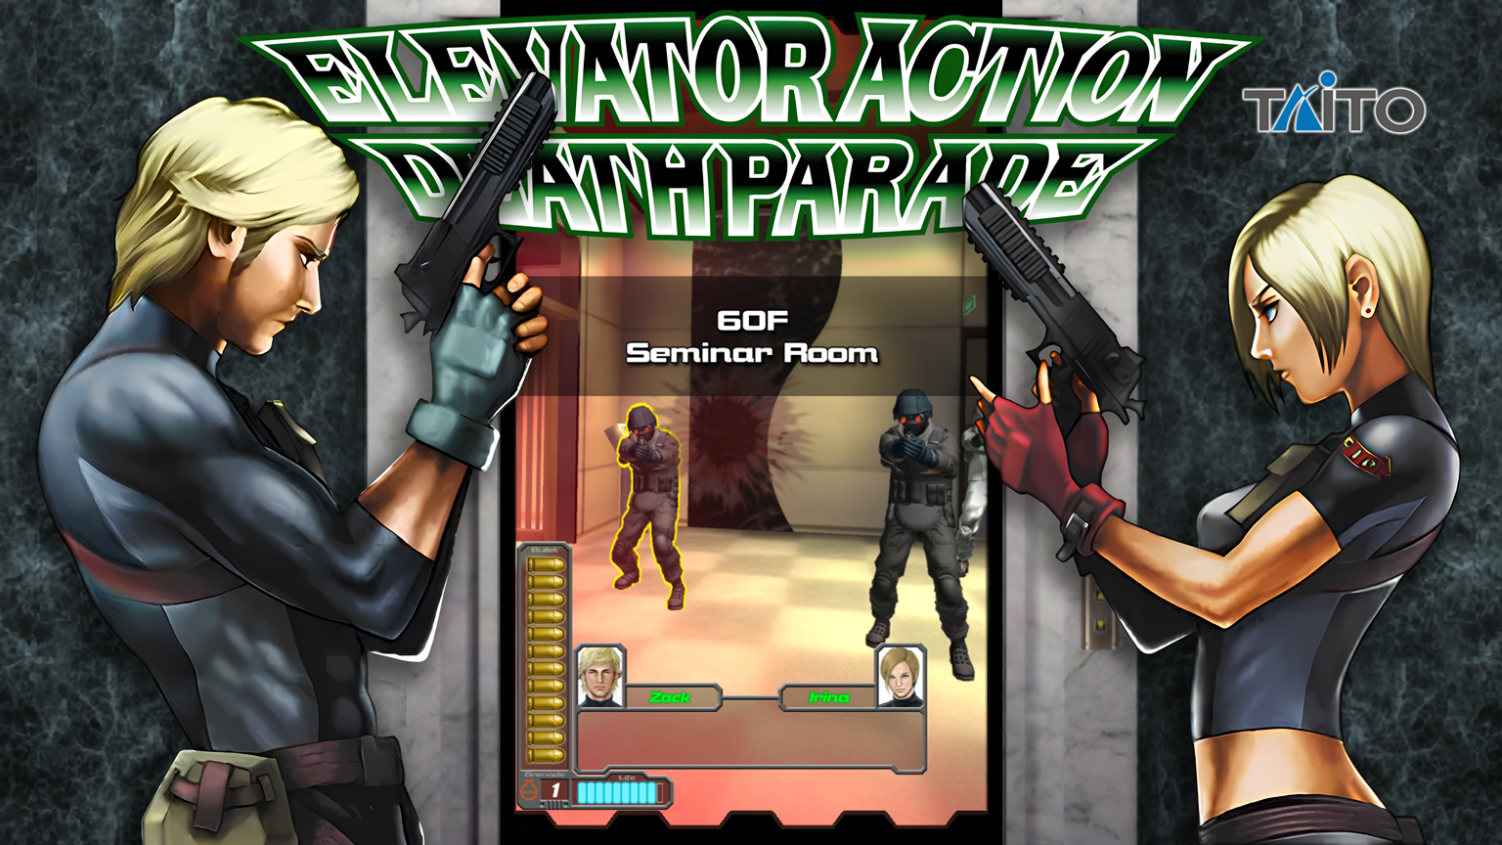
Hey everyone! Hope you all had a great holiday season! I kept busy over the break and have a packed update to show for it - v2.0.135 brings 233 commits of improvements across 13 test builds. This update focuses on making MAME management more seamless, expanding media capabilities, and polishing the interface throughout HyperSpin. From automated BIOS handling to intelligent media fallbacks, custom ROM filtering to universal search, this release tackles workflows that have long needed attention. Let’s see what’s new. MAME Workflow Enhancements Parent-Clone Media Fallback Smart Media Display: Clone games now show parent artwork when clone-specific media is missing, and vice versa Automatic Downloads: Media downloads include related parent/clone artwork automatically Split ROM Support: Works perfectly with MAME split/merged ROM sets and multi-disc games Custom ROM List Import Direct Folder Scanning: New MAME wizard mode scans your ROM folders directly Skip Filtering: Perfect if you’ve already curated your collection and don’t need the full filter workflow Automatic Metadata: Matches filenames against MAME’s database for accurate game information Import Count Accuracy Correct Counts: Success messages now show parent count or total count based on your clone preference Clear Feedback: "Fetch clones separately" shows all games, while "Merge clones" or "Skip clones" shows parent count only System Workflow Enhancements BIOS Management Automatic Detection: HyperSpin detects and manages required BIOS files when adding systems Wide Support: Works across emulators that require BIOS files Seamless Setup: No more hunting for BIOS files manually Media System Improvements System Media Override Flexibility Any Filename Works: Override folders now accept any filename for system media (logos, backgrounds) Random Selection: Multiple files? One gets chosen randomly for variety Clearer Instructions: Renamed to _README_Place_Override_Media_Here.txt with better examples Add Media Button One-Click Access: New button on the Media tab opens the override folder for your selected media type No More Folder Hunting: Drop your custom artwork right where it needs to go Works Everywhere: Supports both system-specific and default media locations Video Thumbnail Extraction Automatic Generation: Extracts thumbnails from video game files for display in game lists Smart Caching: Tiered extraction uses memory cache, persistent cache, Windows Shell, embedded thumbnails, and HTML5 video Configurable: Control the feature in game settings based on your preference Expanded Media Types 24 Media Options: Change Game Image dropdown expanded from 6 to 24 comprehensive artwork types Complete Coverage: Includes Boxes (2D/3D/2.5D/Spine/Box-Back), Video Snaps (240p/480p/1080p), Snaps (Gameplay/Title), Music, Marquees, Cabinets, Control Panels, Bezels, Overlays, and Manuals Better Organization: Scrollable dropdown with consistent naming conventions Logo Fallback Display Beautiful Alternative: When box art isn’t available, game cards now display the logo in the top third with a drop shadow Background Fill: Game’s background fills the entire card behind the logo Consistent Design: Matches the system list view style Spotlight Search Universal Search Interface Quick Access: Press Ctrl+F to search across games, systems, platforms, plugins, collections, and settings Full Keyboard Control: Navigate with arrows, Enter to select, Escape to close, Tab to cycle focus Visual Context: Category icons, plugin images, and game/system artwork displayed in results System & Metadata Enhancements Hardware Metadata 13 Specification Fields: CPU, memory, graphics, display, resolution, and more for each system Refresh from API: New button automatically populates specs for existing systems Clean Layout: Organized in a 2-column layout in the system editor Game Metadata Navigation Previous/Next Buttons: Browse through games without leaving the metadata editor Position Indicator: Always know where you are (e.g., "5 of 120") Faster Bulk Editing: Update metadata for multiple games without constantly returning to the game list Additional System Support Nintendo 64DD: Added to RetroArch core mappings (Mupen64Plus-Next and ParaLLEl N64) xemu Support: Required files added for original Xbox emulation HyperMarquee Updates Settings Persistence Reliable Configuration: Settings now cache and resend on reconnect or when requested by HyperMarquee Media Fallbacks: Added gameplay snapshot fallback for backgrounds Better Box Art: Improved loading with 2D and 3D fallback support Display Options: New option to cut off the top of marquee images Interface Redesigns User Profile Settings Modern Card Layout: Redesigned with clean, scannable sections Clickable Rating Chips: ESRB/PEGI logos displayed as interactive badges Camera Badge: Added to avatar to indicate it’s clickable Better Terminology: "Content Rating" renamed to "Parental Controls", "PIN Protection" to "Profile Lock" System Access Controls Simpler Opt-Out: All installed systems shown as a toggle list Default Access: All systems enabled by default (full access) Bulk Actions: Enable All / Disable All buttons for quick changes Searchable: Filter input for large system lists Settings Screens Card-Based Design: Modernized Default Platform Settings, System Metadata Settings, and ROM Paths screens Custom Dropdowns: Consistently styled throughout Better Scrolling: Fixed layout issues on System Details page System List Appearance Improved Positioning: Better image placement with gradient overlays for text readability Refined Styling: Polished icon and text presentation Offline Mode & Connectivity Offline Support Work Without Internet: Intelligent detection distinguishes between complete offline and service unavailability Auto Reconnection: Seamless return to online mode when connectivity restores Clean Notifications: No more notification spam when working offline Initial setup will need to be online to get metadata and media. After that it will still function completely offline. In future builds we will allow for importing of media from an external drive to further support this feature Performance & Technical Improvements Caching & Optimization Games Caching: Games cached for faster loading Clone Queries: Optimized with batch operations and backend caching for faster media lookups Reduced Queries: New caching layer eliminates redundant database calls Memory Management: Better handling when loading large ROM collections Media Processing Faster Media Audit: Optimized loading performance Image Loading: Improved system list image loading Media Manifest: Get media updates as they happen! As media becomes available, you will always get the latest. Bug Fixes & Stability Critical Fixes ROM Processing Hang: Fixed issue where HyperHQ could hang when loading systems with empty databases API Error Handling: Errors no longer cause indefinite hangs Stuck Reauthentication: Fixed authentication process that could hang indefinitely File Handling Fixed Windows file locking issues when deleting media files Retry Mechanism: Added for media deletion with informative error messages Permission Handling: Check now happens when selecting folders (no surprise UAC prompts) UI & Display Fixes Game Search Modal: Fixed styling issues in metadata screen Modal Loading States: Fixed during media audit Game Dropdown: Options sorted alphabetically, cabinet/control panel options only show for MAME/Arcade Log Export: Now shows helpful message when no logs exist instead of failing silently Authentication & Services EmuMovies Auth: Fixed authentication check showing false 401 errors API Endpoint: Fixed malformed URL for user profile data Subscription Cleanup: Enhanced to prevent memory leaks Additional Improvements Organization & Polish HyperSpin Logging: Relocated toggle from Display Settings to System Logs page with performance warnings Collection Management: New dedicated modal replaces dropdown menu for better usability Plugin Updates MAME Plugin: Added support for filtering PlayChoice items Media Verification: Now uses improved VerifyMedia API Thank you for being part of the HyperSpin community and for all your support, feedback, and enthusiasm. Every bug report, feature suggestion, and word of encouragement helps make HyperSpin better. Here’s to many more improvements ahead! Stay awesome, -fr0stbyt3 Artwork courtesy of @baddeolv @SubZero @Roadrunner @rondar Elevator_Action_Death_Parade (1).mp4
11 points
-
Hey everyone, Yeah… it’s been a while. What was supposed to be a few quick weeks of patching turned into a full-blown overhaul of how we handle media, assets, and everything in between. Thanks for sticking with us through the chaos — let’s dive in. Media Migration & Folder Structure When you launch HyperHQ for the first time after updating, it will automatically attempt to migrate your existing media to the new structure. That said, this update is a massive shift in how media is organized and referenced. We strongly recommend starting fresh — delete your existing media and redownload it using the new system. You’ll thank yourself later. All media now lives under a unified data\Media directory, and we’ve standardized folder names across the board — Overrides for example: [system name]/Backgrounds - Game/ [system name]/Backgrounds - System/ [system name]/Boxes - 2.5D/ [system name]/Boxes - 2D/ [system name]/Boxes - 3D/ [system name]/Boxes - Back/ [system name]/Boxes - Texture/ [system name]/Game Media - 2D/ [system name]/Game Media - 3D/ There is an additional _hsm folder in the media directory. This is HyperSpin managed media and will be managed through HQ. Everything is cleaner, easier to browse, and fully compatible with future updates. ThemeBuilder Gets a Major Upgrade ThemeBuilder also got a serious glow-up. You’ll notice: More asset types supported (backgrounds, alternate wheels, overlays, marquees, and more) Media Previews right inside the editor Smarter editing tools — autosave, multi-undo, improved drag-and-drop, and faster imports Better performance with smoother playback, real-time updates, and 4K-ready scaling Building and testing your themes now feels modern, fast, and fun — exactly how it should. New timeline with live scrubbing: 2025-08-16 20-06-26.mp4 Grid system (Thanks @yaron ) 2025-08-13_10-04-26.mp4 Alignment locking: 2025-08-13_09-05-06.mp4 Handle settings: 2025-08-04_15-40-56.mp4 More grids!: 2025-08-04_20-15-16.mp4 Themebuilder now supports video previews! @rondar and @baddeolv vid-previews.mp4 HyperHQ Updates v2.0.76 – July 15, 2025 Added “Import ROMs Only” option to MAME Wizard Faster, lighter download engine Fixed blank screen and import issues v2.0.78 – August 2, 2025 Added support for systems without emulators Integrated latest MAME builds Added loading animations for reauthorization Fixed import logic issues v2.0.81 – August 11, 2025 Huge performance boost for ROM browsing Fixed Windows startup and crash issues Improved inter-process communication v2.0.82 – August 15, 2025 Added drag-and-drop system import Virtual scrolling for smoother large lists Refined ROM details layout Added UAC elevation support v2.0.84–85 – August 21, 2025 Enhanced search + new media audit tools Added EXIF metadata support Fixed Windows shortcut detection Build patch (thanks @thatman84!) v2.0.86 – August 26, 2025 Complete media page makeover with glass-morphism UI Fixed MAME game detection Fixed login and auto-auth issues Faster animations and smoother loading v2.0.89 – September 2, 2025 Added game version tracking AutoHotkey syntax highlighting Enhanced process monitoring UI cleanup and bug fixes v2.0.91 – September 25, 2025 Complete Media Folder Migration! All media now lives under data\Media New folder naming (e.g. “Boxes - 2D”, “Logos - Game”) Automatic migration with progress screen Added custom wheel positioning Faster startup + better progress tracking v2.0.93 – October 6, 2025 Smarter background authentication Safer file ops (copy → verify → delete) Faster refresh and startup Fixed label, icon, and authentication issues v2.0.94–97 – October 7, 2025 Fixed missing media and sound issues Added game music toggles in downloads Fixed plugin reinstall/visibility issues Folder naming fixes (spaces now supported when launching from HQ) HyperSpin Updates v2.0.45 – July 24, 2025 Fixed theme loading issue Refactored media playback logic Fixed wheel images not loading Updated theme player to support new features v2.0.46 – July 30, 2025 Themes now only reload when changed (no unnecessary restarts) Snappier and smoother overall performance v2.0.47 – August 11, 2025 Fixed race conditions when scrolling quickly through the wheel Refactored animation service for smoother wheel behavior Enhanced MAME and emulator detection Added hidden theme layers + improved attract mode Expanded plugin event hooks Optimized memory and animation cleanup v2.0.48 – September 26, 2025 Introduced Dynamic Wheel System (curved, straight, horizontal, vertical) New Display Settings menu + advanced aspect ratio controls Fixed animation and stability issues Visual polish: grayscale filters, Z-index fixes, smoother transitions General performance cleanup v2.0.49 – October 6, 2025 Enhanced CRT and retro display effects Integrated theme background layering Fixed animation, attract mode, and pointer behavior Added metadata support for new media types Core API and performance updates v2.0.50–51 – October 7, 2025 Fixed wheel sound and startup music issues HyperTheme & ThemeBuilder Updates This is where the biggest creative changes happened. ThemeBuilder has become faster, smarter, and more capable than ever — a real evolution for anyone building themes. July–August 2025 Added Pinball FX as a new supported system Smoother flipbook playback (and fixed reversed animations) Added pivot points, rotation, and easing-based animation curves Grid alignment and aspect ratio scaling improvements Live property updates (real-time sprite transform editing) Zoom controls, axis locking, and full SVG rendering at 4K One-click screenshot capture Added new “Background” metadata type Major UI/UX performance boost and cleanup Fall 2025 Enhancements More Asset Types Supported: alternate wheels, marquees, dynamic overlays, background layers HQ Media Previews — now live inside ThemeBuilder and HQ (watermarked 480p streaming for speed and safety) Faster Imports — up to 10× improvement on large sets Import Stats & Audit Tools — instant feedback and collapsible reports Improved Drag-and-Drop Media Management Autosave + Multi-Undo System — safer, smarter editing Lightweight Project Format — faster loads and smaller project files Content & Media Updates Huge thanks to @Circo and the EmuMovies crew for all the work behind the scenes. Here’s just a glimpse of what’s been refreshed: MAME HD Video Snaps – full set redone Xbox 360 – 1,144 new retail videos Atari 5200 – 74 new videos added Thanks again to everyone who’s tested, broken, and rebuilt things alongside us. The cache bugs, the folder debates, the sleepless nights — it all led to this point. The foundation we’ve built now will carry HyperSpin into its next era. You’ve all been patient, hilarious, and brutally honest — exactly what we needed. — fr0stbyt3 & The HyperSpin Team11 points
-
Hey everyone! This week’s focus has been all about refining HyperTheme—both the web UI and the ThemeBuilder itself. We've polished controls, introduced powerful new tools for theme creation, and rolled out more visual upgrades across the board. Plus, thanks to some shader wizardry from @yaron and his team, we’ve added a whole new batch of effects to play with. Let’s dive in! ThemeBuilder Updates We’ve continued to improve the control system we introduced earlier, giving users more flexibility in how they build and style themes. One of the biggest additions this week: 12 new shaders. New Shader Effects Stripes Stripes 2 Blur Circle Rays Swipe Reveal Left / Right / Top / Bottom Pixelate Flag 2 Big thanks again to Yaron and his team for the insights—they made this possible, and there’s even more on the way. Layer Grouping (Now Live!) You can now group layers together, making it easy to apply animations or effects to multiple elements at once. This is the first major step toward our next-gen theme-building experience. It also lays the groundwork for linked positioning—think wheels that automatically move with a car layer. You’ll start seeing more of this type of control in upcoming builds. UI Upgrades Across HyperTheme We’ve quietly been refreshing more of the HyperTheme site. You might’ve already noticed updates to: Login screen (with animated background) Media details pages Project creation screen (with animated background) ThemeBuilder UI We’re not done yet—expect more visual polish and consistency improvements over the next few weeks. HyperHQ Updates Updated EmuMovies support Emulator UI fixes What’s Next Work on the new controller base code is still moving forward. HyperTheme has been the main focus lately, but we’re ready to shift gears a bit and give the controller system the attention it deserves—starting next week. More soon! — fr0stbyt3 Theme Credit: @rondar Crazy_Ride_revised.mp4 Elevator_Action_Invasion_REVISED.mp411 points
-
Hey everyone! We’ve got a solid round of updates to share across HyperSpin, ThemeBuilder, and HyperHQ—with big improvements to performance, visuals, and workflow. Most notably: 3D Perspective support is in, themes now load faster, and a bunch of long-standing bugs have been squashed thanks to your reports. Let’s break it down: Theme Engine Updates The latest ThemeBuilder beta includes: 3D Perspective Mode – Bring depth and dimension to your themes Improved UI Controls – Smoother workflows and better precision. New Flag Shader – Adds ripple motion for more dynamic effects Updated Spritesheet Handling – More responsive and accurate Save Project Fixes – No more corrupted saves or lost work These updates also speed up theme loading in HyperSpin itself—everything feels snappier and more responsive. Coming Soon We’re working on even more tools to boost creativity and streamline theme building: Element Grouping – Easily organize and manage related elements Group-Based Animations – Animate multiple elements together Expanded Shader Support – More ways to enhance your themes These features are already in development and coming soon. HyperHQ Beta (v2.0.59) The latest HyperHQ beta is now available: Sync Settings – Sync ui updates - more updates to come Dropdown UI Fixes – Cleaned up behavior across the board Download Safeguard – Prevents accidental overwrites Emulator Overrides – Back online and functioning as expected Please give it a spin and let us know if anything still feels off. Wrapping Up We’ve got a few more updates coming out as they’re completed, but we’ll be shifting to a bi-weekly release cycle very soon. That schedule should give us a good rhythm—enough time to focus on bigger features while still staying responsive to your feedback. As always, huge thanks to everyone building themes, testing builds, and sharing ideas—it’s been awesome seeing the community come alive again, and your input is driving everything we’re doing. More cool stuff on the way. Stay tuned!11 points
-
Hey everyone! Important Installation Notice Due to the level of changes in this update, we highly recommend performing a clean installation to avoid compatibility issues. Please follow these steps: Uninstall your current version of HyperHQ and HyperSpin. Delete the following directories manually: C:\Users\[your_username]\.HyperHQ Your HyperSpin install directory Install the latest version fresh from our official source. This will fix issues for users who installed in custom directories and ensure that all settings and media comply with the latest version. We’ve been hard at work making improvements to HyperHQ and HyperSpin, focusing on performance, usability, and bug fixes. Below is a breakdown of the latest changes. HyperHQ Updates MAME Enhancements Player count is now a preference, not a filter – Selecting “2 players” will prioritize 2-player versions of games but won’t exclude playable 4-player games. Support for 'imperfect' ROMs – These are now recognized as playable and will no longer be filtered out. Improved clone detection – Enhancements to ensure better ROM organization. ROM Handling & Downloads Duplicate handling improvements – Games from multiple regions, languages, and sets are now properly merged. Video download updates – Fixes matching errors for more accurate media retrieval. Memory utilization improvements – Downloads are now more efficient and less memory-intensive. Cache System Overhaul New UI for cache progress – You can now track cache building progress in real time in HQ. Faster cache builds – Expect 60-70% faster cache build times compared to previous versions. Media override fixes – Bugs affecting media verification and overrides have been resolved. Auto Import & System Performance Improved auto-import logic – More refinements coming in future updates. Performance boosts – Faster system loading times and smoother navigation. UI Enhancements – The title bar now uses background assets where applicable. Logging & Debugging HQ logs moved to a dedicated folder – Now located in /logs within the HyperHQ directory. New log viewer – Access it via Settings > HyperHQ > Logs. ROM Details & Media Fixes UI refinements – Smoother experience when viewing ROM details. Bugfix for media apply state – Ensures proper display of applied changes. HyperSpin Updates Media Improvements Updated music support – Enhancements to in-game music handling. Intro/Outro bug fixes – Resolved issues affecting intro and outro sequences. Cache Enhancements Full support for new cache improvements – Includes all performance and UI updates from this build. Controller Fixes Navigation improvements – Controller input handling has been refined for a smoother experience. Final Notes These updates bring significant improvements to usability, speed, and overall functionality. As always, we appreciate feedback from the community—let us know if you run into any issues or have feature suggestions! Happy gaming!
11 points
-
HQ Plugin refresh issue fixed. This would create "duplicates" after an update Fixed Intro outro video does not play if the videos are the same Media delete bug fixed HS (2.0.28) Fixed javascript error on close Fixed wheel not being available after some change types Controller support updated Fixed Snap images going outside of bounds of the frame Fixed issue where the "selected" wheel item index was not centered Letter hop errors fixed App can now be closed with alt+f4 without throwing an error Marquee allows video overrides (requires HQ 2.0.35) Wheel opacity bug fixed11 points