ericleroi Posted April 29, 2014 Author Posted April 29, 2014 Indeed vaad. The challenge for me is getting the balance with making tangible progress and not geting too hung up on very minor flaws. I've finished it and am satisfied: I will coat it in polyurethane tomorrow and then start cutting the mesh, artwork and acrylic.
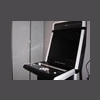
ericleroi Posted April 30, 2014 Author Posted April 30, 2014 Grill with mesh: Grill with mesh and aluminium bars. Edit: With the tow hook:
majorspawn Posted May 1, 2014 Posted May 1, 2014 Indeed vaad. The challenge for me is getting the balance with making tangible progress and not geting too hung up on very minor flaws.I've finished it and am satisfied: I will coat it in polyurethane tomorrow and then start cutting the mesh, artwork and acrylic. is that flat black and water based poly? My Arcade Projects: SNES PC Project Vewlix Cabinet LS-30 Rotary Joysticks
ericleroi Posted May 1, 2014 Author Posted May 1, 2014 It's just flat black in that picture majorspawn. With the polyurethane applied, it looks like this:
ericleroi Posted May 3, 2014 Author Posted May 3, 2014 Hat (for TrackIR) and mouse pad ordered: 4 panels for the front cut: Inside view showing the reason for T-Molding:
ericleroi Posted May 3, 2014 Author Posted May 3, 2014 Spent a couple of hours designing the cutouts/windows for the side pieces:
ericleroi Posted May 4, 2014 Author Posted May 4, 2014 Started cutting the side sections for the dashboard. This will extend beyond the side panels on the front an make it wider to accommodate more buttons etc. there will also be a space behind it and those side panels for more air ducting. It will also enable me to create an angled dash so the outer part will be slightly closer for me to reach: It's my wife's birthday today and I need to get some building in before we go out ... Edit: Just to give an idea concerning the spacing / air vent metioned earlier: It will give a more 3 dimensional look to the build.
maxxsinner Posted May 4, 2014 Posted May 4, 2014 Looking great ericleroi. I am going to try the polyurethane and blackboard paint method on my next cabinet as the results speak for themselves by looking at your pics. How many control buttons do you think will be needed? And can I ask where are you getting the custom branded gear like your hat, mouse pad and epoxy logo badge from cause they are awesome! Really takes it to a whole new level. Electropin - Enough lights to land a jet on an aircraft carrierHigh Voltage Pinball - Cause one build just wasn't enough Voltek Arcade - Funglo pedestal style mame cabinet Pinball Electrical Tutorial - Wire All Your Bling With Confidence and Fewer House Fires
ericleroi Posted May 5, 2014 Author Posted May 5, 2014 Thanks maxxsinner. Ifrom previous experience, it can be the little details which make the difference. I'm trying to strike a balance with the 'accessories' and not overload it too much. Regarding the buttons, I'll likely purchase a Derek Speare Designs button box and decase it. It still represents good value doing it this way and I know all the components will be compatible. The one I'm looking at is here: http://www.derekspearedesigns.com/p1p2.html The mousepad and mat can be bought from many on-line shops. I ordered mine from here: http://www.vistaprint.co.uk The badge I ordered from an no-line Name Badge making site. I used this one: http://www.namebadgesinternational.co.uk/ Have fun!
ericleroi Posted May 5, 2014 Author Posted May 5, 2014 Holes drilled in the first of the front panels: Rough cut and ready for the router guides to be attached:
ericleroi Posted May 5, 2014 Author Posted May 5, 2014 Completed flush trimming the first panel: Close-up:
ericleroi Posted May 5, 2014 Author Posted May 5, 2014 Sorry about the proliferation of posts, just want to keep a complete log ... Test fit for the front: I'm pleased with how this is turning out so far.
ericleroi Posted May 5, 2014 Author Posted May 5, 2014 Completed the other side. This was a lot easier using the other piece as a template:
ericleroi Posted May 5, 2014 Author Posted May 5, 2014 Got my head down and completed the router work for the outside front panels: Close-up of the outside: Inside:
HazzardActual Posted May 5, 2014 Posted May 5, 2014 http://www.derekspearedesigns.com/p1p2.html holy crap, that handbrake is so awesome
connorsdad Posted May 5, 2014 Posted May 5, 2014 Great craftsmanship as usual Ericleroi Sent from my SM-N9005 using Tapatalk
iiixtream Posted May 6, 2014 Posted May 6, 2014 I have to say you have some serious skills. The attention to detail you have is outstanding. You have a well thought out plan that makes me jealous. Your sure to have many hours of fun with this, unless your like me and enjoy the build more than the play. Good luck and can't wait to see the final piece in place.
ericleroi Posted May 6, 2014 Author Posted May 6, 2014 holy crap, that handbrake is so awesome I try not to look at sites like that too often. Some of the equipment is outrageously good. Great craftsmanship as usual Ericleroi Thanks connorsdad. Still deciding on the configuration of some aluminium strips to embed over the mesh. I'm completely undeceided though and may not go for them at all. Decisions, decisions. I have to say you have some serious skills. The attention to detail you have is outstanding. You have a well thought out plan that makes me jealous. Your sure to have many hours of fun with this, unless your like me and enjoy the build more than the play. Good luck and can't wait to see the final piece in place. Thanks iiixtreme. It's probably due me endlessly (read obsessively) piecing things together in my mind and then just ploughing through the build. I do enjoy the process as much as the use I get out whatever is created.
ericleroi Posted May 7, 2014 Author Posted May 7, 2014 There are some small jobs which I can complete during the week. I'd been meaning to tidy up the footwell / kickplates and ensure that there was no MDF visible. There was an area behing the kickplates and also down the side of the side panel where this would have been the case. Firstly, I painted the visible areas with flat black paint: Then I made some blanking plates which would: -Raise the kick plate to integrate better with the T-Molding on the front. -Add more protection to the side of the foot well and ensure that any foot scuffs wouldn't cause the vinyl in that area to peel. -Tidy up an area visible between the kick plate and the seat base. Blanking plates: I covered these in vinyl for a good finish: Close-up of the vinyl - I can't recommend this stuff enough, it has a lovely texture: The section is now a lot tidier: I will need to use epoxy to glue all these pieces in-place.
ericleroi Posted May 7, 2014 Author Posted May 7, 2014 Not happy with the finish on this piece (and will be re-doing it) but here it is after varnishing:
connorsdad Posted May 7, 2014 Posted May 7, 2014 Don't see what's wrong with it tbh. I have the same Makita drill/screw driver set Sent from my SM-N9005 using Tapatalk
ericleroi Posted May 8, 2014 Author Posted May 8, 2014 The Makita is a great tool - beats the hell out of a substandard and underpowered Black and Decker I used to have. Quality control has rejected the panel as it has too many flaws. If I don't do it right, I'll know it's there
HazzardActual Posted May 8, 2014 Posted May 8, 2014 Makita are the only tools for me. Those batteries are great.
ericleroi Posted May 9, 2014 Author Posted May 9, 2014 Yep, nothing worse than being in the building groove only to find you've run out of juice!
ericleroi Posted May 10, 2014 Author Posted May 10, 2014 A list of things I'm hoping to get done this weekend: Make hinged drop down panel for 'glove box' - this is to hide the USB Hub under the wheel shelf Widen cable hole on top of dashboard - the monitor cable doesn't fit through this at present Fit interior cable ducting - tidy up / hide interior cables Power and cable management - Fit velcro for better cable management (and 4-way power extension) inside dash area and below wheel shelf Permanently attach blanking plates / kick plated - Screw in / epoxy these pieces Attach thin foam to inside of shifter console - will help to reduce any vibrations between the shifter console and the base Cut new internal shifter / Buttkicker mount - needs to be a single piece for better Buttkicker effects Wire up pedal and shifter Buttkickers - Only the seat buttkickers are operational at present Apply vinyl to inside visible faces of front panel, wheel shelf and glove box - remove any visible MDF Complete side panel - currently re-filling and sanding. Will need to cut wire mesh, acrylic, artwork backing board Route inlays for aluminium strips on front side panels - I will be going for 'one and one' Still To-do: Shape dashboard sides Cut dashboard side attachments - this will include 'venting' Cut dashboard top pieces Design and cut dashboard fascia panels - I will need to trim some of the side panel pieces to allow for buttons and rotary controls Finishing for side pieces - aluminium bars, painting and varnishing, mesh, rubber sheet inlay with backing board Finishing for dashboard sides - inlay for rubber sheet plus backing board Add pleather to top of dashboard Device holder - make a cradle to hold portable device to sit behind the CSW base Design and build hood for monitor / TrackIR External vinyl application Complete air intake for the hood Attach grill / tow hook to front Accessories / secondary units: Design and build amplifier rack - this will have a fan on top - it gets hot racing Design and build mouse and keyboard unit Design and build accessory racking - wall panels for holding wheel rims, secondary shifter knob, hat, gloves, headphones Design and build base with integrated LED lighting Still to purchase Real carbon fibre sheets for dashboard fascia Derek Speare Designs button box - to be disassembled and integrated into the build 6mm MDF for glove box drop down panel Cooling fan MDF and rubber for base At some point in the future: New graphics card - GTX 880 probably 3 screens 1000w amp for large Buttkicker Large Buttkicker New headphiones - probably Astro a50's There's bound to be quite a few things I've missed ...

Recommended Posts
Archived
This topic is now archived and is closed to further replies.