-
Posts
159 -
Joined
-
Last visited
-
Days Won
1
malarrya last won the day on June 3 2022
malarrya had the most liked content!
About malarrya

- Birthday 05/29/1968
Profile Information
-
Location
Riverside, CA
-
Interests
Snowboarding, Hockey, Baseball, Arcade Games, Guitar, Travelling, Comic-Con, Star Wars, and Movies.
Retained
- HyperNewbie
Recent Profile Visitors
7,626 profile views
malarrya's Achievements
-
View File Window 10 Arcade Classics Desktop Theme I created this desktop theme for Windows 10 from images found around the internet and use them for my arcade cabinet. I take no credit for any of the images but thought I would share the theme in case anyone's interested. Most images are 1920x1080 except for 2 that are a bit bigger and don't look that good scaled down. I also included a VBS script that makes the desktop wallpaper rotate to the next random image and a shortcut to this script that makes it easy to double-click and run the script. You may need to make your own or edit the shortcut depending on where you move the VBS script but I included it for completeness. Enjoy, and let me know if you have any issues with the theme. Submitter malarrya Submitted 05/27/2018 Category HyperSpin File Count 3 Credits
-
- windows
- classic arcade
-
(and 1 more)
Tagged with:
-
Version 2.0.0
94 downloads
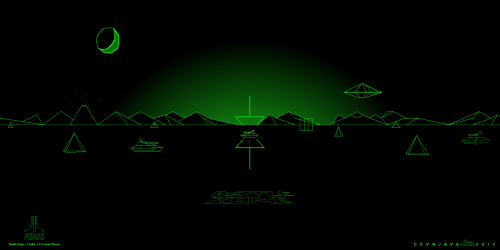
I created this desktop theme for Windows 10 from 33 images and 30 wave files found around the internet and use them for my arcade cabinet. I take no credit for any of the images or sounds but thought I would share the theme in case anyone's interested. I put the two together to create a WINDOWS 10 DESKTOP THEME. Most images are 1920x1080 except for 2 that are a bit bigger and don't look that good scaled down. IN ORDER TO GET THE SOUND SCHEME AND NEW DESKTOP THEME TO WORK: 1. Place the Arcade Classics Folder containing the WAV files into your %WINDIR%/media folder. 2. ONLY if you installed an earlier version of this Arcade Classics Theme (IF NOT then skip this step), click on another theme (like Windows Default), then RIGHT-CLICK on the ARCADE CLASSICS THEME and select DELETE. 3. Double-click on the NEW ARCADE CLASSICS THEME. It should connect the sound scheme to the desktop theme. 4. ENJOY! I also included a VBS script that makes the desktop wallpaper rotate to the next random image and a shortcut to this script that makes it easy to double-click and run the script. You may need to make your own or edit the shortcut depending on where you move the VBS script but I included it for completeness. Put the VB-SCRIPT wherever you'd like then edit the shourtcut to point to the vb-script. I have my script in my c:/Hyperspin folder and the shortcut on my desktop. Enjoy, and let me know in the comments below if you have any issues with the theme or what your favorite images are. I like Space Invaders, Star Wars, and Battle Zone the best.-
- 3
-

-
- classic arcade
- windows
-
(and 1 more)
Tagged with:
-
malarrya started following sega triforce playable games and Sega model 1 arcade board
-
Version 1.1.0
1,936 downloads
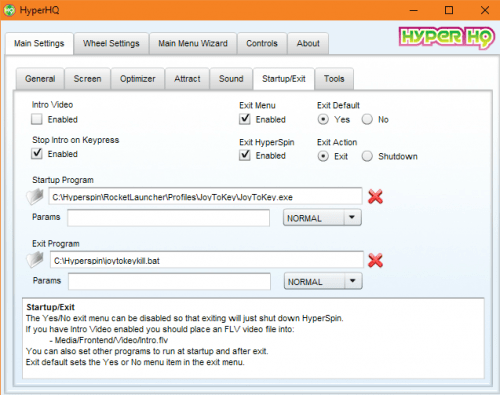
What's New for Version 1.1.0: ADDED 7 New Systems (80 TOTAL) + HS/RL/Default profiles. New systems include Sega Model 1, Sega System 16, Sega System 24, , Sega X Board, Sega Y Board, Pop-Cap, and Microsoft MS-DOS. Changed the ESC key functionality to buttons 7 + 8 (COIN+START). You must now press both to exit the game. Placed the ESC key location on Button 25 (a dummy location good for using combo buttons). Changed Button 5 to TAB. Changed Button 6 to P (PAUSE). Changed Button 9 to C. Changed Button 10 to V. Changed Button 11 to Z. Changed Button 12 to X. I'll see how this configuration works for me for the time being. If it's a pain or something is not quite right, I'll continue tweaking it until I find what's best. ***************** BACK UP YOUR OLD PROFILES IN CASE YOU DON'T LIKE THE CHANGES ***************** ------------------------------------------------------------------------------------------------------------------------------------------------------------------------------------------------------------------------------------------------- I created about 75 profiles for various systems, added them to a RAR archive, and attached to this post. All you have to do is unrar and place the folders within the archive into your ..\RocketLauncher\Profiles\JoyToKey directory. For example, mine is -- C:\Hyperspin\RocketLauncher\Profiles\JoyToKey. You may need to edit the profiles so they are more to your liking or work correctly with your setup. I use the default MAME setup for everything. If you want to change one or all of them, all you have to do is edit only one CFG file, copy the CFG file to every other folder, and rename the CFG file and FOLDER to the name of the emulator you're using for the system. For example -- I use Stella for the Atari 2600. My path is then C:\Hyperspin\RocketLauncher\Profiles\JoyToKey\Atari 2600\Stella\Stella.cfg Maybe you don't use Stella for the Atari 2600 but use RetroArch. Here's how to change it: You would simply rename C:\Hyperspin\RocketLauncher\Profiles\JoyToKey\Atari 2600\Stella\Stella.cfg to C:\Hyperspin\RocketLauncher\Profiles\JoyToKey\Atari 2600\RetroArch\RetroArch.cfg. It's the same path\folder\file but the innermost folder and cfg file have simply been renamed to match the emulator being used. It's tedious to copy, paste, and rename but it doesn't take too long. I've copied these files to another machine that uses Launch Box, set up JoyToKey in Rocket Launcher via the tutorial link below, and found it working beautifully. MAME is a bit of a jerk, however. Sometimes it works straight away and sometimes you still have to map the game within the MAME TAB menu. I ONLY HAVE CONTROLLER 1 MAPPED IN THESE FILES! NOTE: There are NO games or programs within this archive. There are, however, 2 other files -- a BAT file for killing the JoyToKey process and a shortcut that gives that BAT file ADMIN privileges. Place the BAT and LNK files in your root Hyperspin directory and use the JoyToKey.exe as the startup program and JoyToKeyKill.lnk as a shutdown program in the HyperHQ UI. Using the LNK shortcut file allows for Administrator privileges with the CMD prompt window. You may need to create your own shortcut but I've included it for completeness. See the attached images. All files were created manually by me so there's no copyright issue. **** Here is a very good tutorial on how to set up JoyToKey with both Hyperspin and Rocket Launcher - READ IT CAREFULLY!: http://bit.ly/2oA2CJ4 ----------------------------------- ONLY FOR THOSE USING A MOGA PRO CONTROLLER----------------------------------- In case you have a Moga Controller, download and install the Moga Serial program: https://github.com/Zel-os/MogaSerial NOTE: I can only get it to work in Mode A on the PRO Controller but it works great! Your computer will also need BlueTooth enabled and successfully linked to the MOGA. Here is where you can get the latest vJoy USB Controller Driver (you'll need this for the MOGA Controller): http://vjoystick.sourceforge.net/site/ -
Future Pinball Wheel Pack 1.0.0 View File Future Pinball wheel pack consisting of 700 images to go along with my XML database. Many of these images are very high quality and most are as close to the table logos as possible. Some have been fabricated by me an others but this group has the most corresponding videos I could find. The image collection is quite pleasing. Please let me know if you encounter any mistakes or errors. Submitter malarrya Submitted 11/14/2016 Category Wheel Packs HyperBase Version Media Dimensions File Count Credits
-
Version 1.0.0
532 downloads
Future Pinball wheel pack consisting of 700 images painstakingly collected and edited from sites like VPForums, Pinsimdb, Google image search, Hyperspin Forums, and other users' collections to go along with my XML database. Many of these images are very high quality and most are as close to the table logos as possible. Some have been fabricated by me and others but this group contains tables that mostly have a corresponding video. The image collection is quite pleasing. Please let me know if you encounter any mistakes or errors. The filenames do not contain the year. If this is important to you I can possibly provide you with a set that does or you can easily edit the names using an XML editor (like MS Excel) and a program like File Renamer. The corresponding Database XML can be found here: The Video clips can be found here: https://mega.nz/#F!cBly1Q7b!9yw3zCrpmnym0K4KgitKTQ Here are the settings I use for Future Pinball:- 3 comments
-
- 11
-

-

-

-
Version 1.1.0
588 downloads
I've compiled a list of 700 pinball tables for Future Pinball. This pack also includes genres for Originals, Recreations, Bally, Gottlieb, Sega, Data East, Stern, and others. I also have a matching set of 700 very high quality wheel images and nearly 700 videos. Please let me know if you find any errors and I will fix them as soon as possible. Note: the file naming scheme does NOT include the year. If having the year in the filename is important to you please let me know. I can easily change this or make a set that includes it. I've included the GENRE wheel art here on this post. The corresponding Wheel Art can be found here: The Video clips can be found here: https://mega.nz/#F!cBly1Q7b!9yw3zCrpmnym0K4KgitKTQ Here are the settings I use for Future Pinball: -
Future Pinball Database (XML) Pack View File I've painstakingly compiled a list of 700 pinball tables for Future Pinball. This pack also includes genres for Originals, Recreations, Bally, Gottlieb, Sega, Data East, Stern, and others. I also have a matching set of 700 very high quality wheel images and nearly 700 videos. Please let me know if you find any errors and I will fix the as soon as possible. Note: the file naming scheme does NOT include the year. If having the year in the filename is important to you please let me know. I can easily change this or make a set that includes it. I've included the GENRE wheel art here on this post. Submitter malarrya Submitted 11/14/2016 Category Databases (XML) Credits
-
Version 1.0.0
140 downloads
Well since releasing my first 2 XMLs (MAME Horror Games and William's Classics) I've been quite busy with other projects like Dungeons & Dragons,Terrordrome, Visual Pinball, and Future Pinball. I've also been playing/restoring my ColecoVision console and noticed there are quite a few great games by Exidy. I decided to whip up an Exidy Classics XML and Main Menu theme for your enjoyment. Attached is a Wheel image with the Exidy Logo. The Exidy Classics XML can be found here: http://www.hyperspin-fe.com/files/file/12379-exidy-classics/ The Main Menu video can be found here: http://emumovies.com/files/file/2054-exidy-classics/ Incidentally, I never copy and paste all the MAME artwork into these Arcade Classics folders. There is a much better way using symbolic links. I simply PICK the video folder from the MAME media directory and DROP it in the media folder for the new system (in this case Exidy Classics). For a full explanation on how to do this and save a lot of time and space look here: http://www.howtogeek.com/howto/16226/complete-guide-to-symbolic-links-symlinks-on-windows-or-linux/ -
Version 1.1.0
147 downloads
Well since releasing my first 2 XMLs (MAME Horror Games and William's Classics) I've been quite busy with other projects like Dungeons & Dragons,Terrordrome,Visual Pinball, and Future Pinball. I've also been playing/restoring my ColecoVision console and noticed there are quite a few great games by Exidy. I decided to whip up an Exidy Classics XML and Main Menu theme for your enjoyment. Attached is a Wheel image with the Exidy Logo. The Exidy Classics Main Menu Theme can be found here: http://www.hyperspin-fe.com/files/file/12400-exidy-classics-main-menu-theme/ The Main Menu video can be found here: http://emumovies.com/files/file/2054-exidy-classics/ Incidentally, I never copy and paste all the MAME artwork into these Arcade Classics folders. There is a much better way using symbolic links. I simply PICK the video folder from the MAME media directory and DROP it in the media folder for the new system (in this case Exidy Classics). For a full explanation on how to do this and save a lot of time and space look here: http://www.howtogeek.com/howto/16226/complete-guide-to-symbolic-links-symlinks-on-windows-or-linux/ -
-
238 downloads
The crew at Huracan Studio just released a new version 2.10 of this fantastic game on Halloween. I've had this set up in my Hyperspin Main Menu for quite some time now and wanted to share it with you all. I did not create the menu graphics but collected them from around the web and thought there needed to be some easy place to find them. I am uploading the XML I created, the main menu graphics from sinistersix, the main menu wheel art, and the gameplay video. Please contact me if you need help getting the game to work correctly. Hope you enjoy!







(DataEast).thumb.png.18d14ace0e0d302218f217056ff8b98e.png)
