thatman84
-
Posts
3,640 -
Joined
-
Last visited
-
Days Won
9
Content Type
Forums
Events
Downloads
Store
Development Tracking
HyperCL
Everything posted by thatman84
-
i didnt think mess games were included in mame sets? Just the bios files for the mess systems what do you use to filter?
-
No reason not to share @phantasy just make your thread intro the same as the post above. He'll none of my stuff is close to official !
-

(Tutorial) Hyperspin Android Overview and Install
thatman84 replied to thatman84's topic in HyperSpin Android
Cool don't lose hope man! retroarch configs are a real pain unless you root your device ( I didn't want to) -
(Tutorial) Hyperspin Android Overview and Install
thatman84 replied to thatman84's topic in HyperSpin Android
Click the Hyperspin Android Base Pack link in the 1st post tutorial. Give that a read and click on Donload. You will have a list of all the files including the help text files and settings folder- 80 replies
-
- 1
-

-
- android
- hyperspin android
- (and 1 more)
-
(Tutorial) Hyperspin Android Overview and Install
thatman84 replied to thatman84's topic in HyperSpin Android
That was my attempt with the base pack. Problem is you should really treat Android as a stanalone setup because there is way more stuff you can do with a windows setup. Just keep all the ROM's in one place for both and have 2 sets of media/settings -
(Tutorial) Hyperspin Android Overview and Install
thatman84 replied to thatman84's topic in HyperSpin Android
When my little one is in bed I will try get on the PC, i will probably grab default themes as a project but I setup a universal one for my own system to get me by until I take on that full set project. if you fancy extracting your default themes I won't say no! But for the project I will have to try and keep track to give credits for them as much as possible -
(Tutorial) Hyperspin Android Overview and Install
thatman84 replied to thatman84's topic in HyperSpin Android
im correct in saying this is your main menu themes @badhemi? I grabbed it and fixed your turbografx 16 one to display the background correctly im good for main menus. I have not really started on default themes for calling in the boxart and stuff. -
(Tutorial) Hyperspin Android Overview and Install
thatman84 replied to thatman84's topic in HyperSpin Android
Strange I will take a look at the uploaded file -
(Tutorial) Hyperspin Android Overview and Install
thatman84 replied to thatman84's topic in HyperSpin Android
Sound like a media issue, are you getting the intro video? for main menu you need main menu.xml in Hyperspin/databases/main menu (lists all your systems, case sensitive, matching all your system folders, xml's and settings) images for your main menu system list in hyperspin/media/main menu/images/wheel themes and videos for your main menu go in Hyperspin/media/main menu/themes (& videos) -
-
-
(Tutorial) Hyperspin Android Overview and Install
thatman84 replied to thatman84's topic in HyperSpin Android
Are these your Main Menu Themes? the ones I checked looked that way and they are all named as per the system so guessing they are -
(Tutorial) Hyperspin Android Overview and Install
thatman84 replied to thatman84's topic in HyperSpin Android
Post #9 has badhemi's settings files link and it you look at the android base pack linked in first post you will find a cleaned up version with all RocketLauncher and filter preference's removed. For I hope easier setup. -
(Tutorial) Hyperspin Android Overview and Install
thatman84 replied to thatman84's topic in HyperSpin Android
Well that's not so bad then. I have a process to convert the themes which works well depending on the animation used. Sounds like you would be best creating a copy of your Hyperspin setup and adjusting the media for android. Then leave the rompath pointing to wherever it is. May be hard if your swapping a drive between droid and PC (Reznate has done a great job getting it this far, but yes an update would be awesome. Developers are hard to come by on Android, I think it's the main reason for stagnation) -
(Tutorial) Hyperspin Android Overview and Install
thatman84 replied to thatman84's topic in HyperSpin Android
Im fairly certain defining different themselves is not possible. Hyperspin prioritises usb 1st Are you using game themes? -
(Tutorial) Hyperspin Android Overview and Install
thatman84 replied to thatman84's topic in HyperSpin Android
Updated Base pack with Badhemi's settings files Currently porting the tutorial over from word to the forum -
(Tutorial) Hyperspin Android Overview and Install
thatman84 replied to thatman84's topic in HyperSpin Android
The only space I see for these is templates. That is where my base pack is. As they can't be used directly on the PC or with RocketLauncher If your ok with it badhemi I will take your settings files and do the following for release. 1. Strip out RocketLauncher parameters 2. Set all filters to false 3. Set all indexes to true 4. Default any custom positions 5. Adjust the rompath to uniform location except those that require specific (MAME softlists) This should give anyone new a solid and simple base to start with. I have a vanilla set of about 217 so will basically copy the rompath, exe and parameters out. You have any problems with reload_backgrounds. I have seen that issue pop up. I don't have transitions and I think that's to option for them. -
(Tutorial) Hyperspin Android Overview and Install
thatman84 replied to thatman84's topic in HyperSpin Android
Cool JSK Nice one badhemi, did you ever put your settings in the Upload section? If not I don't see why really. They are the biggest set I have come across -
(Tutorial) Hyperspin Android Overview and Install
thatman84 replied to thatman84's topic in HyperSpin Android
There is badhemi'S set of about 86 systems in the Nividia beginners guide thread and also Reznates set of about 40 in the downloads section. There is also a blank ini file in the Anyone feel free to post up settings as settings will be my next focus. There really is not many settings to change in the android version and big sets can leave odd problems I am aiming to overcome if possible. -
(Tutorial) Hyperspin Android Overview and Install
thatman84 replied to thatman84's topic in HyperSpin Android
Just me then! Lol -
Version 1.1
30,212 downloads
My Attempt at making Andriod, MAC, PC users 1st steps in to Hyperspin Android easier This is an adjusted version of the Media and Databases that are included with Hyperspin Full Install 1.3.3 Tweaked and cutdown for use directly with Android devices (It will not directly work with a PC although you can merge it with a PC setup to aid the building of an Android setup) Whats Included Indenticle Media files as 1.3.3 with some removals Pre configured Settings files Brief Android Emulator setup notes MAME Adjusted xml for 0.139 ROM set (Default one included also Outdated) Additional Settings files for 123 systems/collections (Provided by Badhemi) Systems Included & Emulators suggested Atari 5200 (Retroarch MAME (Arcade) Core) Atari Lynx (Retroarch Handy Core) MAME (MAME4droid Reloaded (Red) 0.139v romset NEC TurboGrafx-16 (Retroarch Mednafen PCE Fast Core) Nintendo 64 (Retroarch Mupen64Plus Core or Glupen Core) Nintendo Entertainment System (Retroarch Nestopia Core) Nintendo Game Boy Advance (Retroarch VBA Next Core Panasonic 3DO (Retroarch 4DO Core) Sega 32X (Retroarch Picodrive Core) Sega CD (Retroarch Picodrive Core) Sega Dreamcast (Reicast 73e2691 2016_05_22 Build) Sega Game Gear (Retroarch Genesis Plus GX Core) Sega Genesis (Retroarch Picodrive Core) Sega Master System (Retroarch Picodrive Core) SNK Neo Geo (Retroarch FB Alpha Core) SNK Neo Geo Pocket Color (Retroarch Madnafen NGP Core) Sony PlayStation (Retroarch PCSX Rearmed Core) Super Nintendo Entertainment System (Retroarch BSNES Mercury Performance Core) See this Thread for details (Tutorial) Hyperspin Android Overview & Installation Install Notes To install this Hyperspin Android base pack Step 1 - Combine the download parts Extract the "Hyperspin 1.3.3 Android PT1" (Hyperspin.zip) file Place the "Hyperspin 1.3.3 Android PT2" (Media.zip) file within the extracted Hyperspin folder Extract the "Hyperspin 1.3.3 Android PT2" (Media.zip) file and it will combine the two parts Alternativly extract both files and the cut and paste them together (Optional Addition) Extract the Settings_Android.zip and pick out the settings files you require as you build your setup. Place them in your Settings folder or Settings_Android folder depending on your setup Rename specific systems if needed ADD YOUR ROMPATH Step 2 - READ the Setup Notes.txt Step 3 - Organise your roms Organise your roms so they are located in the suggested folder structure OR place them in a location of your own choice. MAKE sure you adjust the "SYSTEMNAME".ini files to reflect your own rompath ****Remeber rom names will need to exactly match your Hyperspin databases (.xml) and be in a format that your chosen emulator can open**** Step 4 - Move the pack to your Android Device Once you have the complete Hyperspin folder place this at the root of your storage device connected to your android device (USB HDD, Internal storage, SDCard or Network drive) Step 5 - Download and configure your emulators Step 6 - Install Hyperspin Application Download and install the Hyperspin application from the Goggle Playstore- 4 comments
- 2 reviews
-
- 14
-

-

-
-
- android
- hyperspin android
- (and 1 more)
-
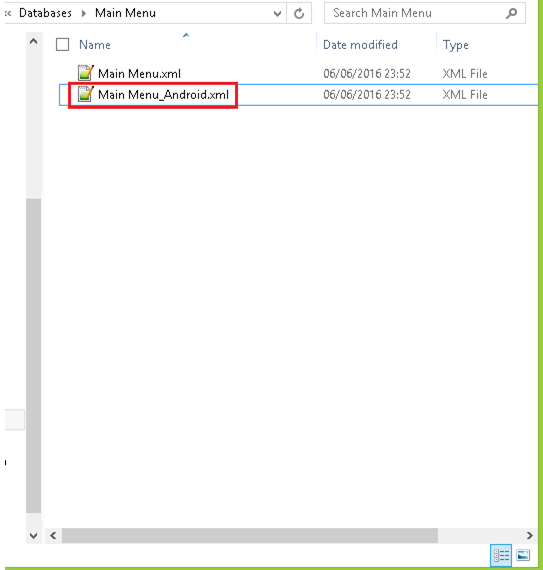
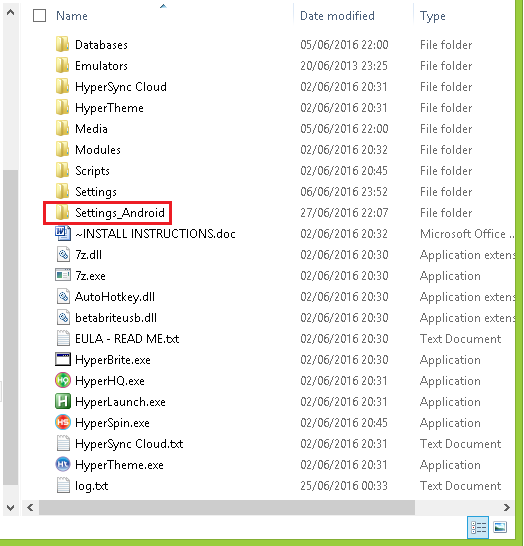
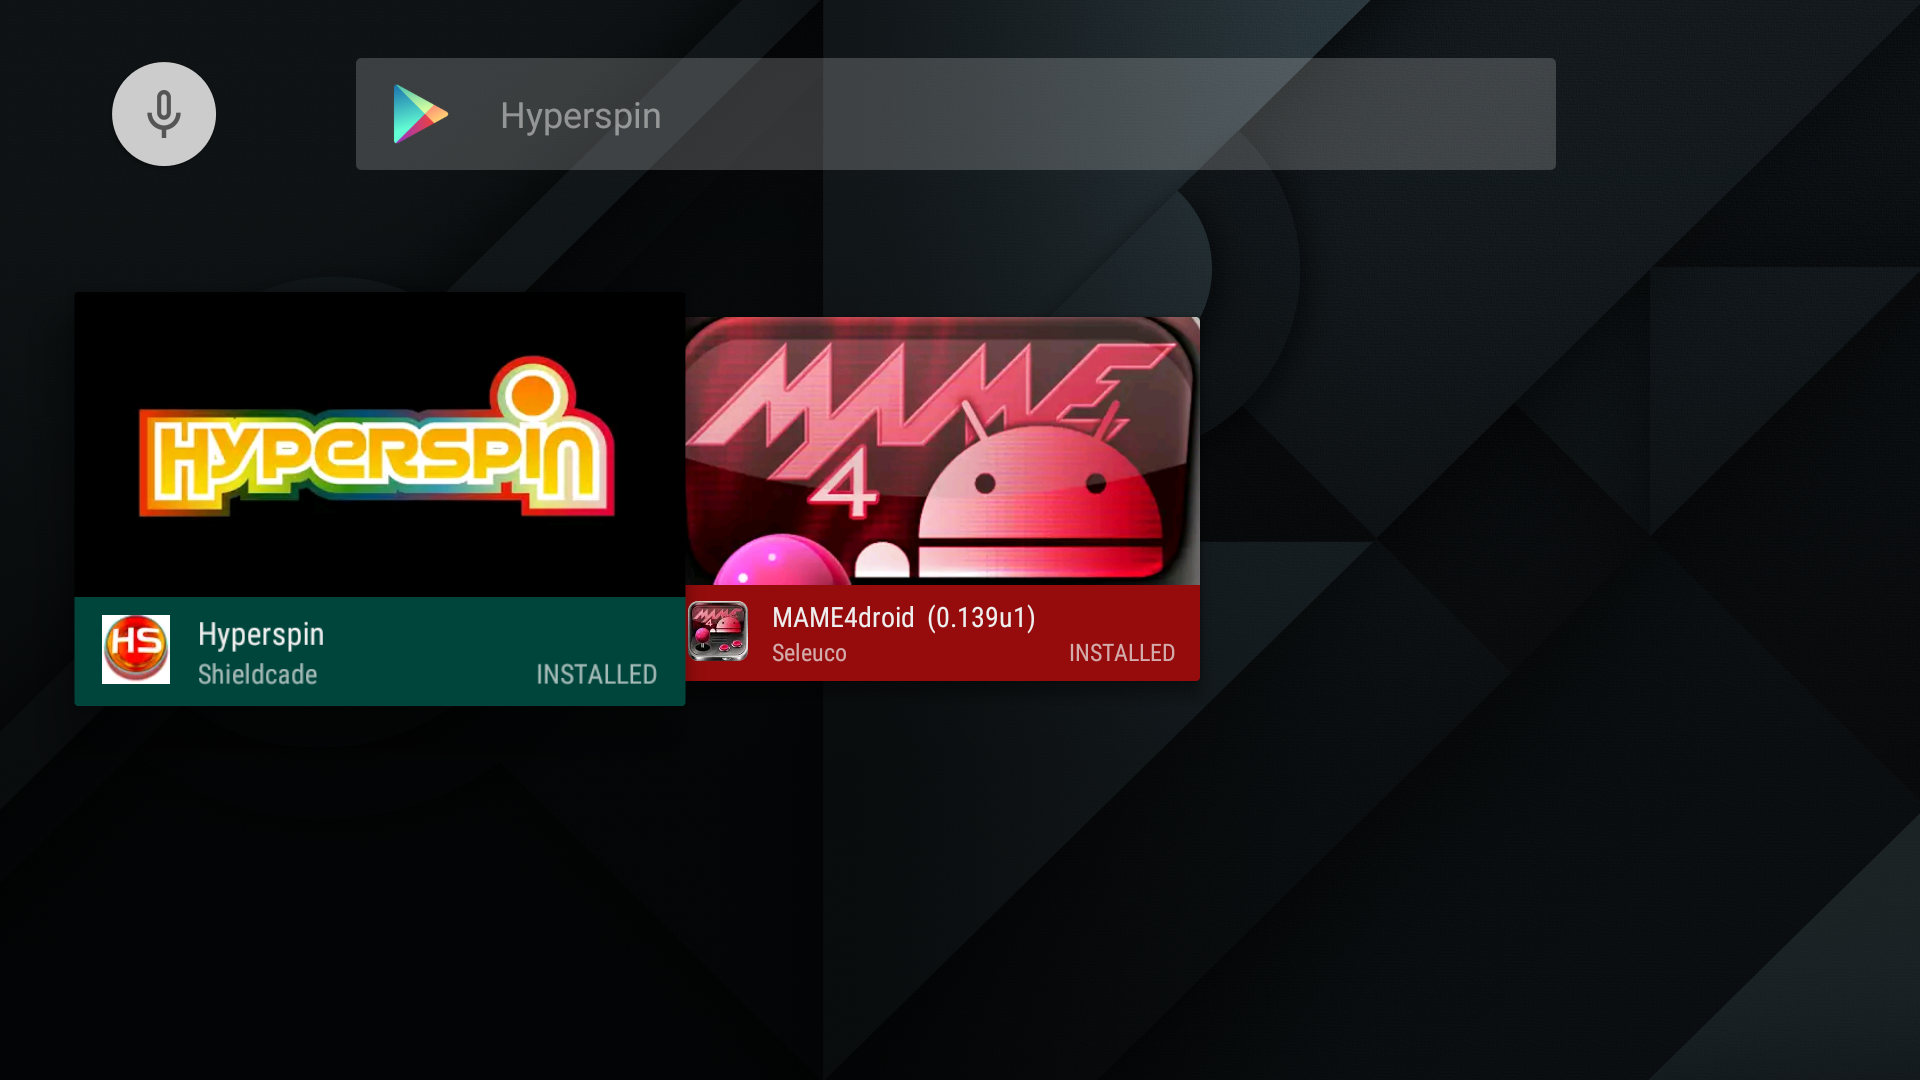
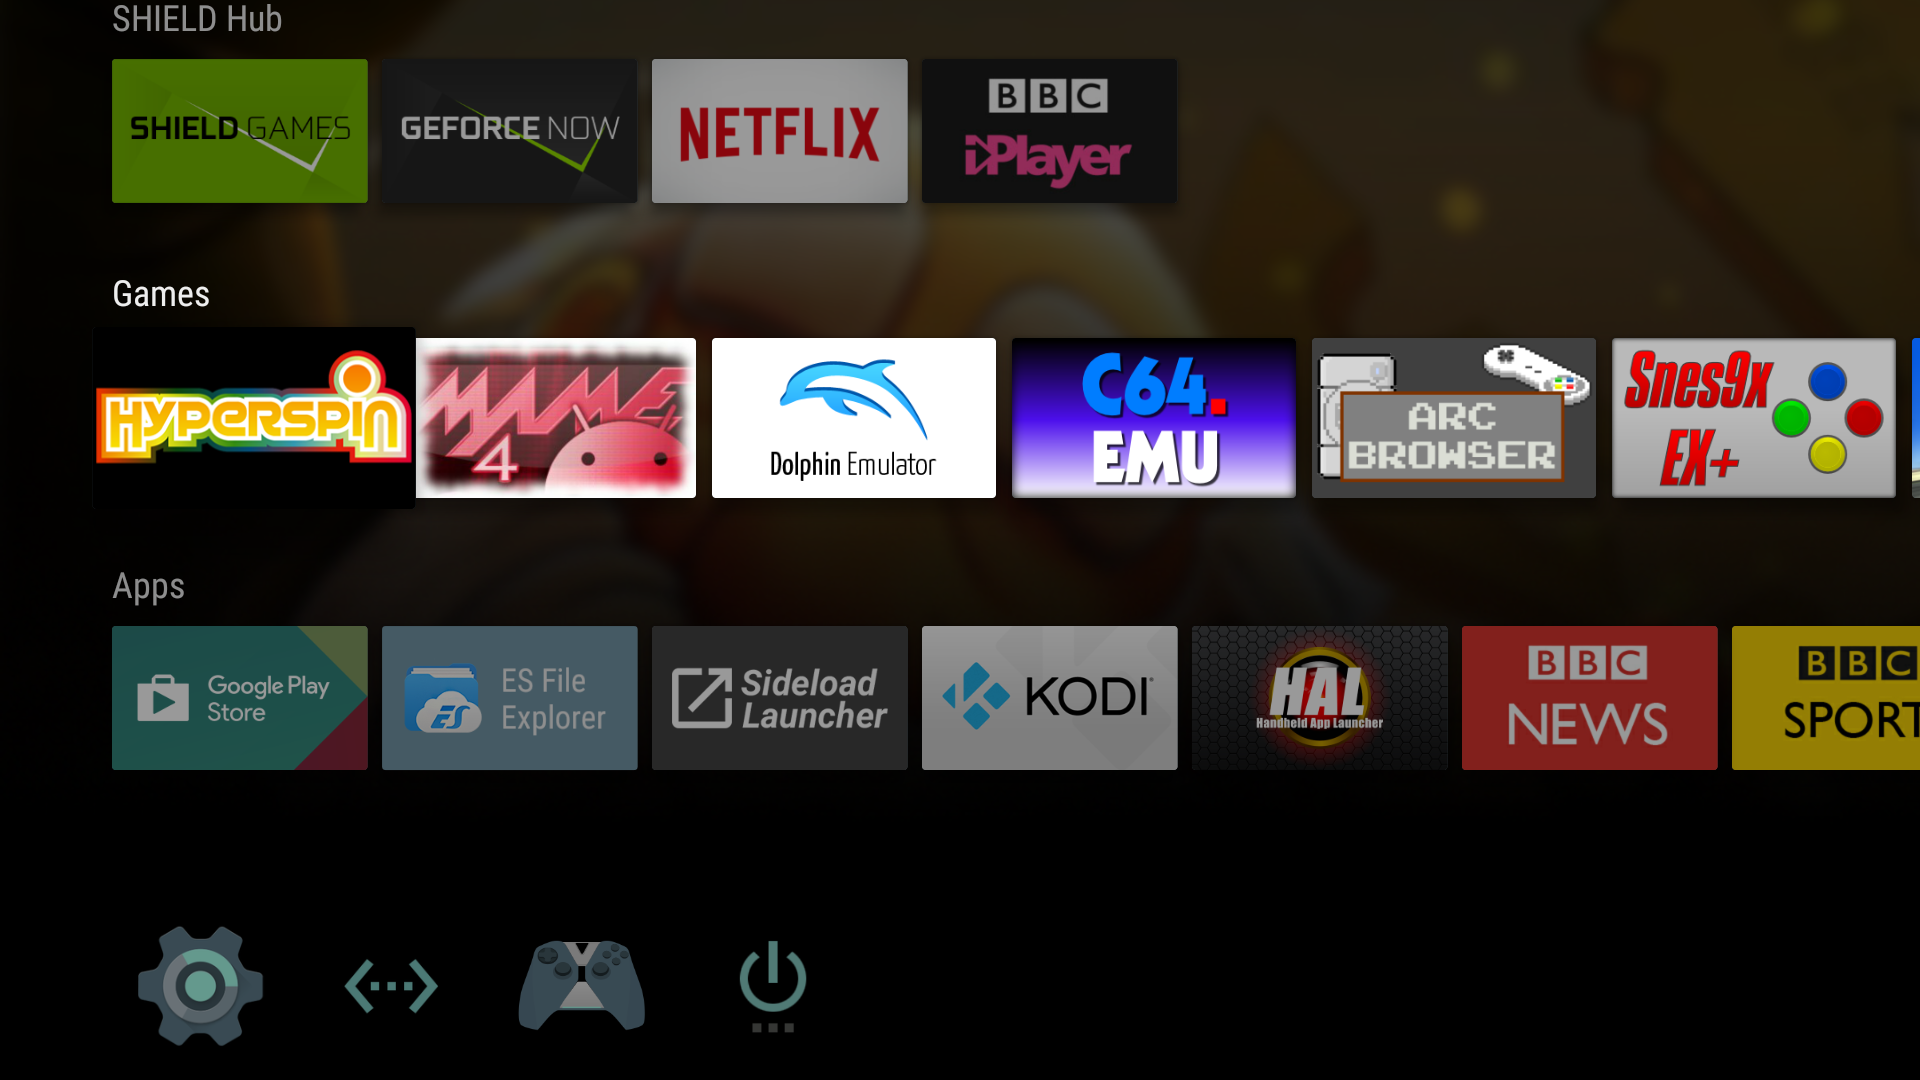
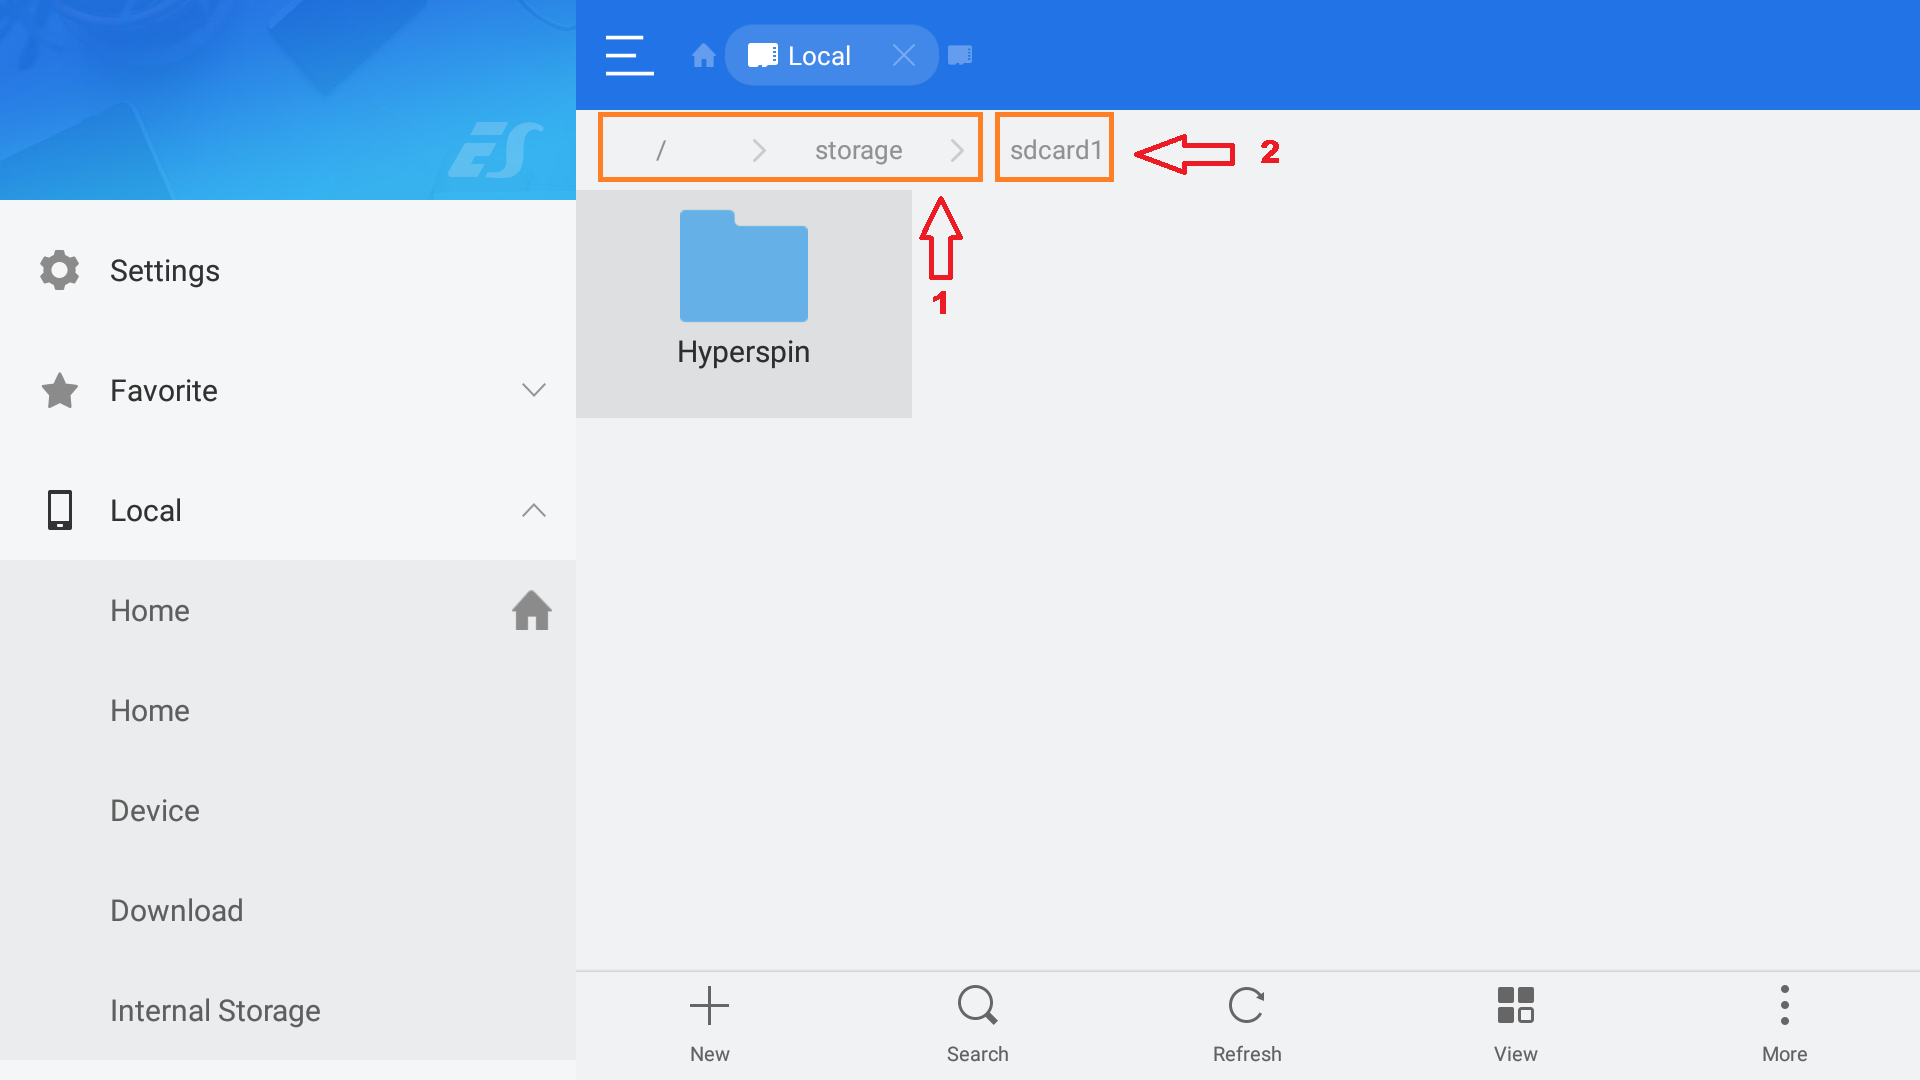
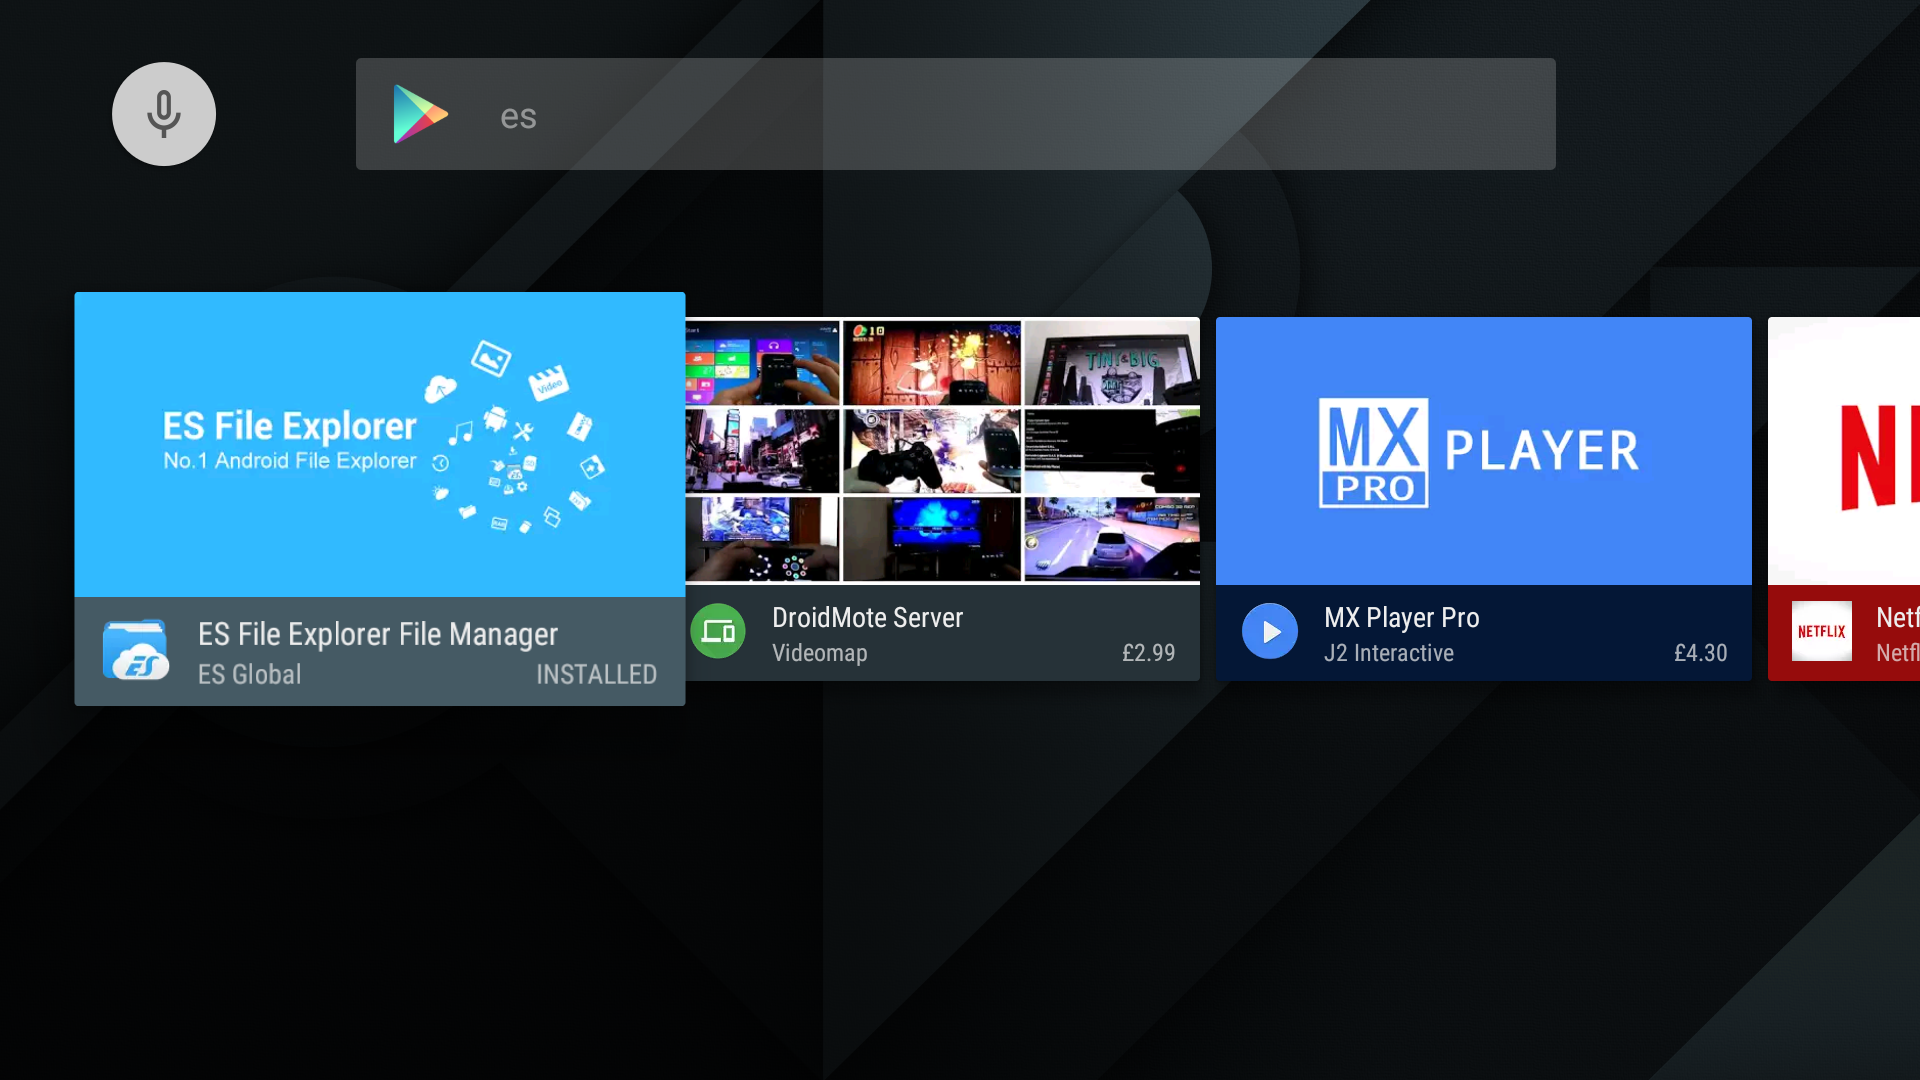
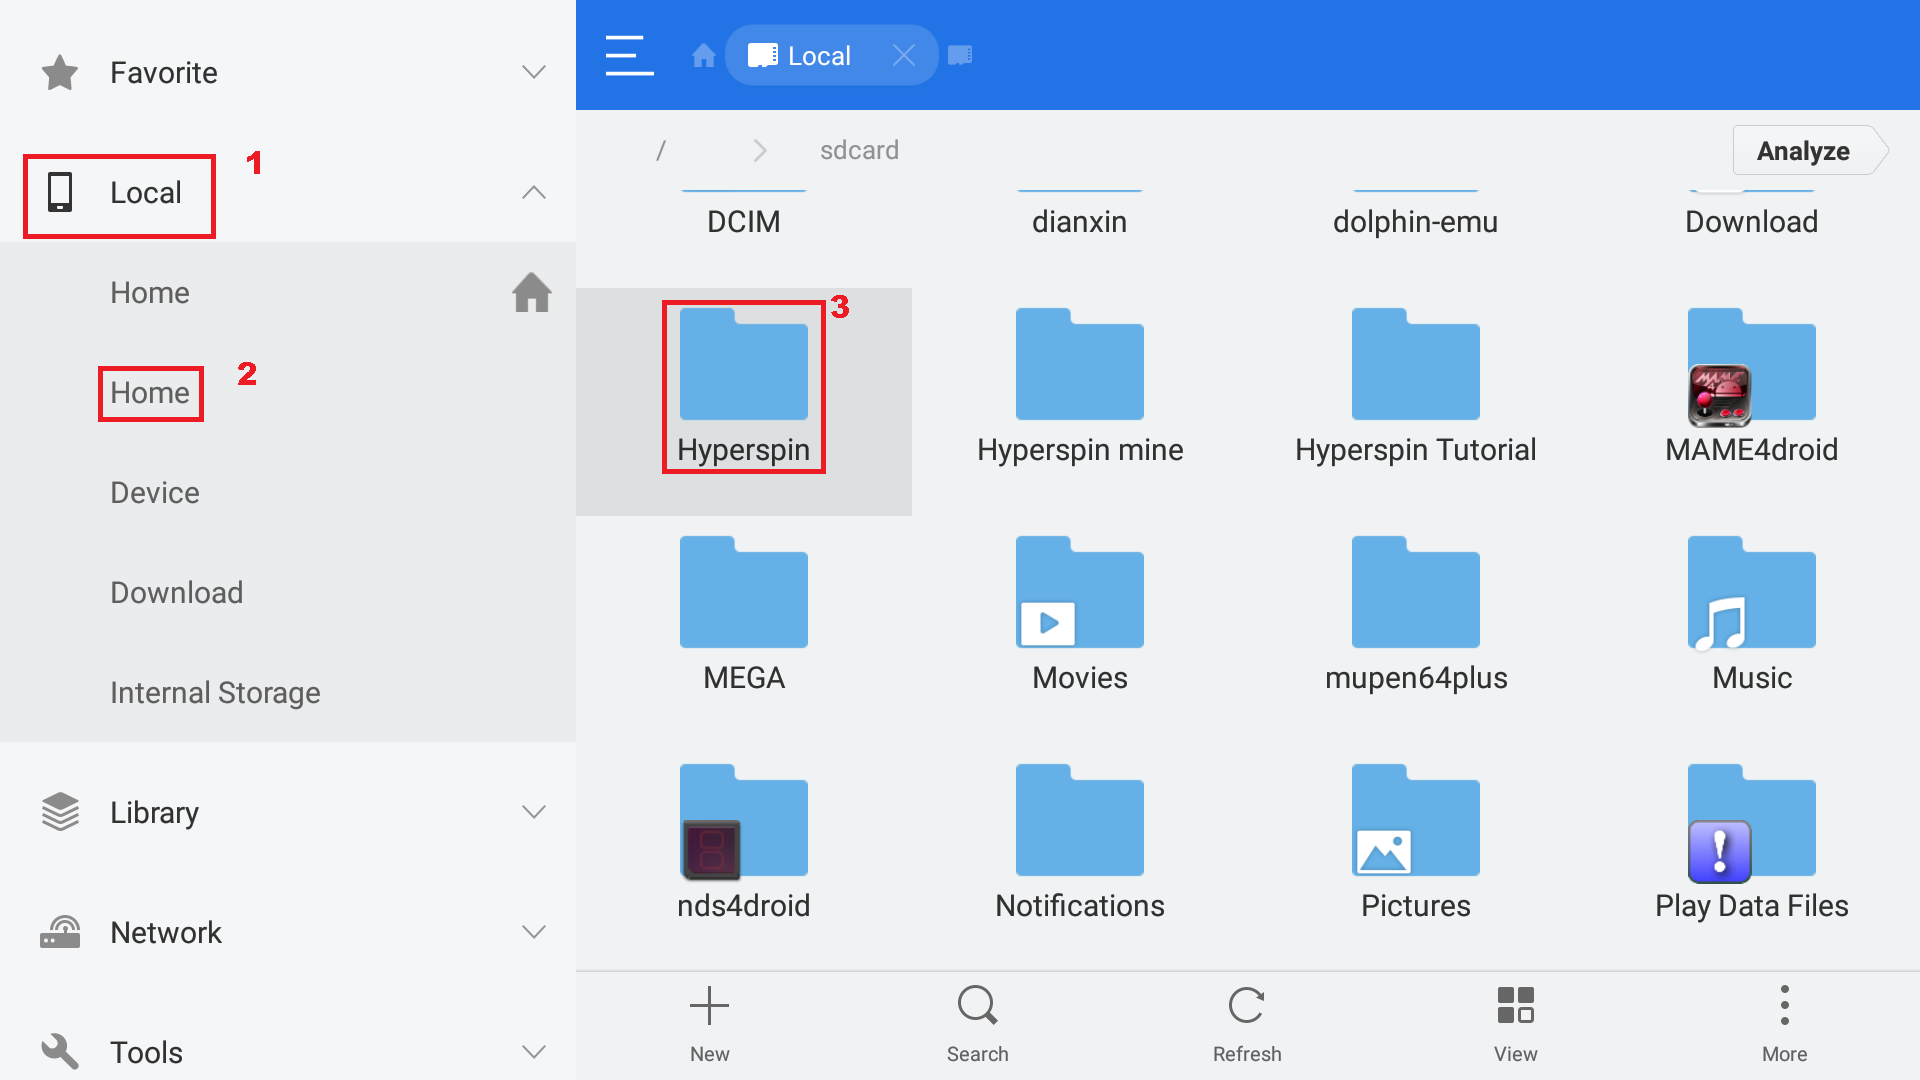
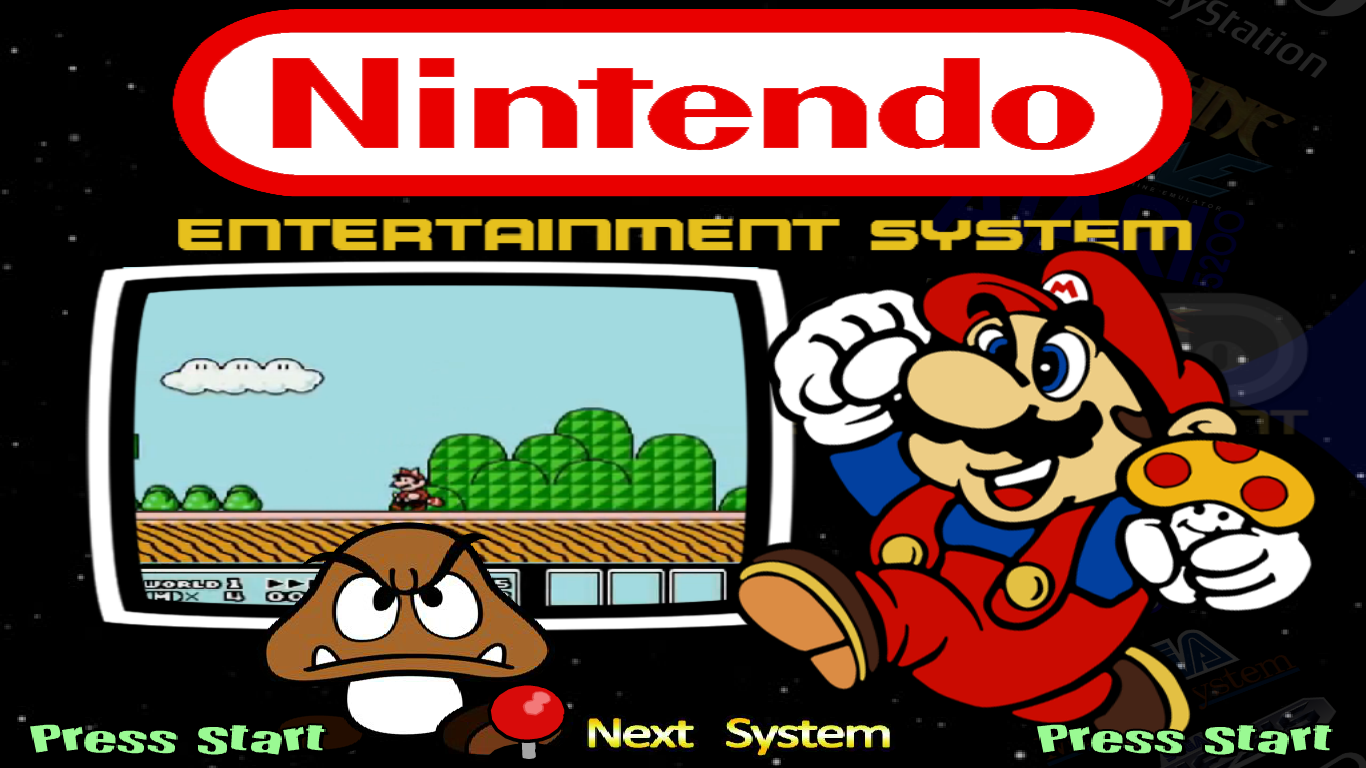
Hyperspin Android Overview & Installation Credits BBB Reznate Thatman84 Lilcza And anyone I have forgotten helped me learn this My guides are only an extension of Reznnate's sticky posts PLEASE READ the OTHER sticky posts What is it? An Android version of Hyperspin that works with existing themes and data directly from the Hyperspin community. It launches both Android games and Android emulators. Why? Several reasons... Android hardware is getting faster and faster. Emulators for Android are getting better and better. We wanted to play with our Hyperspin setups outside the house. I wanted to replace the old PC in my MAME cabinet with a mobile device so I could justify leaving it on all the time. It needed the ultimate launcher!!! How? Since the Windows version of Hyperspin is dependent on Adobe Flash, it was necessary to build the app from scratch. With performance in mind, the Android version is highly-threaded and renders with the GPU using OpenGL. Compatibility Android 4.4+ NVIDIA OpenGL drivers ONLY Tegra4, Tegra K1, Tegra X1 Drivers (Tegra Mobile Device List) Confirmed working device, but not limited to, Shield Portable, Tablet and TV, Google Nexus 9, MiiPad, ADT-1 Tested Emulators Release statements Hyperspin/Android Limitations RocketLauncher is not available for use on Android but the settings files it uses within a PC setup are compatible. Vertical Systems/Wheel list only No Touch Screen Input (Controller required) Favourites list feature not supported Genre feature not supported Searching subfolders for ROM’s not supported Games list only supports launching of one emulator (multiple emulators can exist in settings line and the 1st one installed will be launched) PC based animations and themes not fully functional. See this detailed post HERE Never used Hyperspin before? As Hyperspin Android was originally designed to allow PC users to have another way to experience their setup you will need to first decide how you would like to proceed with your Hyperspin Android setup **Skip to Installation section if NOT using a PC** The easiest way is to install the PC version for testing and building your Android setup (Follow Avar’s official tutorial videos HERE or follow step by step guides HERE Alternatively build your Hyperspin Android setup from iOS computer or directly from your Android device. Already using Hyperspin on a PC? You can co-exist your PC and Android Hyperspin setups in one Hyperspin folder by making the following additions. Optional additional database file called "Main Menu_Android.xml". Located in your Hyperspin/Databases/Main Menu folder. This will allow for a specifically tailored Main Menu for your Hyperspin Android setup Optional additional settings folder called /Settings_Android. Located in your Hyperspin directory and populated with your Android specific Main Menu.ini, Settings.ini and SYSTEMNAME.ini’s. This allows both Windows and Android launcher/rompaths to co-exist in separate .ini files within the same Hyperspin directory. **Note Some of your PC Themes and features may not be compatible with your Android setup so it may pay to build a specific Hyperspin folder for your Android setup. If you take this opportunity to trim unneeded files to save storage space it will likely mean some 3rd party tools (Don’s Filter list and Hypertools) may not function correctly. Also adjustments to your Android set of settings will need to be done manually with a text editor Installation What’s Needed: A file explorer installed on your Android device (ES File Explorer in this case) Optional: PC to make life easier Step 1 – App Installation Note: The device you are using and your chosen Hyperspin folder location (local, sdcard, external HDD or NAS) will directly affect your steps and settings file values All testing was done on my NVIDIA Shield TV Pro 3.2 Marshmallow 6.0, slight differences may be found on other devices On your device open Google Play Store and search for Hyperspin 2. Install as any other Play Store app, accepting all permissions when prompted You will now see the Hyperspin app in you devices menu Step 2 – Build your Hyperspin directories To function, Hyperspin pulls all data from an installation folder NOT included with the app installation. Without this directory you will see the below screen when trying to launch Hyperspin Note: New users without a Hyperspin directory and not installing a PC version of Hyperspin please download Hyperspin Android base pack (Adjusted from BBB's Hyperspin 1.3.3 file) Existing users please locate your PC Hyperspin directory and copy this to the root of your preferred storage device (USB, SD card, internal storage or NAS) see below details. But First... Decide on Storage Media & Location... I will now show you how to install Hyperspin onto the internal storage of your Android device. You are free to place your Hyperspin directory on a different storage device, including SD cards, USB storage and Network Attached Storage (NAS), but please be aware Hyperspin will seek and prioritize booting 1st from /usbdrive/Hyperspin then /sdcard1/Hyperspin then /sdcard/Hyperspin for your data. Also note that on the Shield TV Pro /storage/Emulated/0 & /storage/sdcard are in fact the same location If you will be using a NAS to store your Hyperspin directory, please be aware that there can only be one directory level between your devices /storage directory and your Hyperspin directory. For this to work, you will need to share your Hyperspin folder from your NAS device and the map that device to you Android device through its storage settings. It should then be seen in your devices /storage folder (I will cover this in detail in subsequent tutorials) Example of correct NAS Path:- /storage/MYNAS/Hyperspin Example of incorrect NAS Path:- /storage/MYNAS/SUBFOLDER/Hyperspin My TEST path screenshot Is my Local device directory /storage Is the name of my NAS Drive sdcard1 Next – Get a file explorer I Installed ES File Explorer (ESFE) by searching ES in your Play Store app and install as any other. A. Launch ESFE and navigate to the 1) Local then 2) Home - option. Place your Hyperspin folder here 3) Note: For a HSA to work the ONLY required files/folders for an Android installation are as follows /Hyperspin /Databases /Media /Settings /Emulators (optional ROM location structure for ease of setup) B. Please now exit to your home screen and launch the Hyperspin App, to test everything is correct. Depending on your correct choice of Hyperspin directory you should now be greeted with the Hyperspin intro video and your Main Menu wheel of systems. The base pack download will look similar to this example. This is what you get with the default Hyperspin 1.3.3 version I have adjusted Now you have completed the basic installation there are some settings that require adjusting and reviewing to enable games to be launched. Also the per system/wheel settings are covered here

- 80 replies
-
- 6
-
-
- android
- hyperspin android
- (and 1 more)
-
Version 1.1
4,706 downloads
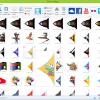
All Pointers I could find 555 Total 211 Official Systems 12 Custom Systems 173 Random/Universal Pointers Thread http://www.hyperspin-fe.com/topic/27773-cu-wip-full-pointers-set/page-1 Pointers collected mainly from files found in the old site downloads section, new upload here section and CU-WIP Thread. All un-credited Pointers are from the official download section. Naming 1. Named with credit where I could Seems like alot of the originate from the THk Blondin set found in the Old Site Downloads section, also thank nija2bceen as he has released many many pointers also. Big thanks the adamg for sepping in to help finish this set!! 2. Combined all THK-Blondin pointer set's and credited where multiple pointers are included 3. Where there are many versions of a pointer I have labeled differently To use the full set pointers:- Rename the pointer of your choice to "Pointer.png" (if not already) and place this in the Systems correct folder e.g Sega Genesis would be Hyperspin\Media\Sega Genesis\Images\Other\Pointer.png To use the drag and drop set Drag the SYSTEMNAME folder into you Hyperspin\Media folder RENAME your current Pointer.png to avoid overwriting it with the one is this set Thatman84 HyperSpin Community United Project -
This looks right but can't confirm at moment, away from my setup. Try looking in the beginners guide thread. A few pages back badhemi upload his settings. I think they are in the Upload here section of the downloads. What is your actual problem? Does retroarch launch the game ok? I think miles core is broken and only displaying a black screen. I have an older version so I'm ok.
-
Hi I don't use an external drive so not sure Make sure your roms are .nes for may not .zip or .7z or anything else. Also have a search for mounting drives. I believe The user sting has put a lot of tips/guides for external drives on the forum